Work Centre
This section allows users to configure Work Centres as either Machines or Workbenches (Work Area that allows multiple operators to work at once)
- Navigate to Configuration → Work Centre.
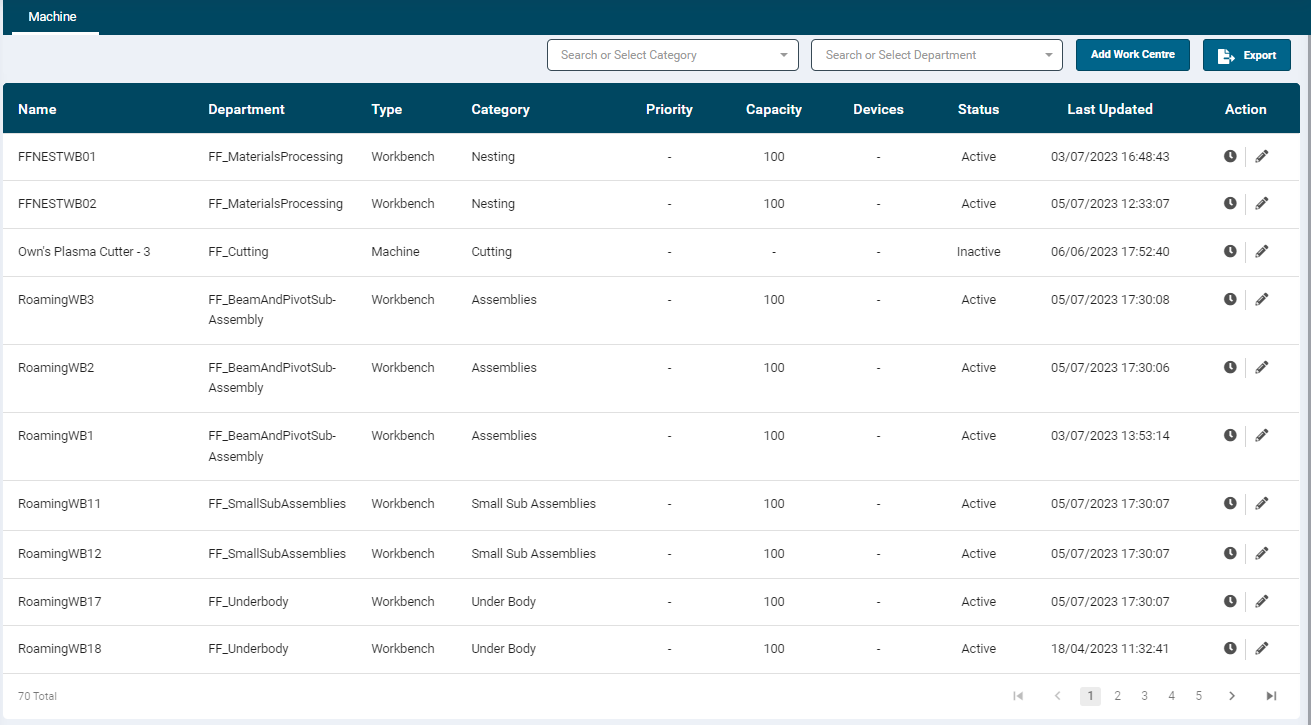
- This page displays all the configured Work Centres with the basic information such as Name, Department, Type, Category, Device, Status (Active/Inactive), Last Updated (timestamp of the last status update).
- The Action column allows the user to view submitted Forms, Edit or Delete a Work Centre and add Work Centre hours.
- This list can be sorted in ascending or descending order by clicking on the column header texts.
- The use can further filter the data by selecting a required Category and Department.
- The data can be exported in Excel, JSON and CSV formats by clicking on the Export button.
Viewing Submitted Forms
- Clicking the very left action button (Calendar icon) will allow you to see the submitted maintenance forms against that Machine or Work Centre.
- The form can be viewed via the print icon and will show the submitted date as well as the form name and Form Type if applicable. You can also delete the form if it was mistakenly submitted.

Add a Work Centre
- Before adding a Work Centre, ensure that the Categories and Departments have both been created as these are mandatory fields.
- Click on the ‘Add Work Centre’ button on the top right-hand side to access the configuration screen.
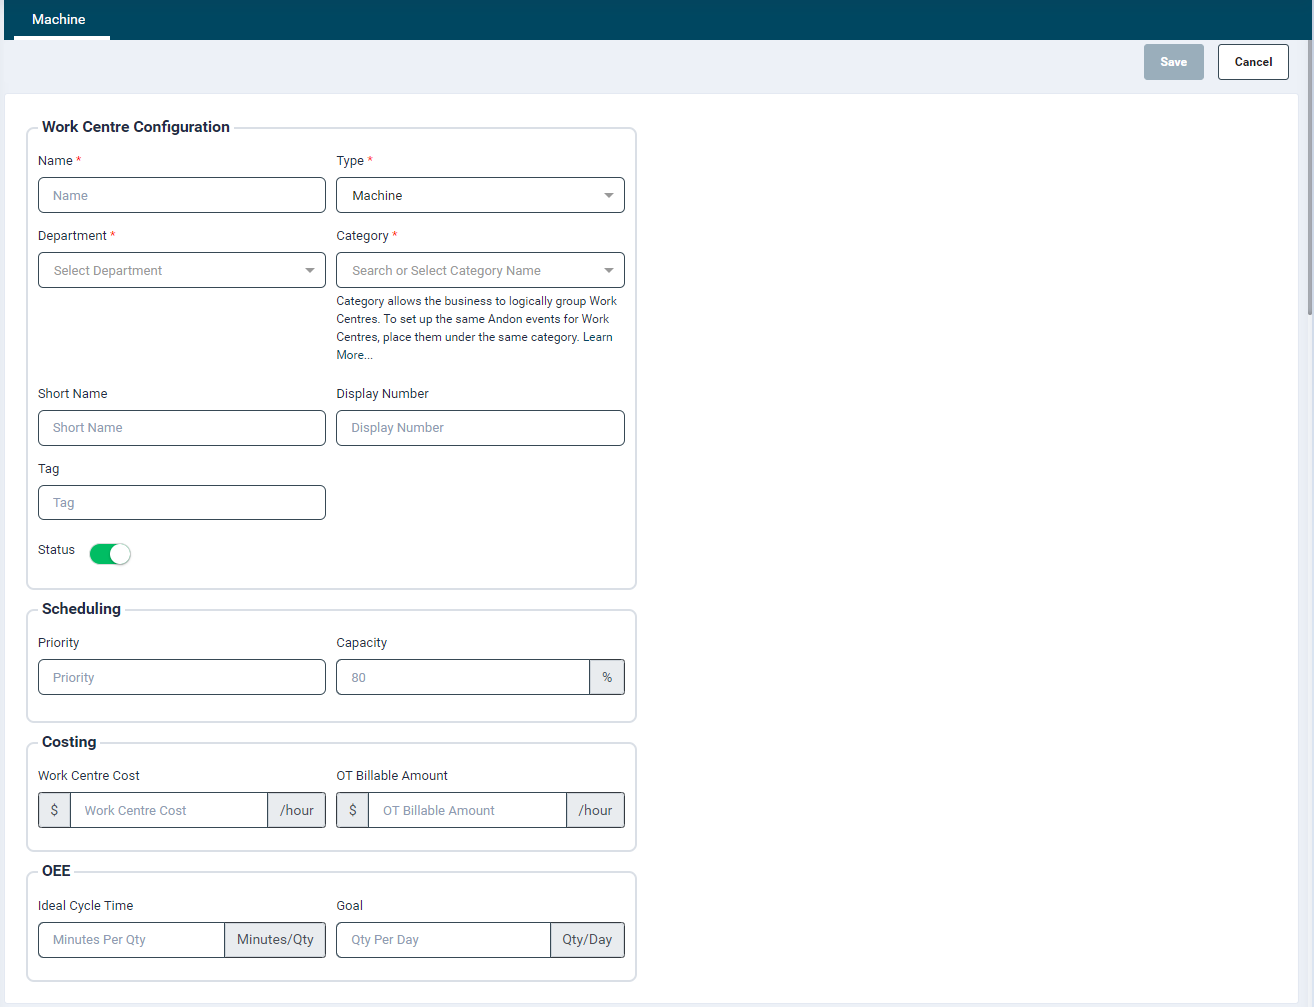
- In the Work Centre Details screen, provide input in the following fields:
-
Work Centre Configuration
- Name: Enter a Work Centre name in the Name input field
- Type: Select one option as per requirement: Machine, Workbench or Condition Monitoring
- A machine will restrict only one operator from working on it at a time. Scheduling will also consider a machine available if both the machine and operator capacity is available
- A Workbench is a work area where multiple operators can work at the same time. This will allow multiple operations to get scheduled at the same time to different operators and its capacity is calculated by the operator’s availability and roster.
- Condition Monitoring will make the WorkCentre ineligible for scheduling as it will just be a WorkCentre used with a sensor for utilization analysis.
- Department: Assign a Department to the Work Centre by selecting a value from the Department field.
- Category: Select a value from the Category field. A default Category is be available to facilitate Work Centre configuration. Once multiple categories are configured, the user can select the required value from the dropdown list. As per the selected Category, its status will associated with the Work Centre. For more information, please refer our Category training guide.
- A category and department allocation will make this Work Centre eligible to have operations scheduled with the same category and department allocation.
- Operations with the same department but a different category will not be able to schedule on this Work Centre
- Short Name: Specify a short name if required
- This short name will be used in displays such as Daily work and Scheduled work screens.
- Display Number: Enter a display number to sort/list the Work Centre in ascending order as per input provided in this field.
- Tag: This is an older feature which doesn’t need to be used. It can be used as an identifier in integration. Talk to Smart Shop Floor team for more details if required.
- Status: By default, the status is set to Active. Use the toggle button to change it too Inactive.
- Inactive Work Centres will not be considered for scheduling
-
Scheduling
- Priority: Define the priority in which the scheduling will try to find a slot on the work centre.
- If the priority is kept same for two or more work centre it would pick the work centre on a First Slot Available basis.
- This is a numeric field with priority set to any integer number between 1 to 999999.
- Default its value to 9999. Priority 1 being given higher priority, priority 9999 being lowest priority.
- Capacity: This will allow user to define the scheduling capacity for the work centre, to which extent the work centre to be scheduled by automatic scheduling. This field shows a default placeholder text, with the value as configured on the Adaptive Scheduling rarr; Configuration.
- By default the capacity will be blank (100%). If the scheduling capacity is set to 80% then scheduling will only allocate 80% of the shift time to that WorkCentre. E.g., anyone working in that WorkCentre will have 80% E.g., 8 hours out of 10-hour shift time allocated as work. This will leave a spare 20% of capacity for daily firefighting and buffers.
- Priority: Define the priority in which the scheduling will try to find a slot on the work centre.
- Costing
- Work Centre Cost: Enter the hourly cost of running the work centre (optional)
- This will calculate a job cost based on the duration operators are working on the WorkCentre and the cost allocated.
- OT Billable Amount: Enter the over time hourly cost of running the work centre (optional).
- Overtime is anything outside of the rostered shift time
- Work Centre Cost: Enter the hourly cost of running the work centre (optional)
-
Goal
- This will allow users to set goals in either Duration (hours) or components completed for the Work Centre
- Users can select Daily, Weekly or Monthly goals for both Duration and Components. This will act as the goals shown in the KPI board and reports
-
Device
- To link a sensor with the work centre, click the Link Device icon


- To link a sensor with the work centre, click the Link Device icon
- From the window that opens, search or select a sensor from the dropdown list and click Save.
- This is only required if Smart Shop Floor sensors are being used in the factory.
If there are no sensors on the portal, then the Devices section will not be displayed.
Disabling a Work Centre
- If a Work Centre status is set as inactive, then they will not be displayed in the following setions from the date they are disabled. However, the old data would remain as it is.
- Analytics
- Daily Work
- Scheduled Work: The disabled work centre and its schedules will be removed.
- Master Schedule
- Utilisation Monitoring
- OEE
- Machine Monitoring (available for Machine work centre type)
- Operator Roster: All future rosters on that work centre would be removed. If someone is already running it, than it will be split.
- SFC App: User will not be able to login to a disabled work centre.
- Production Jobs: The disabled work centre would be removed from all active operations.
- All the future scheduled downtimes would be removed.
- The configured work centre hours would be removed. For intermediate / no slot, it would be reduced to today as already running. Users will not be able to disable a Work Centre if a job is running on it. Paused components on the disabled Work Centre currently are not handled. Later on it will be taken care of.Also, the work centre would be deleted from all active components if set, but the category would remain the same.
Edit & Delete Work Centre
- Clicking on the edit icon
 will allow user to edit the work centre details.
 - Users can click on the trash can icon to delete the Work Centre.