Shop Floor Control App
Installation
- The Shop Floor Control app will be pre- installed in your tablet device.
- For new tablet devices, install the Shop Floor Control App from the App Store.
- Once installed, tap on the Shop Floor Control App icon on the tablet screen.
![]()
- Allow the required permissions.
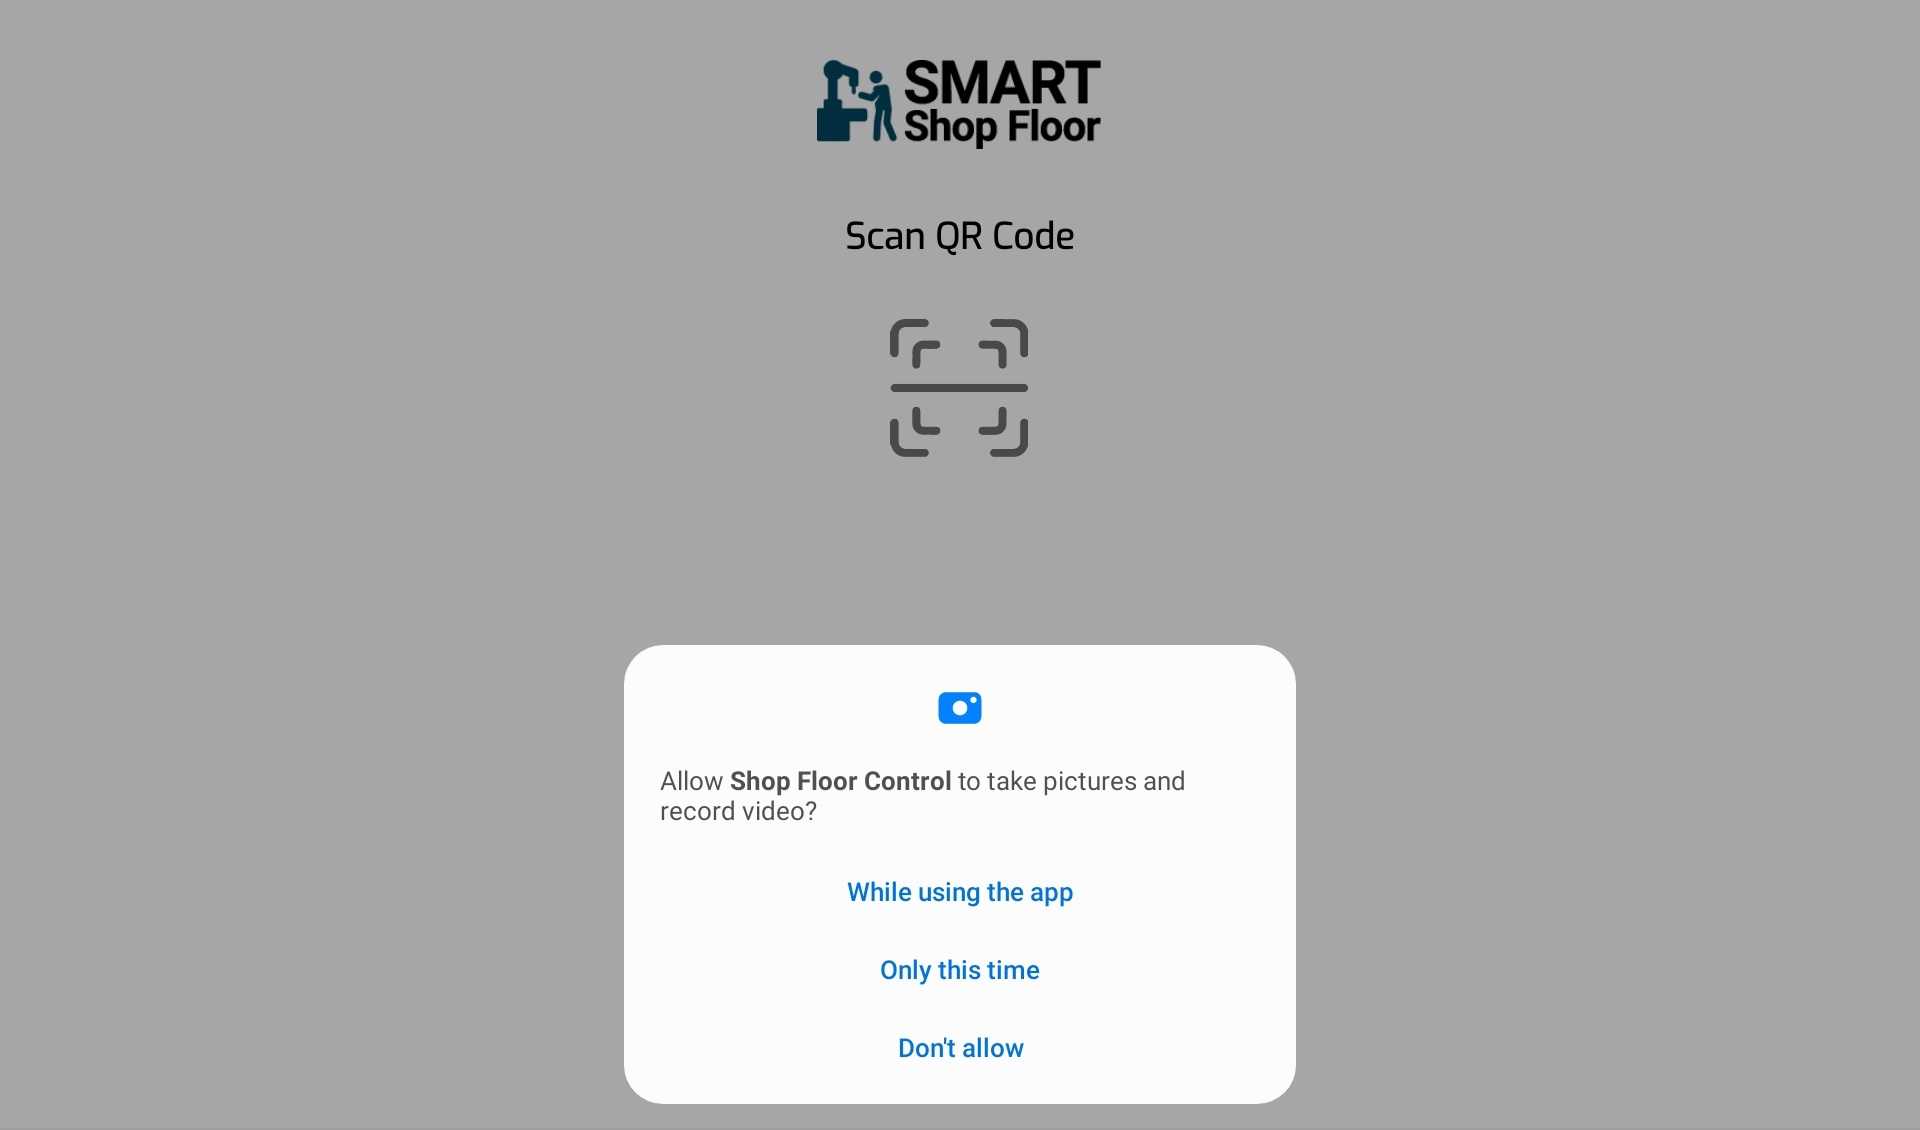
- Login to the SmartShopFloor Web Portal and navigate to the user profile by clicking the user name displayed at the top right-hand side.
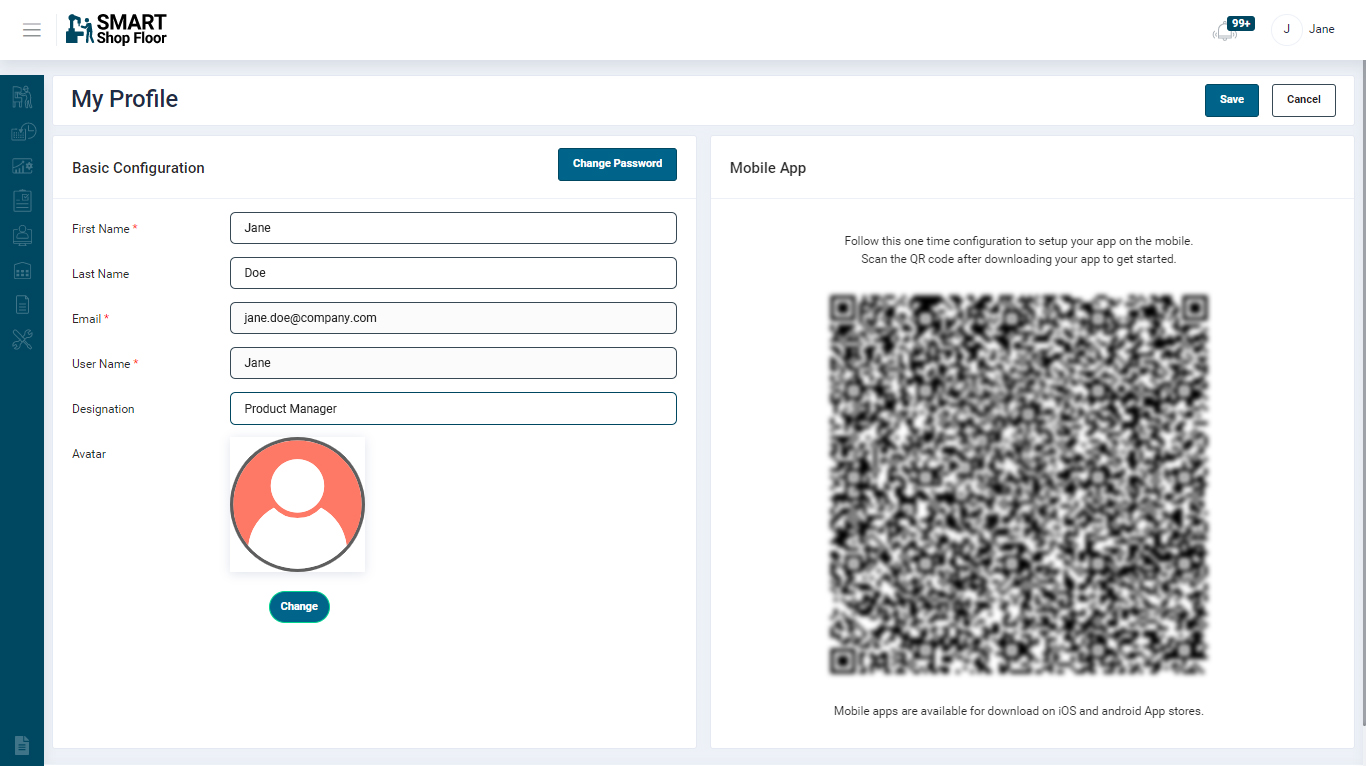
- Tap the SCAN button on the tablet app and scan the QR code displayed in the User Profile screen.
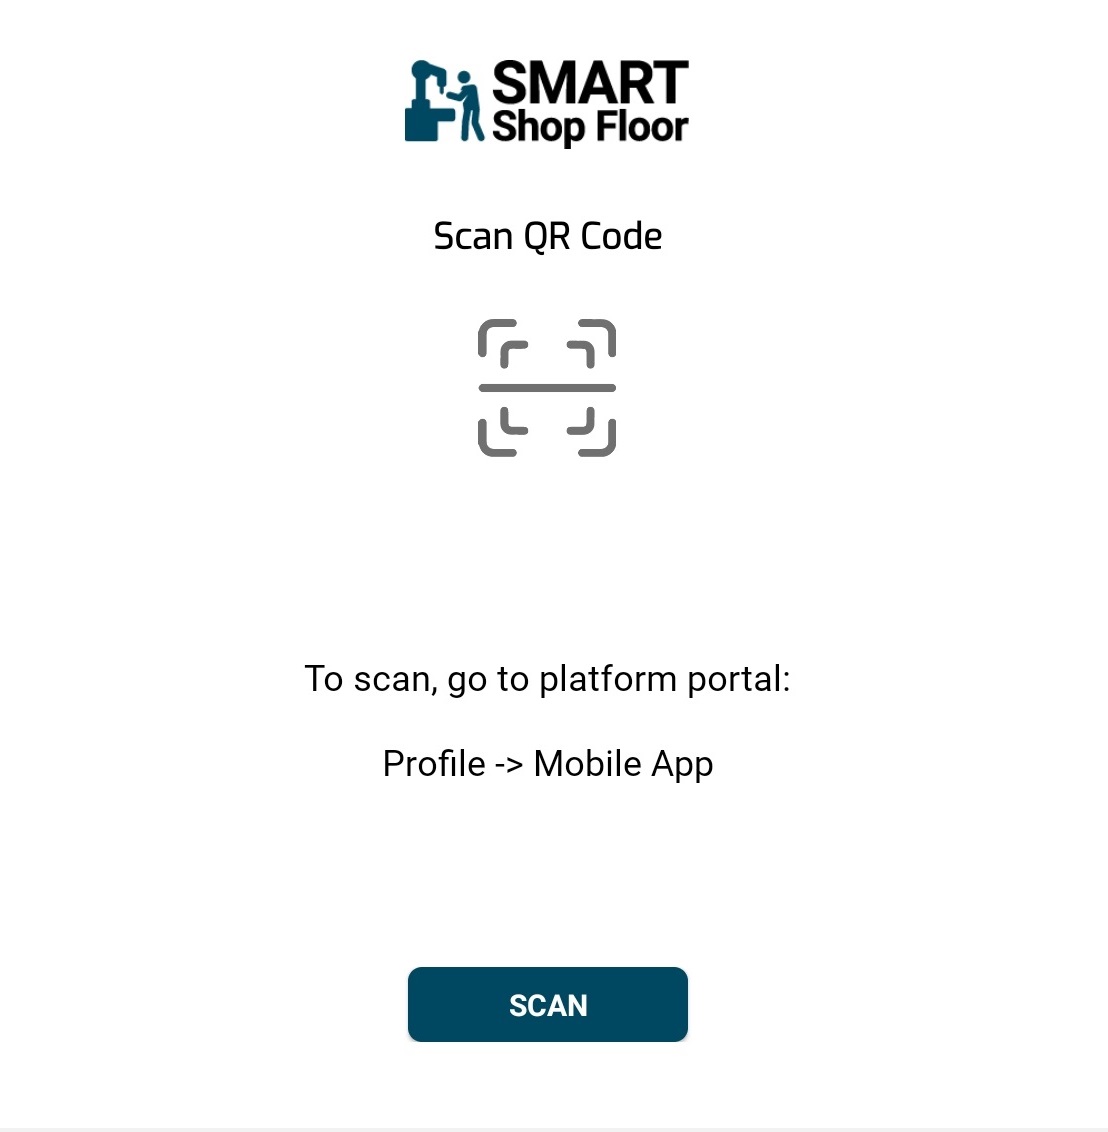
- This is a one time process to setup the app on your tablet/Mobile.
Installing the Tablet in Work Centre
- Mount the tablets into the stand and place the stand near the work centre (ensure that the surface is suitable for magnets).
- Once the tablet is installed, log in to the App by using your PIN.
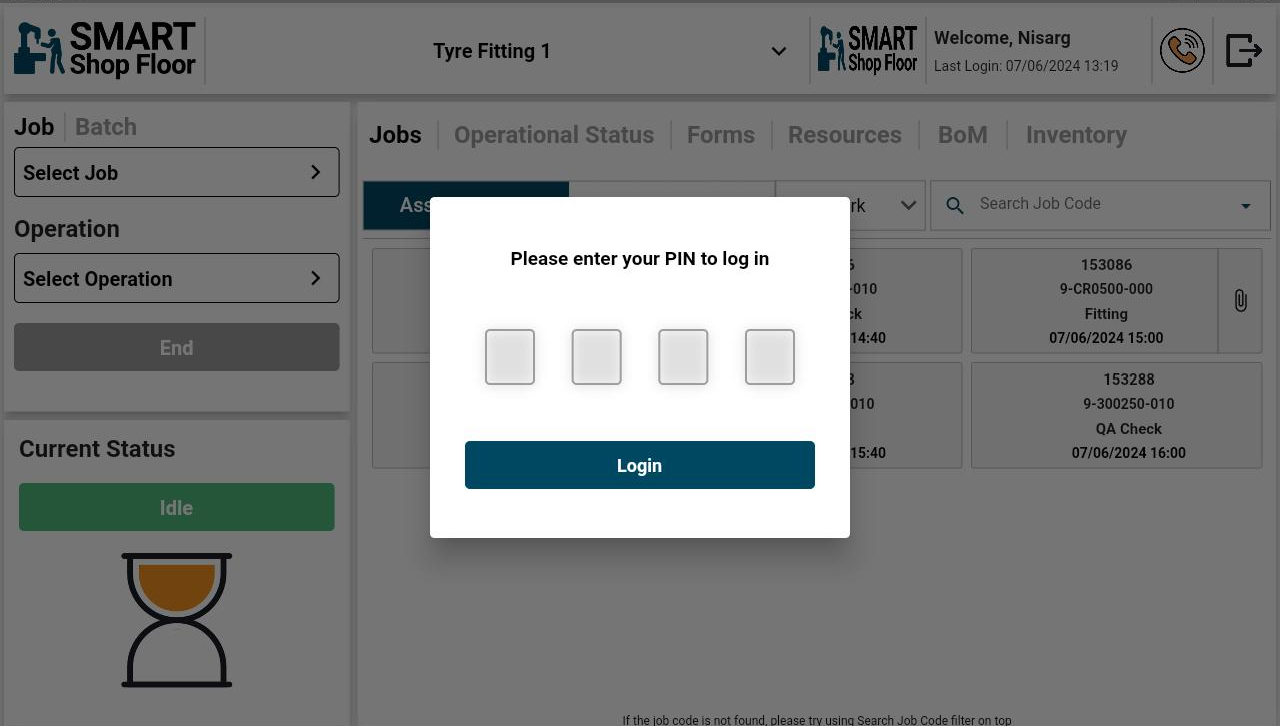
Login
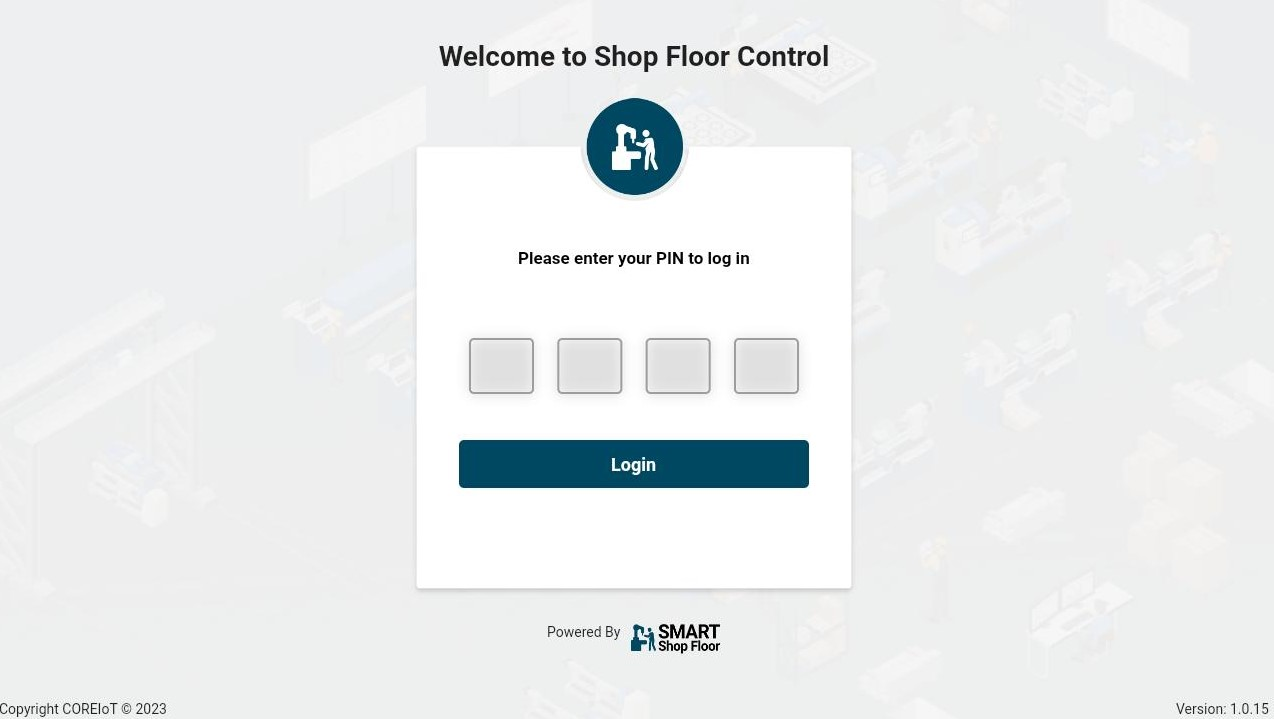
- Enter the 4-digit pin and tap the Login button.
- The work centre operators are required to login every day and log out at the end of the shift.
Link Department
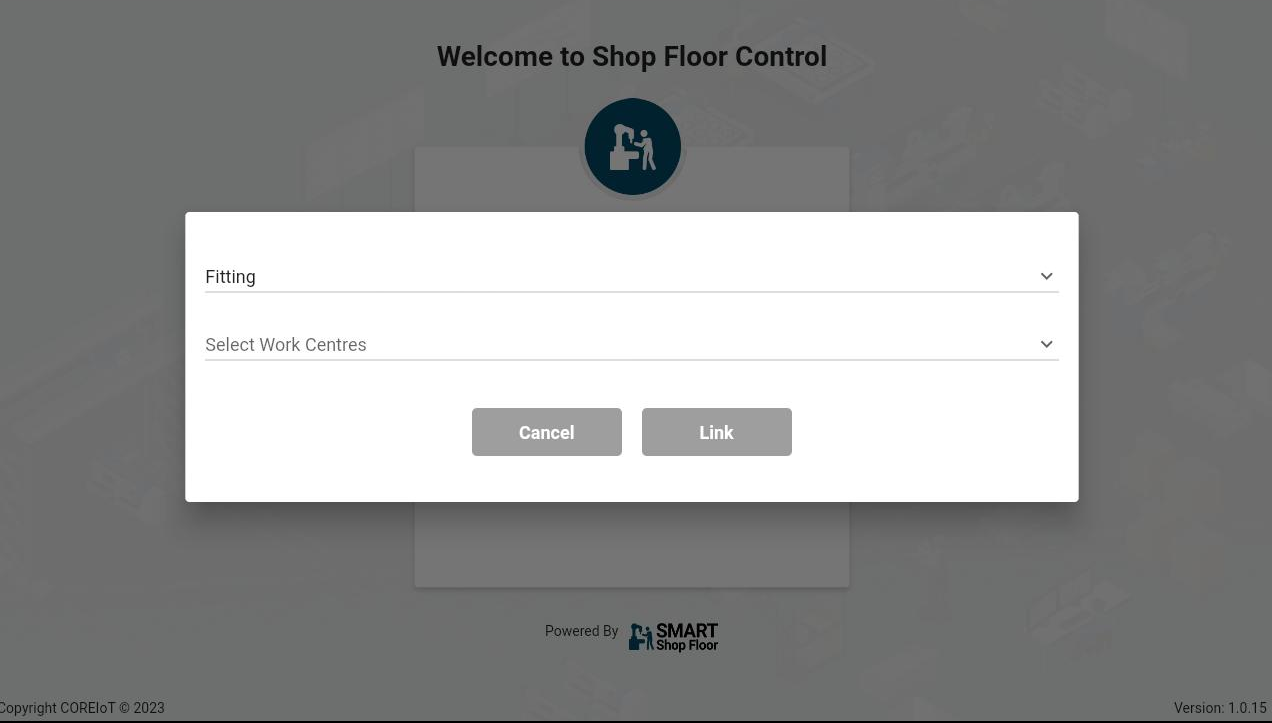
- Select a department
- Upon selection, multiple work centres will be listed.

- Select all the requied work centres and tap the Link button.
Select Default Work Centre & Login
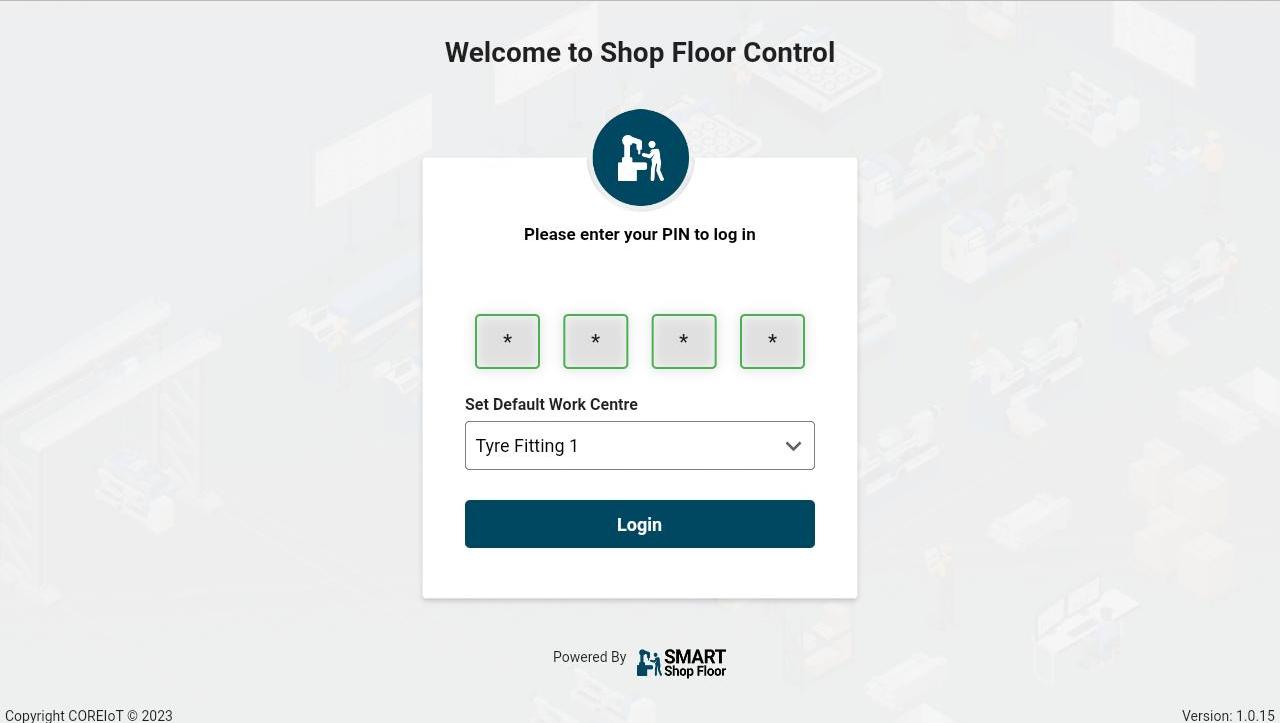
- Entre the 4-digit pin and select any one of the work centres to set it as a default.
- Tap the Login button.
At each login, the user will be able to view jobs associated with the default work centre.
Home Screen
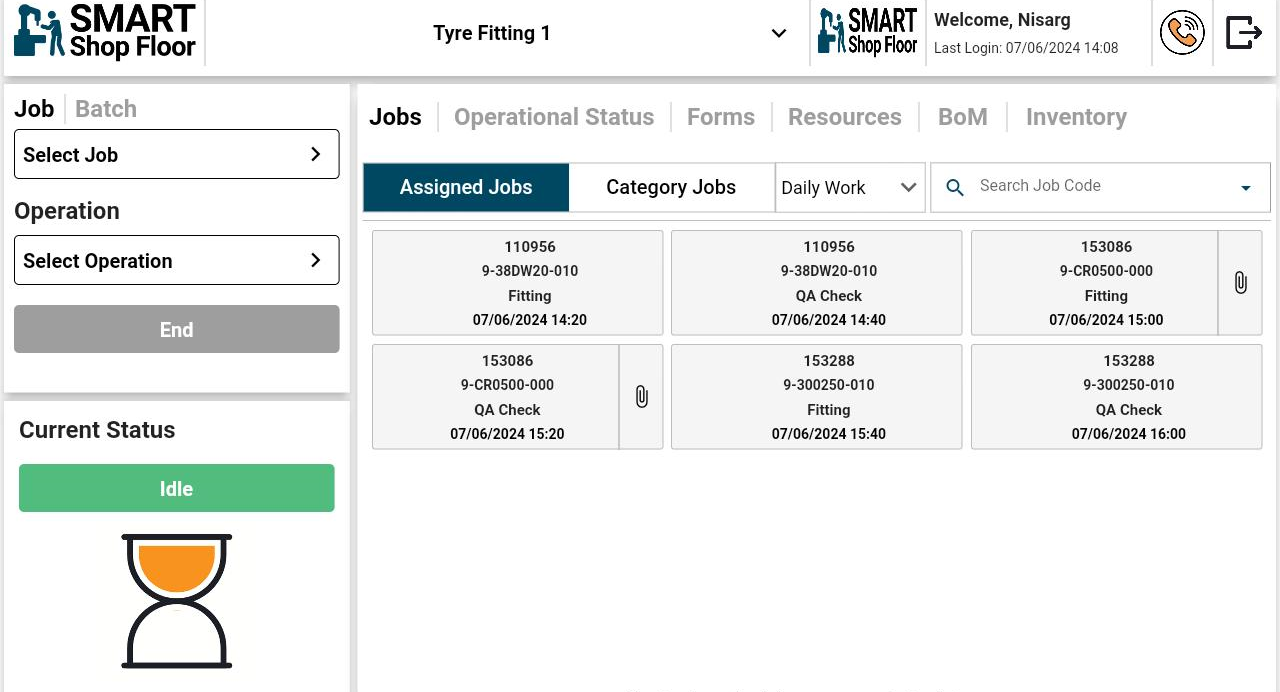
- The home screen displays the default work centre and the operator’s login details.
- It displays all the downtime and uptime statuses of the work centre.
- The current Status is displayed at the bottom left side of the screen.
- The left panel provides options to select Job and Batch work.
- Use the Logout Icon icon at the top right to log out of the app.
Switch the Work Centre
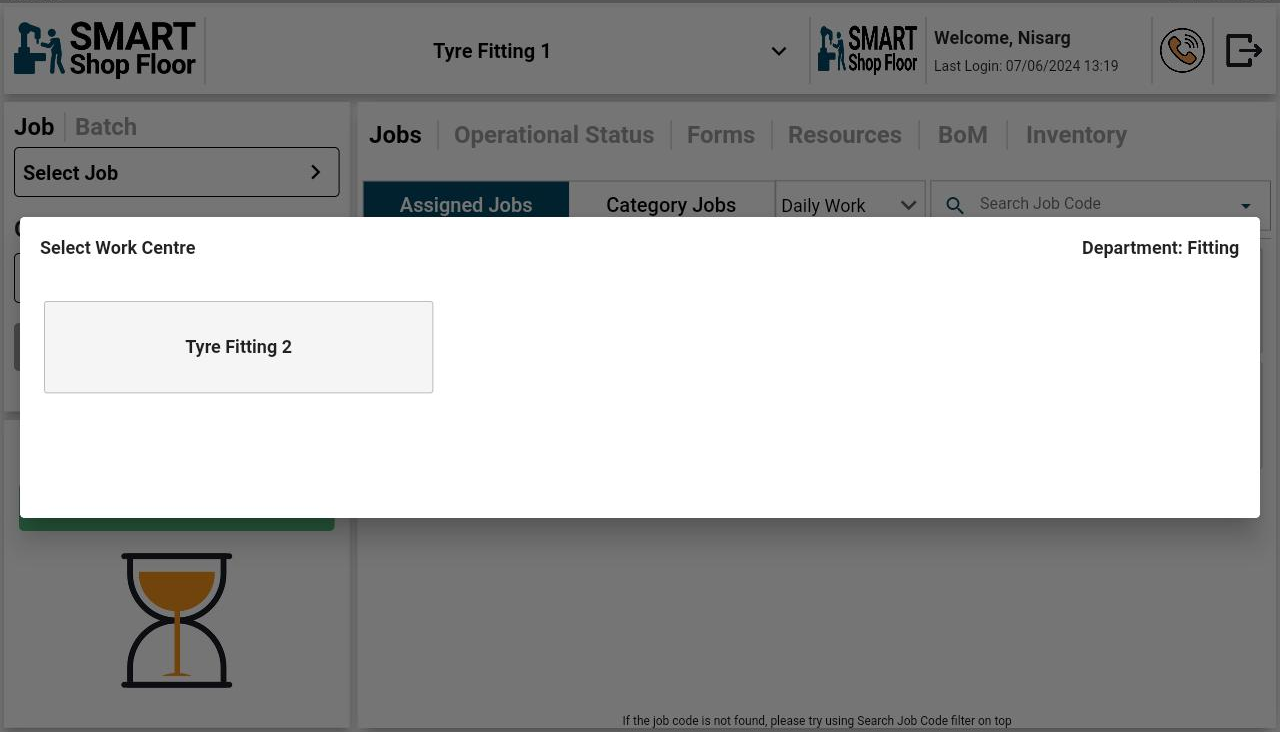
- To switch to another work centre, tap the current work centre name displayed at the top of the screen.
- All the work centres associated with the department will be displayed on the screen.
- Tap any one required work centre.
- Enter your PIN to login to the selected work centre.
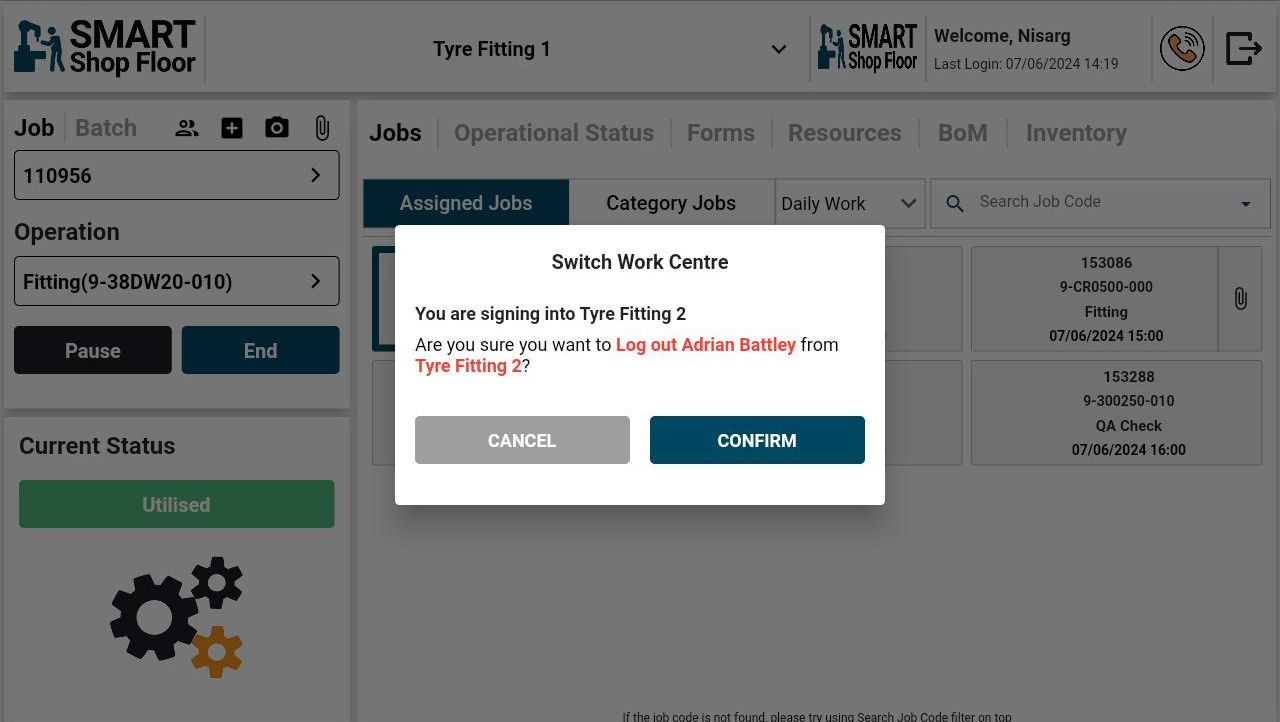
- Tap the Confirm button on the pop-up message displayed on the screen.
- Upon confirmation you will be signed into the selected work centre
NOTE Any operator who is logged in to the work centre you are trying to switch to will be logged out upon your confirmation.
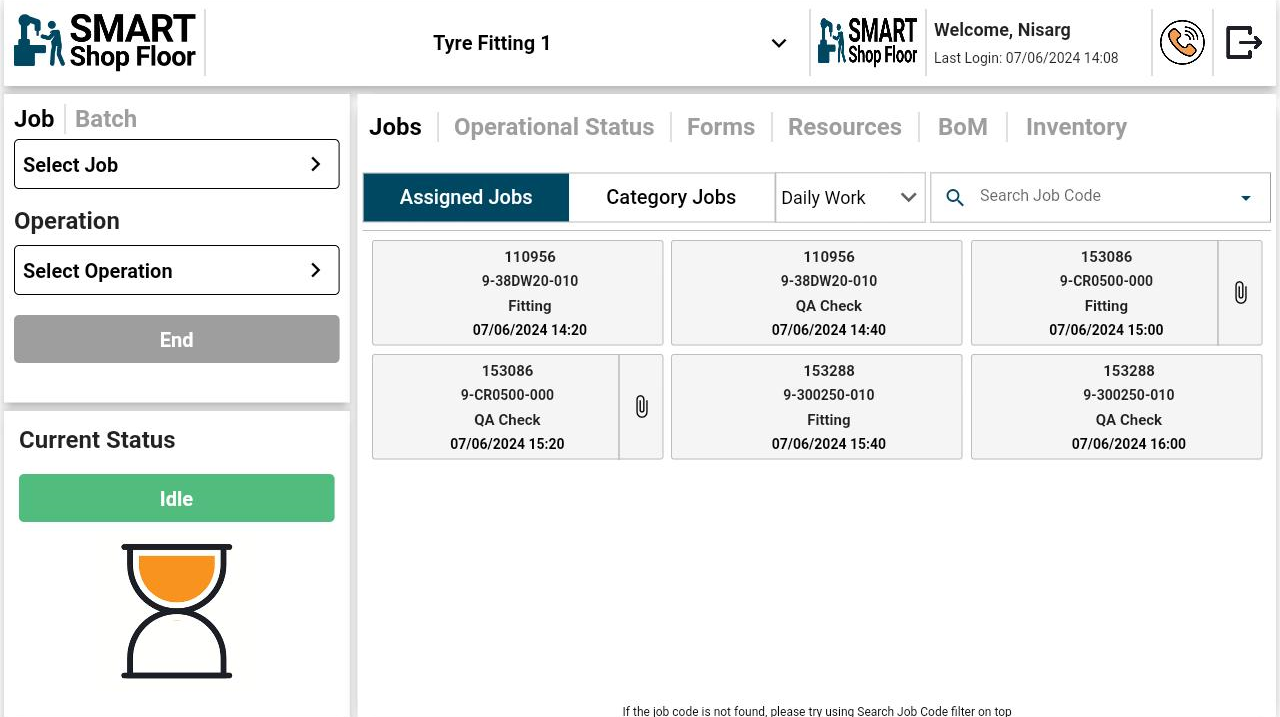
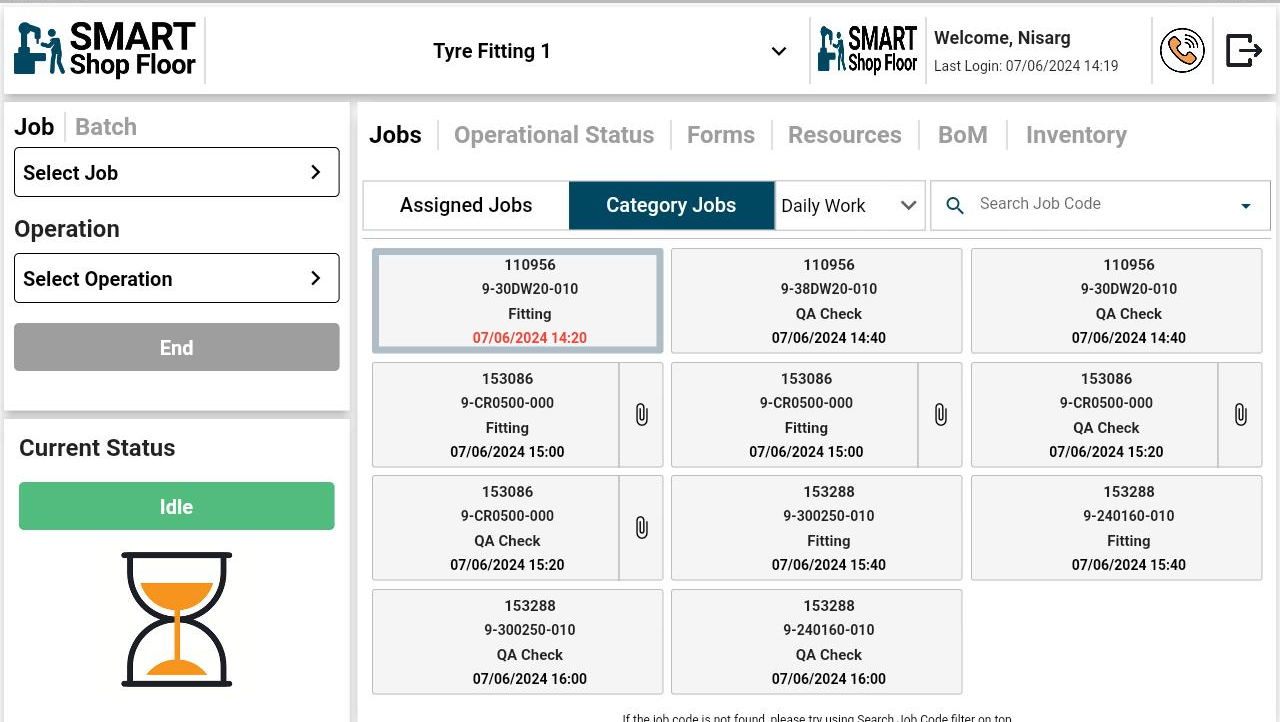
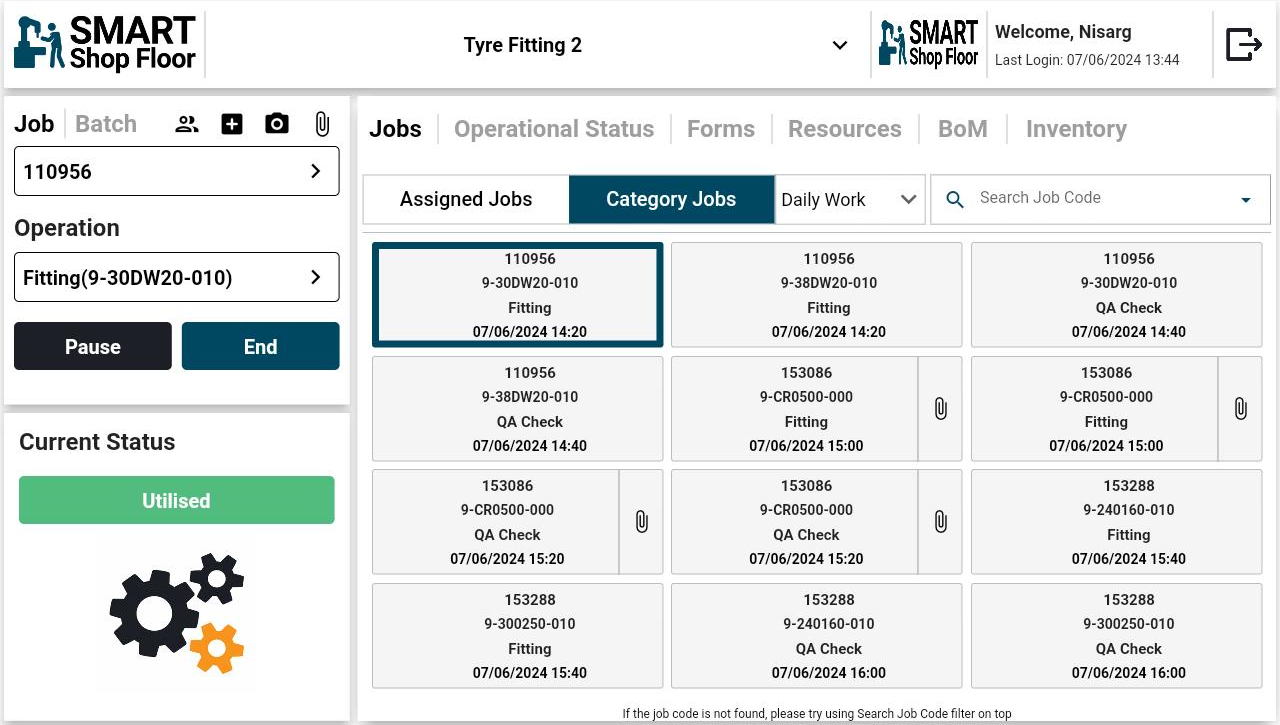
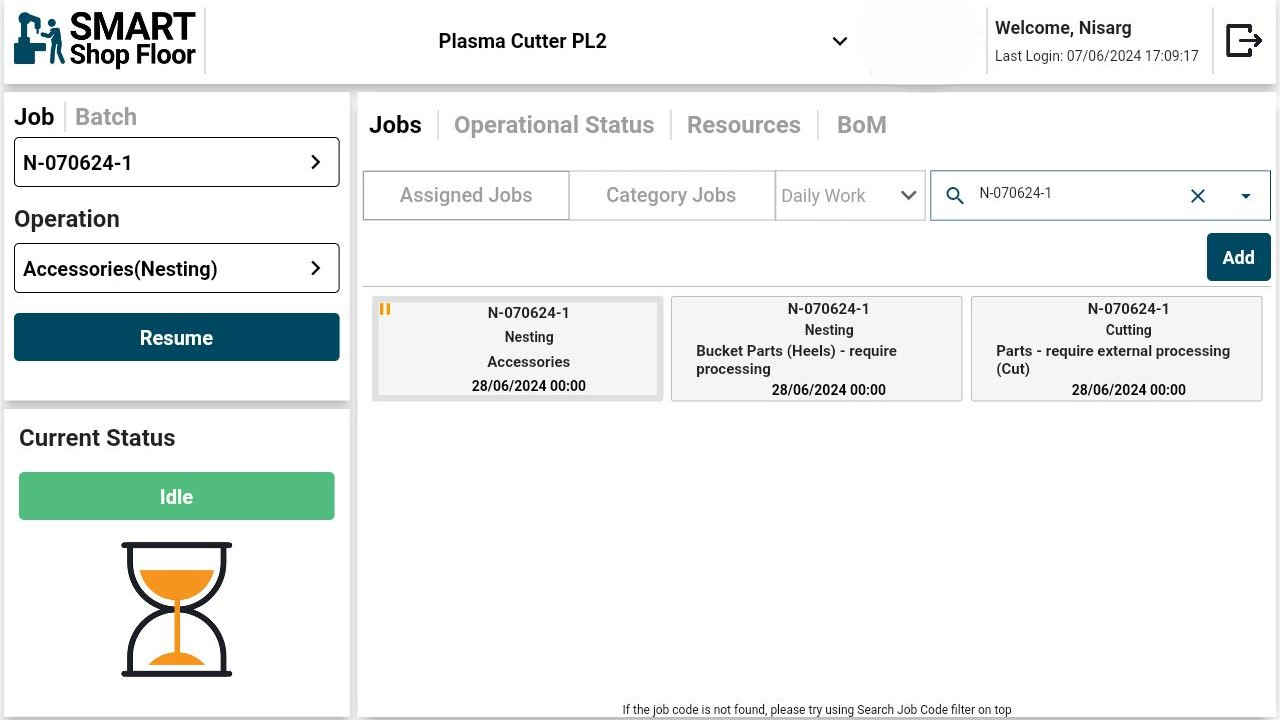
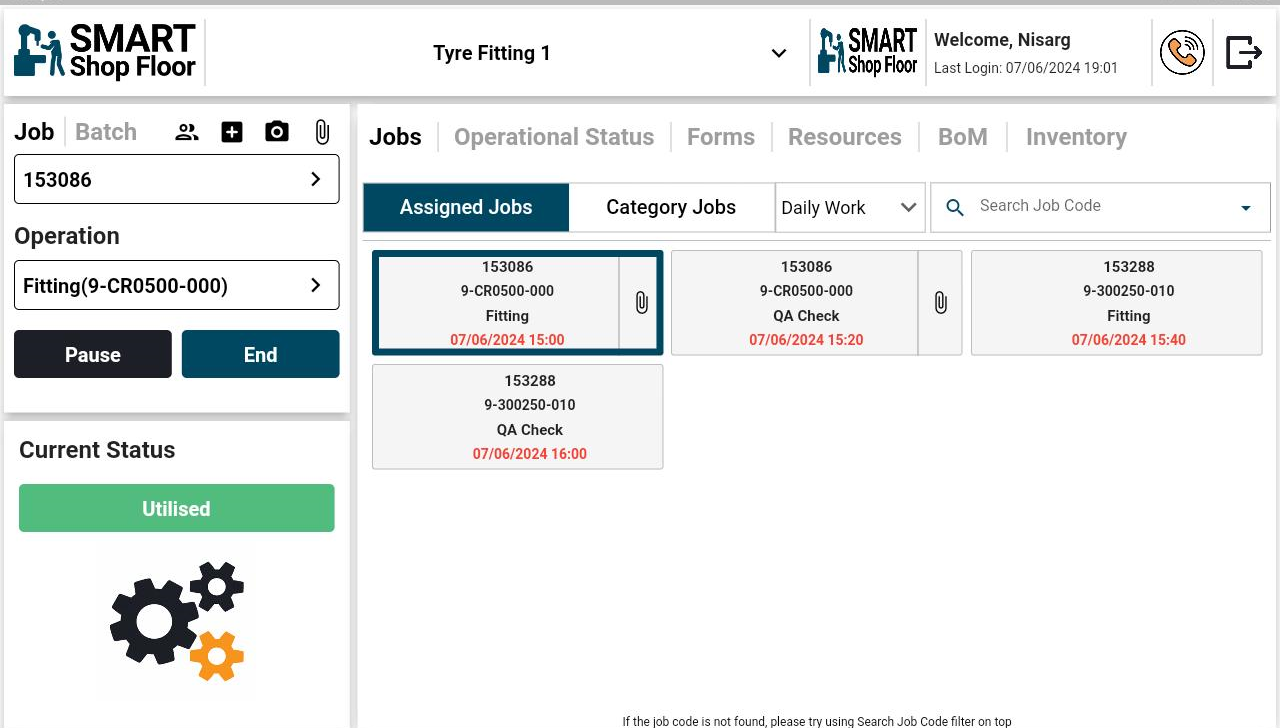
Select Assigned Jobs tab
- The home screen will display a list of jobs under the Assigned Jobs tab.
- It will show a list of Operation of the job which are assigned on current day for the same machine selected while configuring app.
- Tap the job code containing Component and Operation with due date to select it.
- It will show a attachment icon with the Operation of the jobs and clicking on it will show the Resources attached with that Operation from the portal.
Select Category Jobs tab
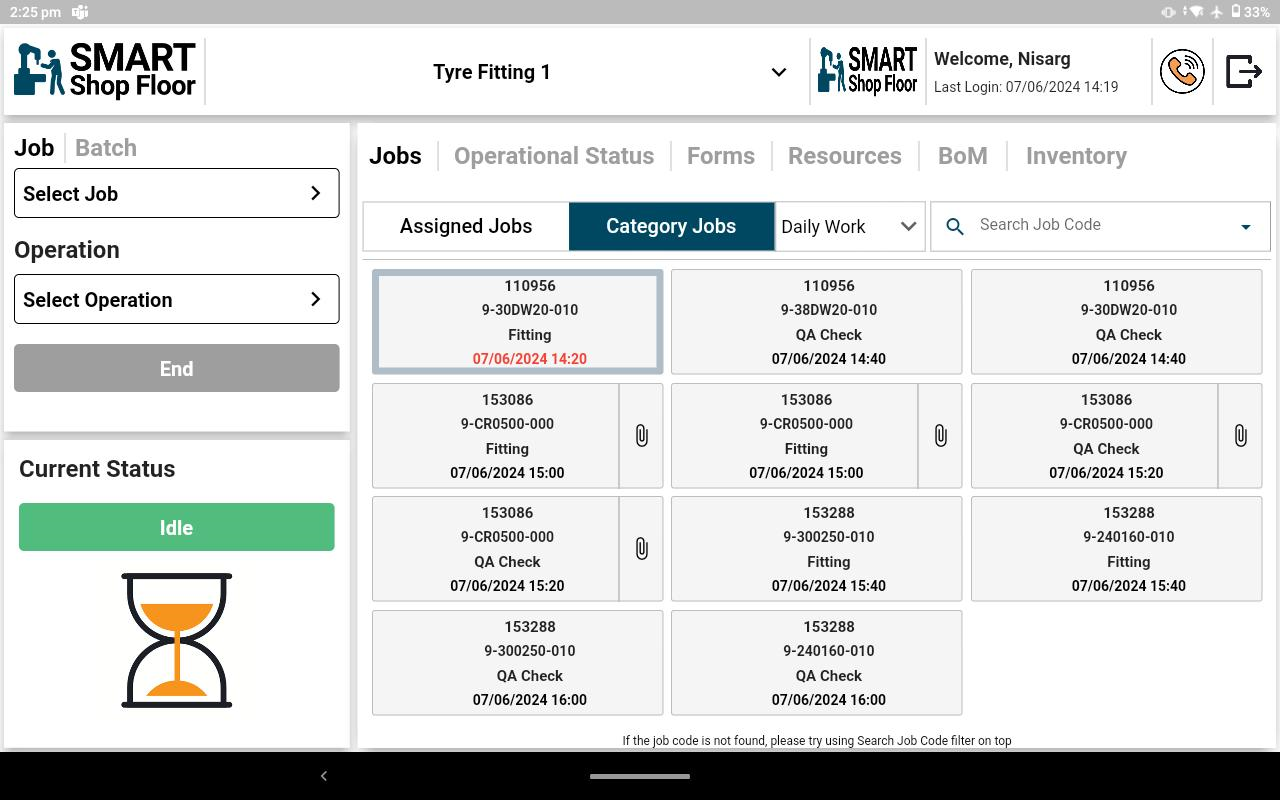
- Tap the Category Jobs tab next to the Assigned Jobs tab.
- Category jobs tab will show the list of Operation based on the same category binded to the machine selected.
- To search for a specific job, enter the job code in the Search Job Code field.
Select Operation
 Once a job is selected, its operations will be listed on the screen.
Tap on the operation to select it.
To assign more operations, tap the Add button at the top right-hand side of the screen.
Once a job is selected, its operations will be listed on the screen.
Tap on the operation to select it.
To assign more operations, tap the Add button at the top right-hand side of the screen.
Add Operation

- When the Add button is clicked, all the operations associated with the department will be displayed on the screen.
- Select a required operation.
- Upon selection, a pop-up will open.
Link Component to Operation
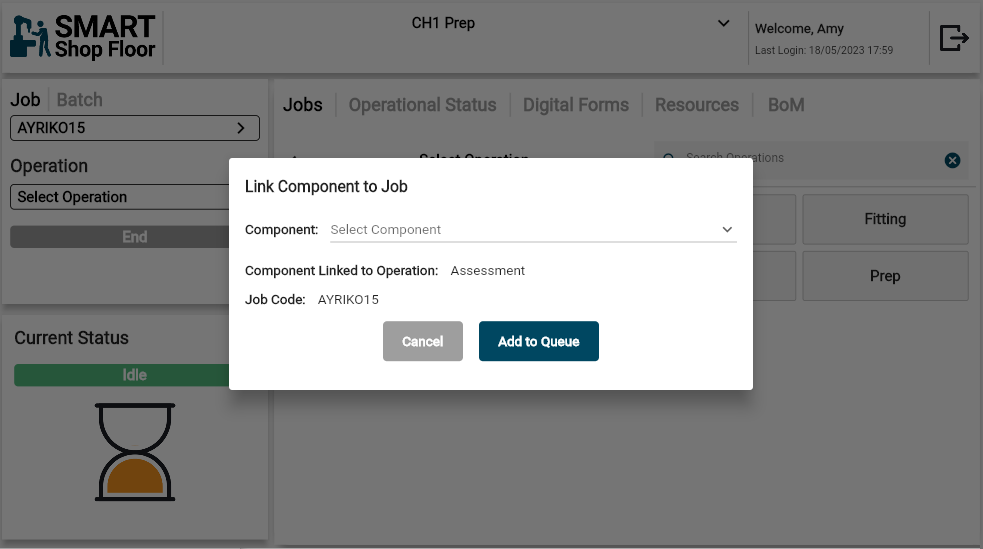
- From the Component dropdown list, select a component which should be linked with the new operation.
- Tap the Add to Queue button.
New Operation List
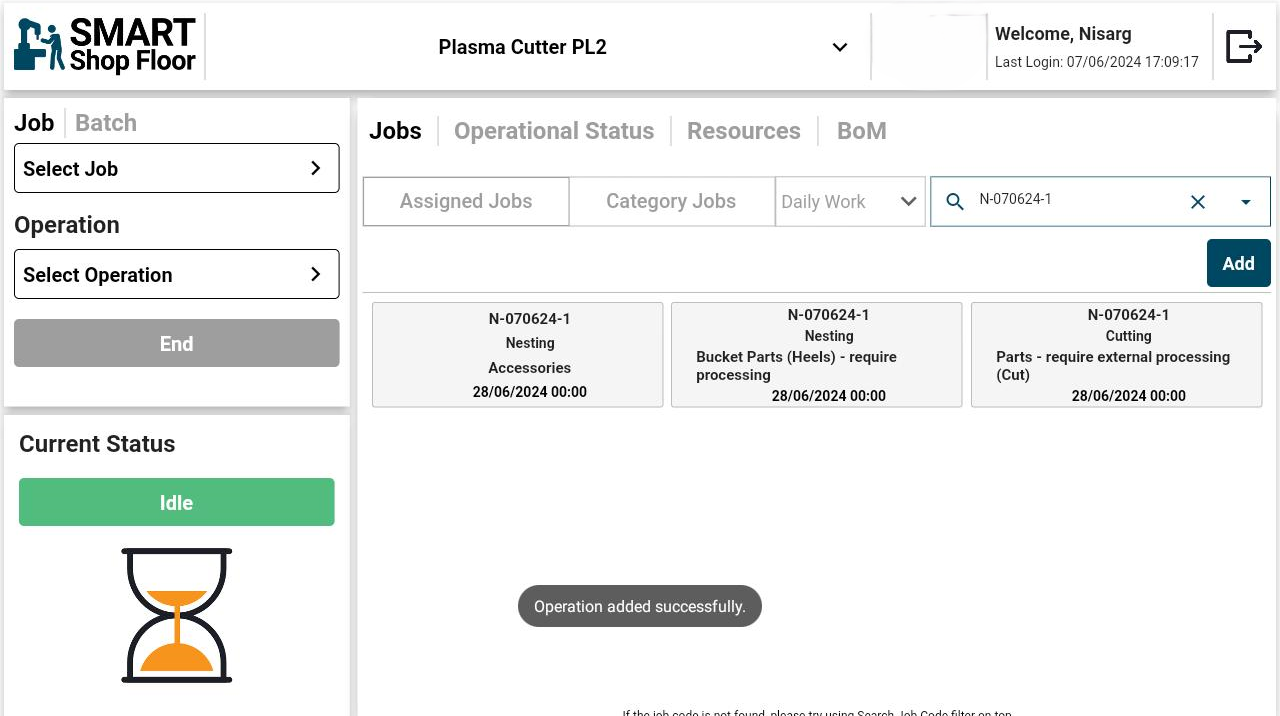
- The new operation will get displayed under the operations list.
- Select the required operation for the job
- The assigned operation will be displayed in the Operation field in the left panel.
Select Daily Work tab
- Selecting Daily work will list down following options:
- Daily work: It will display the Operations of the job's list which are scheduled on current day for the same machine.
- Next 3 days : It will display the Operation of the job's list which are scheduled within next 3 days for the machine selected.
- Next 7 Days: It will display the Operation of the job's list which are scheduled within next 7 days for the machine selected.
Select Operation
- Once you select a job from the list of Assigned, Category or Daily work tab the Operation will be autoselected in left panel.
Add Operation
- When the Add button is clicked, all the operations associated with the department will be displayed on the screen.
- Select a required operation.
- Upon selection, a pop-up will open.
Link Component to Operation
- From the Component dropdown list, select a component which should be linked with the new operation.
- Tap the Add to Queue button.
New Operation List
- The new operation will get displayed under the operations list.
- Select the required operation for the job
- The assigned operation will be displayed in the Operation field in the left panel.
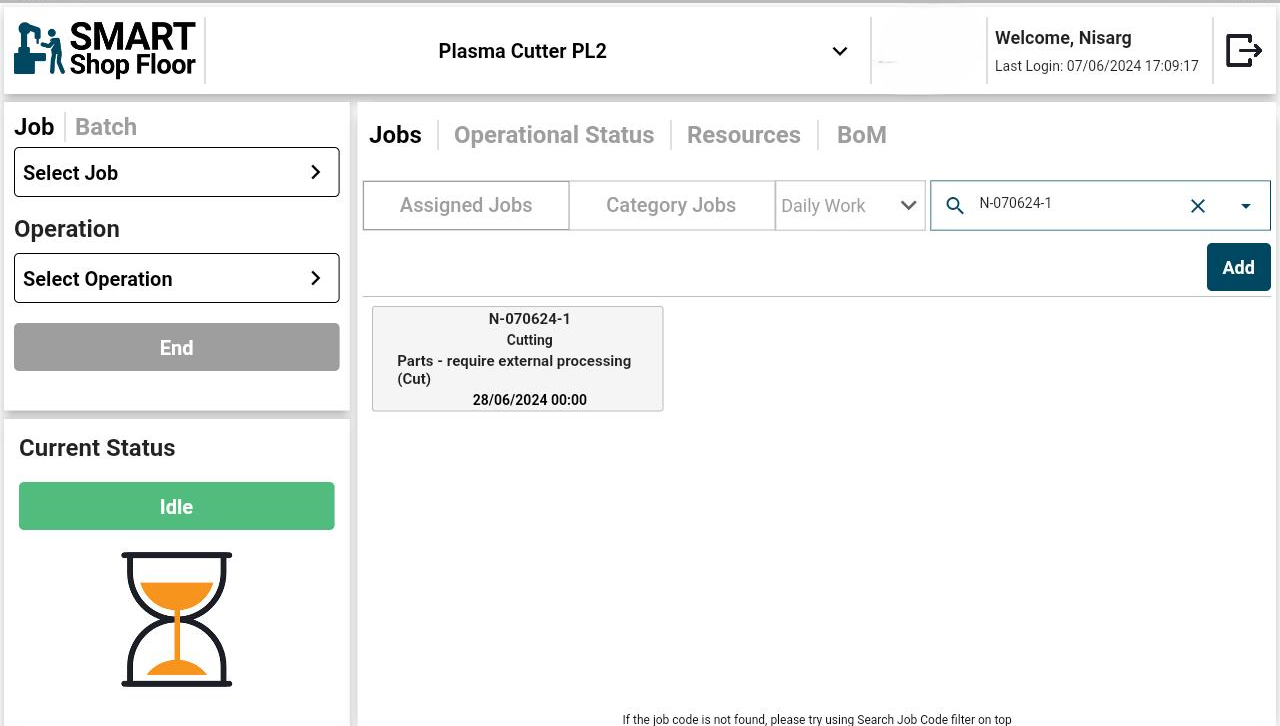
Selecting Job by Category
- Tap the Select Category tab next to the Assigned Jobs tab
- To search for a specific job, enter the job code in the Search Job Code field.
- Tap on the required job code from the list displayed on the screen
View Work Instructions

- The ‘i’ symbol on the operation denotes work instructions for the component.
- Tapping the symbol will display the work instruction details.
- Tap OK to close the pop-up.
Start the Job
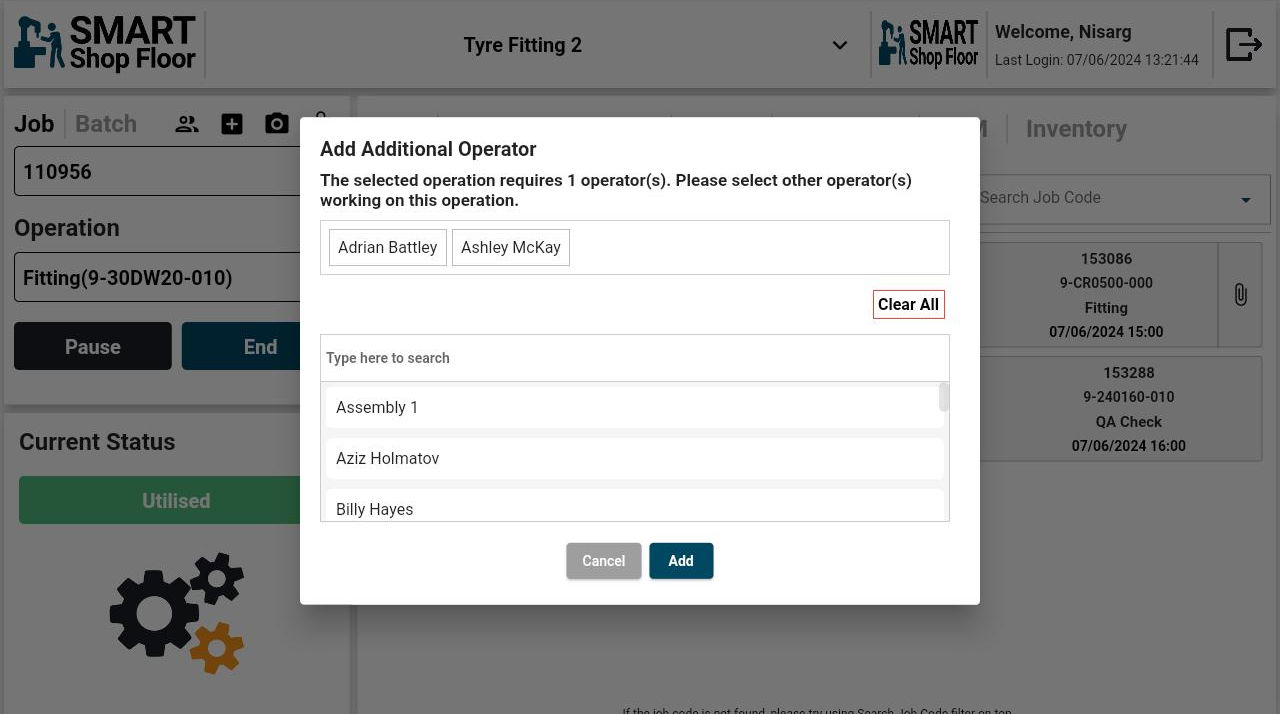
- Once a job code containing Operations with due by selected, tap the Start button below the Operation field to start the job
- A pop-up will open up to select the operators for the operation. The number of operators is specified during job configuration.
- Select the required number of operators and tap the Add button to confirm the action.
- The additional operators can also be removed while the job is running.
- To do so, tap the Add Additional Operator icon
 sfc-app to open the pop-up window.
 - Tap the operators name in the list displayed on the top to unselect the choice and tap Save .
- To do so, tap the Add Additional Operator icon
-
Once a job is started, the following feature icons will be available at the job panel:
- Add Operator, only if this feature is enabled
 Update Component Quantity
  Add Image
  Add File
-
Their functions are explained ahead
Add Images
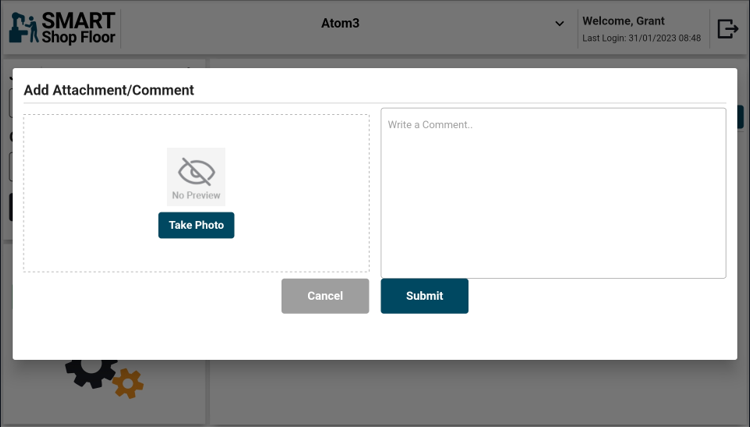
- To add an image, tap the camera icon displayed at the corner of the left panel
- A pop-up screen will open
- On the pop-up screen, tap the Take Photo button
- It will open the camera application of the tablet
- Provide the required permission
- Click the required image
- Once the photo is taken a notes filed will be displayed below image icon
- Add the required notes in this field
- Comments entered in the "Write a Comment" box will appear in the comment section on the "View Job" screen of the SmartShopFloor portal
- Tap Submit to upload the image.
NOTE To add images or any comment, a job needs to be active on the tablet.
Add Files
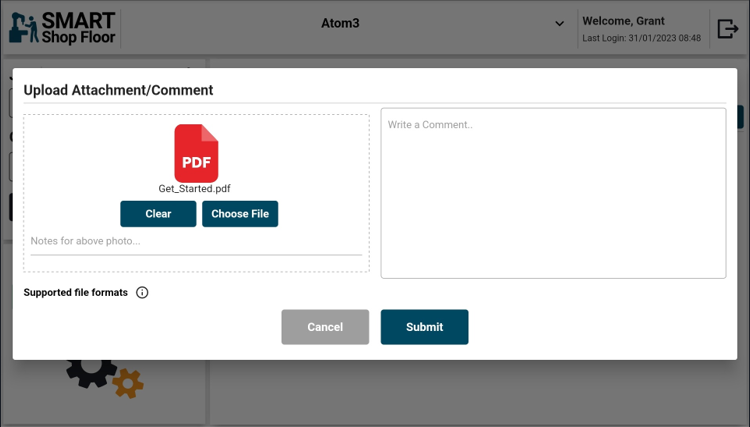
- To add a file, tap the file icon displayed at the corner of the left panel
- A pop-up screen will open
- On the pop-up screen, tap the Choose File button
- It will open a screen allowing you to navigate to your file on your tablet.
- Select the required file. At a time only one can be uploaded.
- The Clear button allows you to clear the file selection
- Once the file is selected a notes filed will be displayed below the file icon
- Add the required notes in this field
- Comments entered in the "Write a Comment" box will appear in the comment section on the "View Job" screen of the SmartShopFloor portal
- Tap Submit to upload the file.
NOTE To add files or any comment, a job needs to be active on the tablet. The supported file formats can be viewed by tapping the ‘I’ symbol on the screen.
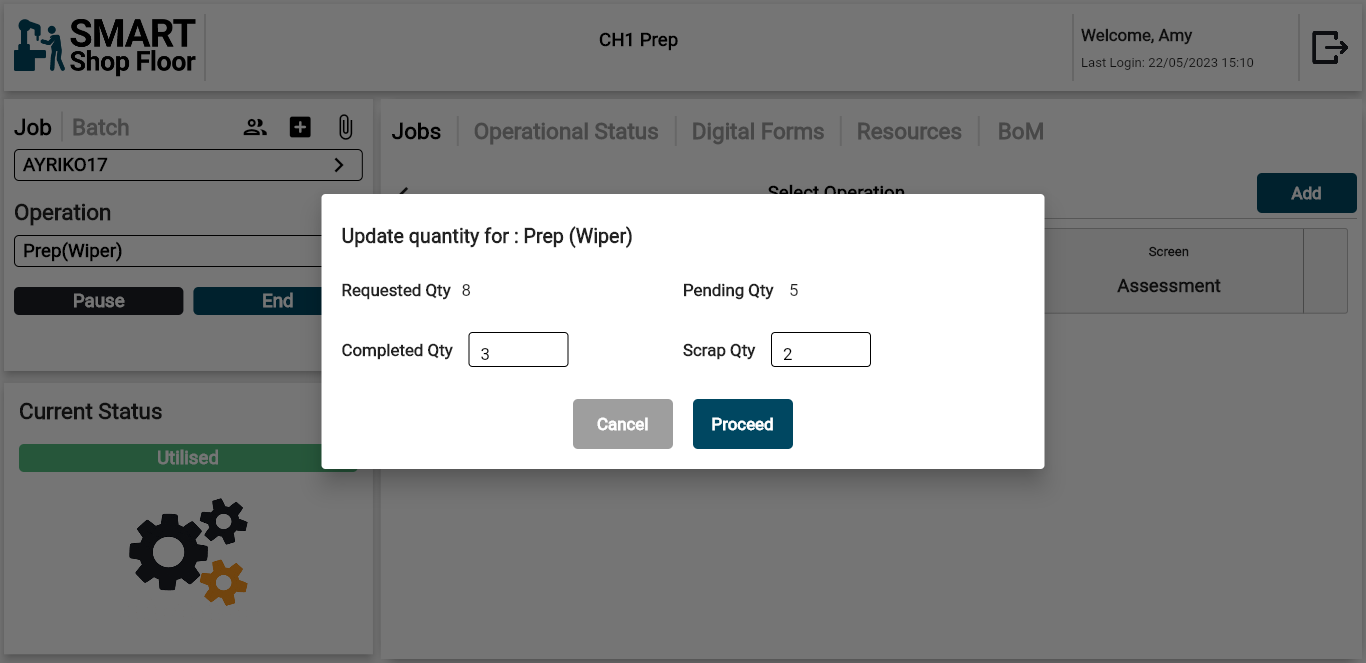
Update Component Quantity
- When a job is running on the machine the component quantity can be updated as and when they are worked on.
-
Tap the Update Component Quantity icon
-
In the pop-up window that opens, update the component quantity and scrap quantity (if available) and tap the Proceed button.
- This quantity update will be shown on the portal in Job View Detail mode, under the Component tab -> Operation view, history table.
Request Assistance
 * If a machine is linked to an Andon device then the SFC tablet app will show an “Assistance” button on the home screen.
* When tapped, the Assistance button will execute a Call For Assistance request to the Andon light and it will turn Blue.
* To disable the Assistance status, tap the reset icon at the top right corner of the Current Status block.
* If a machine is linked to an Andon device then the SFC tablet app will show an “Assistance” button on the home screen.
* When tapped, the Assistance button will execute a Call For Assistance request to the Andon light and it will turn Blue.
* To disable the Assistance status, tap the reset icon at the top right corner of the Current Status block.
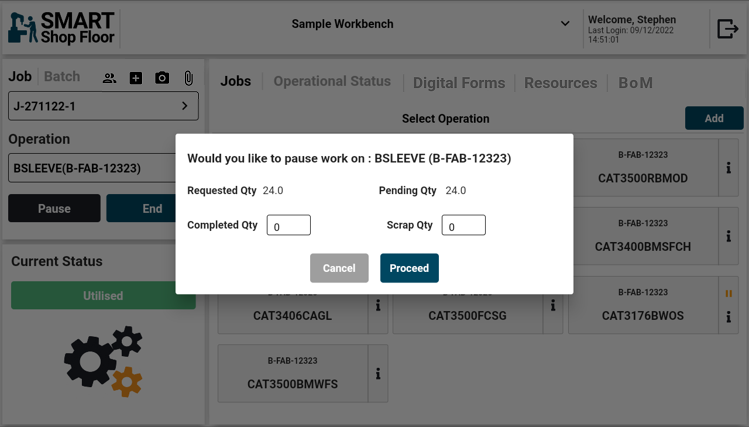
Pause the Job
- To pause a job, tap the Pause button.
- Tap the Proceed button to confirm the action.
- Also, user can enter the Completed Quantity and Scrap Quantity of that job.
Resume the Job
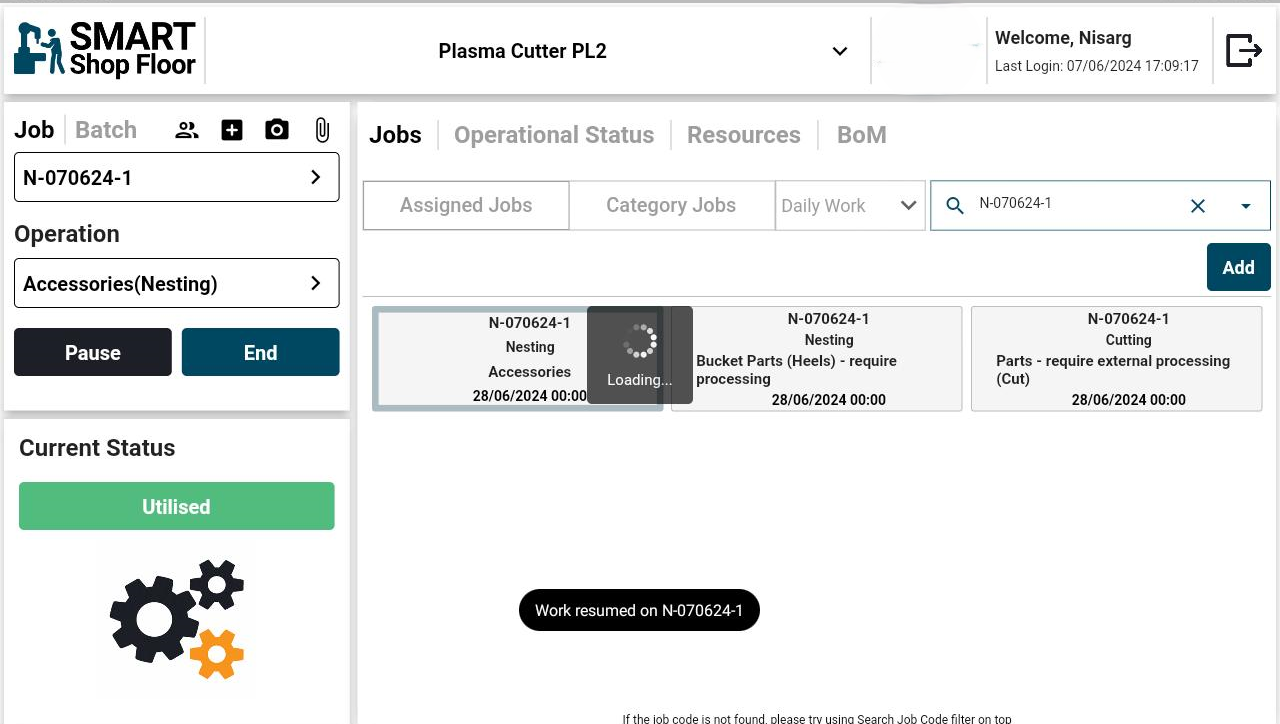
- To restart the job, tap the Resume button.
- When resuming a job, you can update the operator details if required.
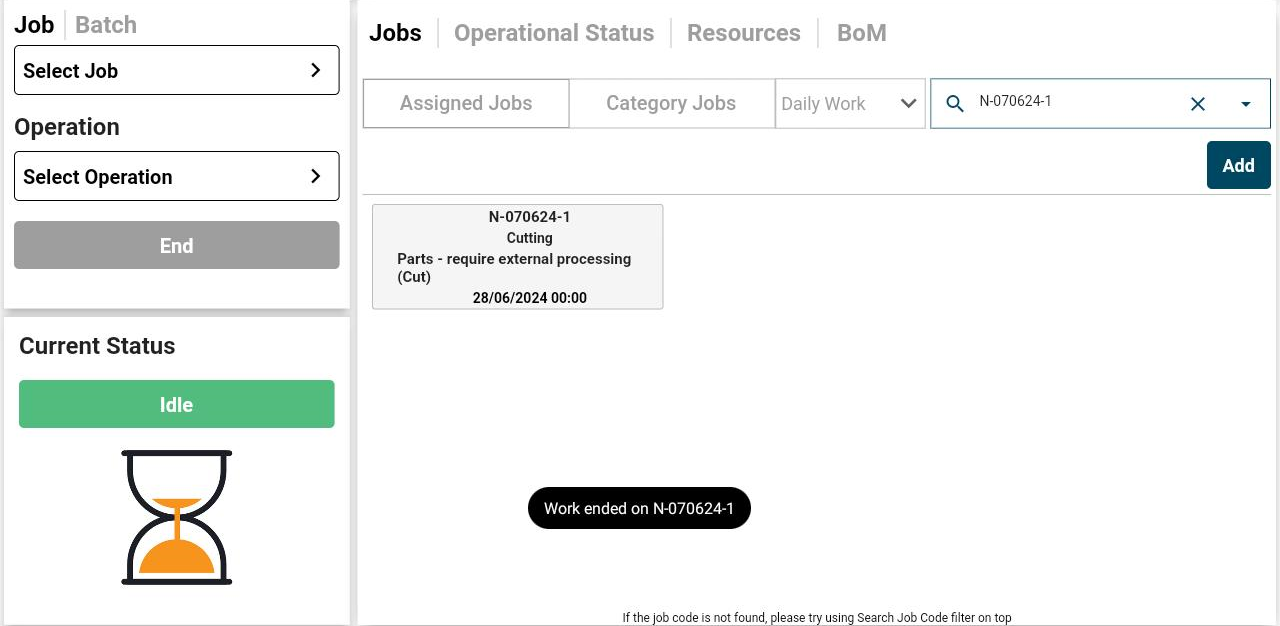
End the Job
- To end a job, tap the End button.
- Also, the user can enter the Completed Quantity and Scrap Quantity of that job
- Tap the Proceed button to confirm the action.
Pause Job and End Job Validation


A job cannot be paused or ended if any uptime or downtime status is active.
Predecessors Validation
-
While trying to start a new operation, if the predecessors are not yet worked upon, it shows a warning message.
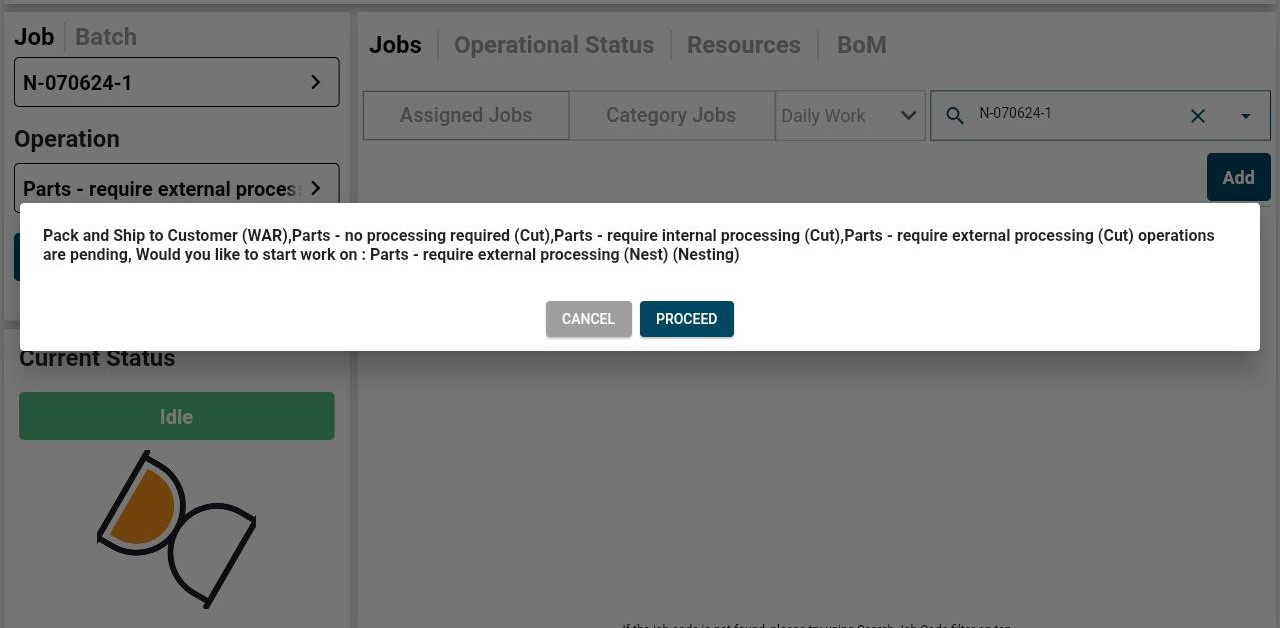
-
Once the operator confirms the action, a pop-up for adding additional operators will be displayed in case multiple operators are required for the job.
Reset Uptime or Downtime Status
- When an uptime or downtime status is enabled, it shows a reset icon above it in right corner of the Current Status block.
- Clicking on this icon will reset the status to default running status of the machine (Utilised/ Idle).
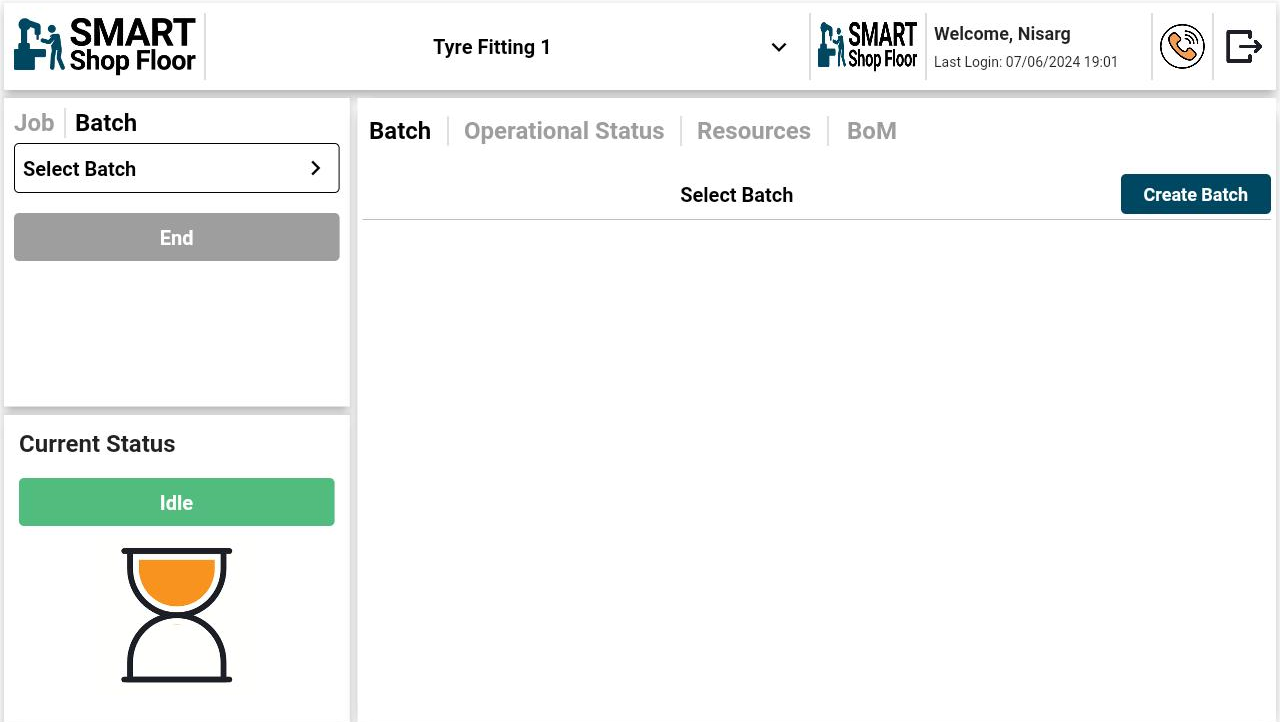
Start Batch Jobs
- Tap the Batch tab on the left panel
- To create a batch job, tap the Create Batch Button on the top right corner
- On tap, the screen would display a list of all the operations assigned to the current department.
- Select an operation.
- If it has jobs available, it will navigate to the Job selection screen.
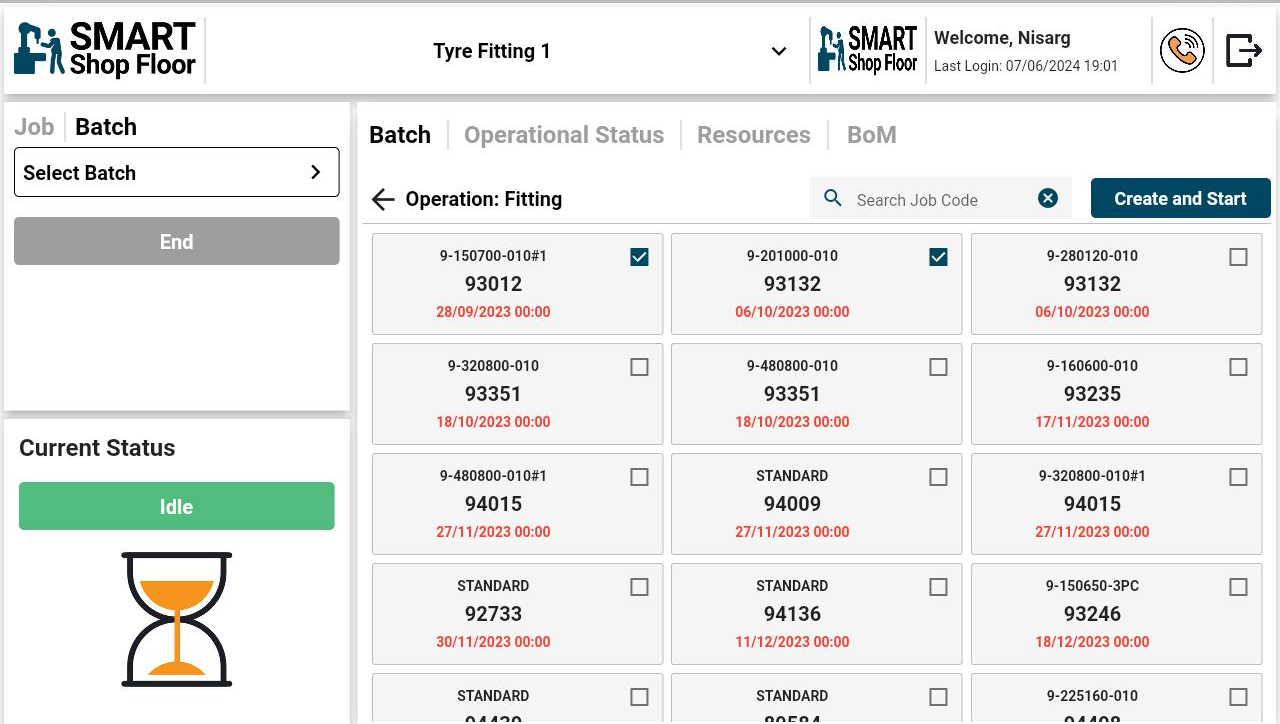
- Select the jobs to be included in the batch.
- Once selected, tap the Create Batch button.
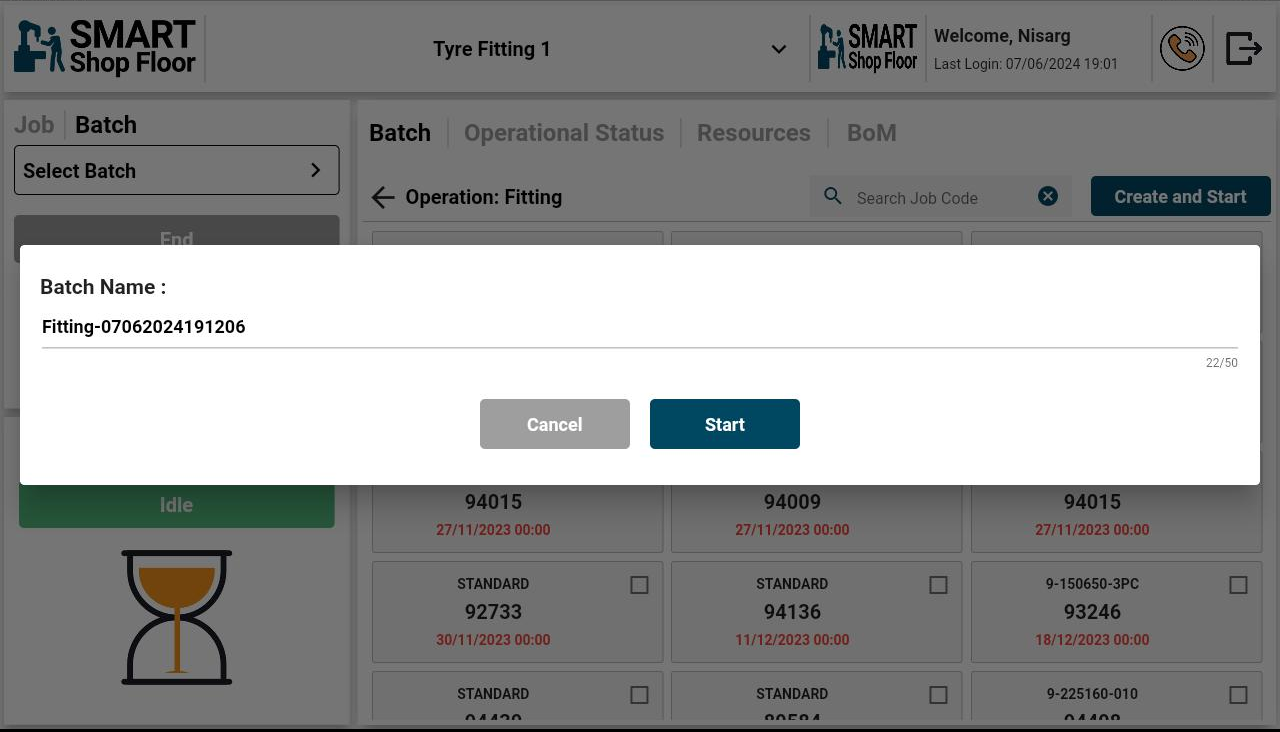
- On tap, a pop-up with an auto generated batch will be displayed.
- Update the name if required and then tap the Start button to start the batch job.
End Batch Jobs

- To end the job, tap the End button.
- On tap, a confirmation message would be displayed.
- Tap the Proceed button to end the batch job.
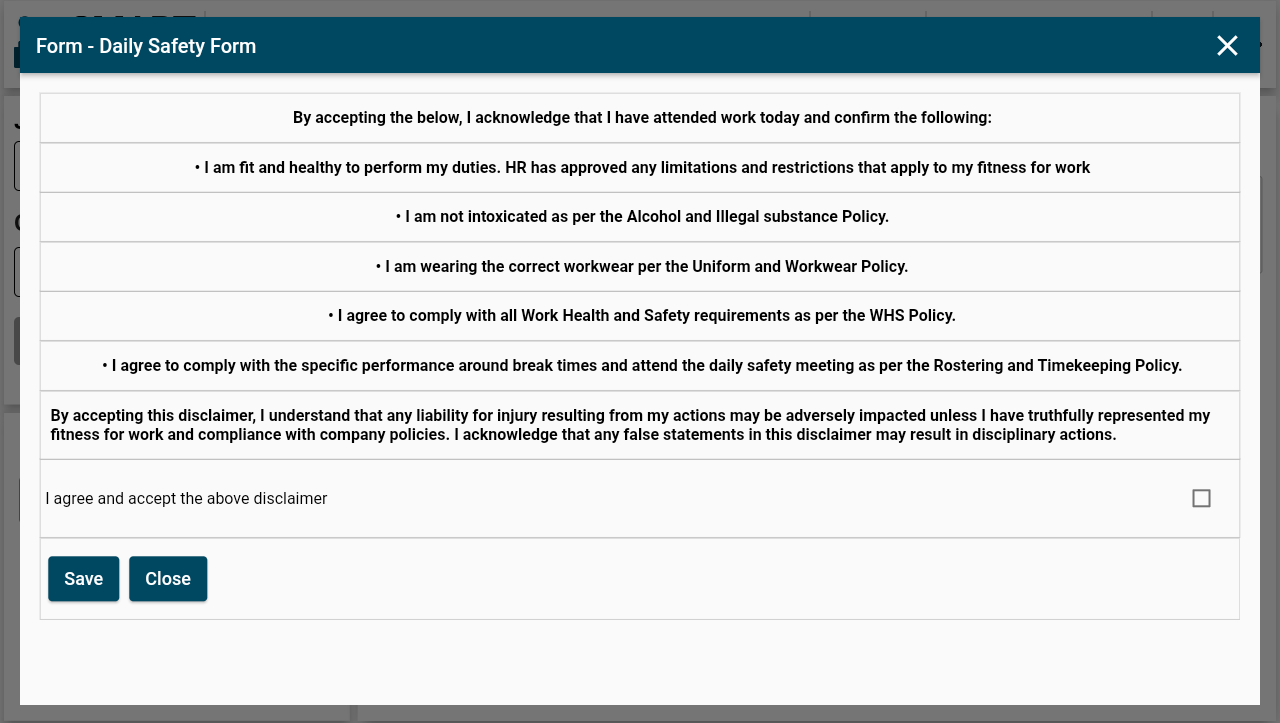
Digital Forms
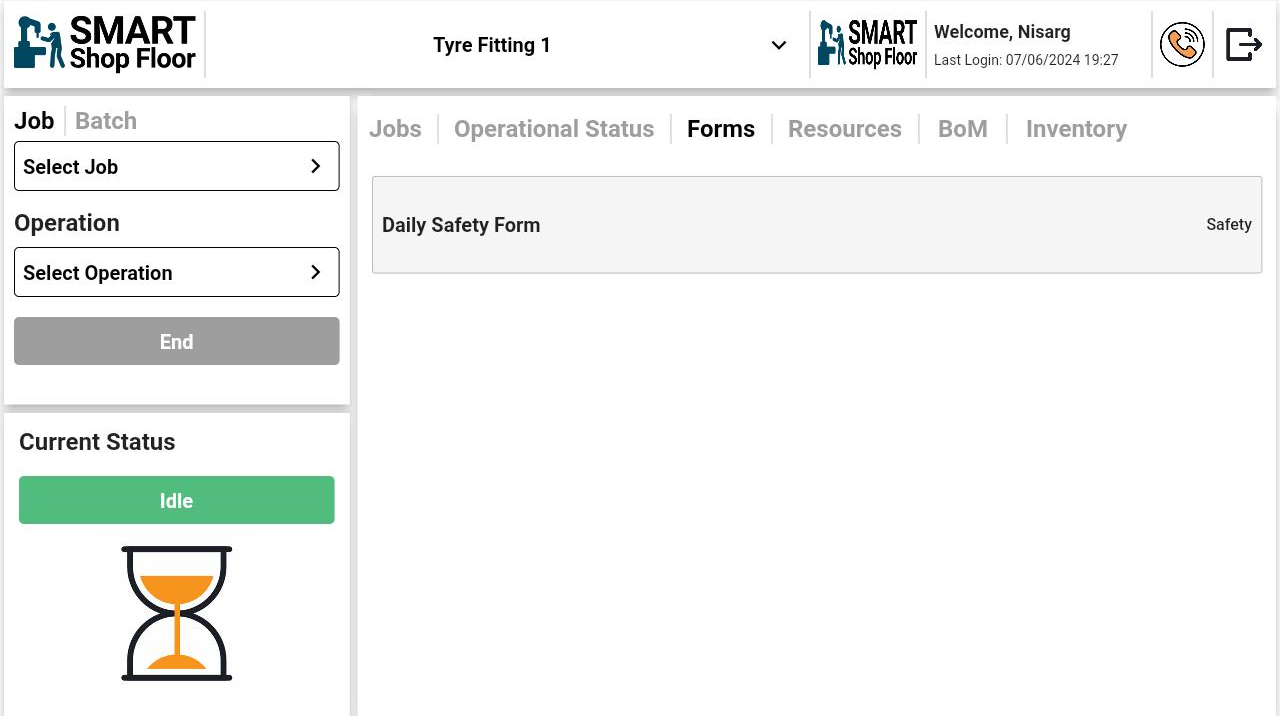
- The forms added from the SmartShopFloor portal will be listed here.
-
The operator can tap the required form and fill up the required information.
-
Once the form is filled up, the operator can submit it to the manager/superior by tapping the Save/Submit button.
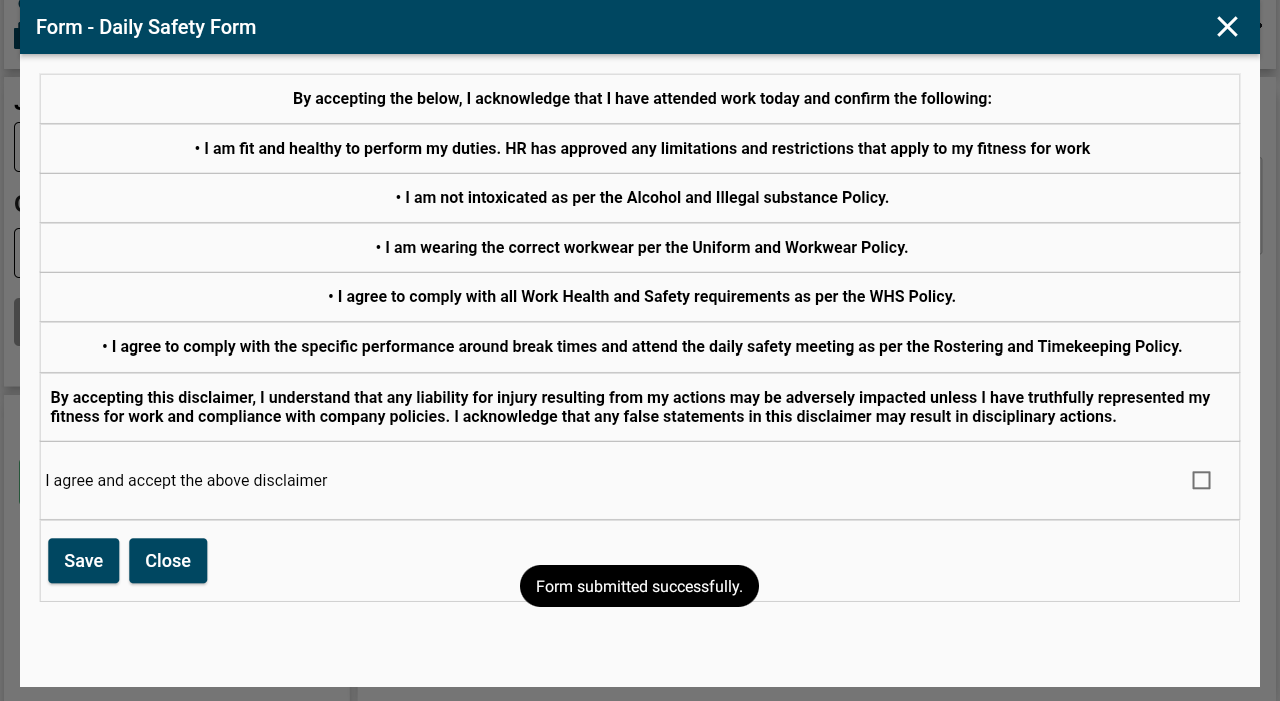
Once the form is saved from the app it will show the submitted form against the work centre, Operator, Job or User as per the form created on portal
--->
Resources
- All the resources added from the SmartShopFloor portal for associated Department and workcentre will be listed in an assigned workcentre.
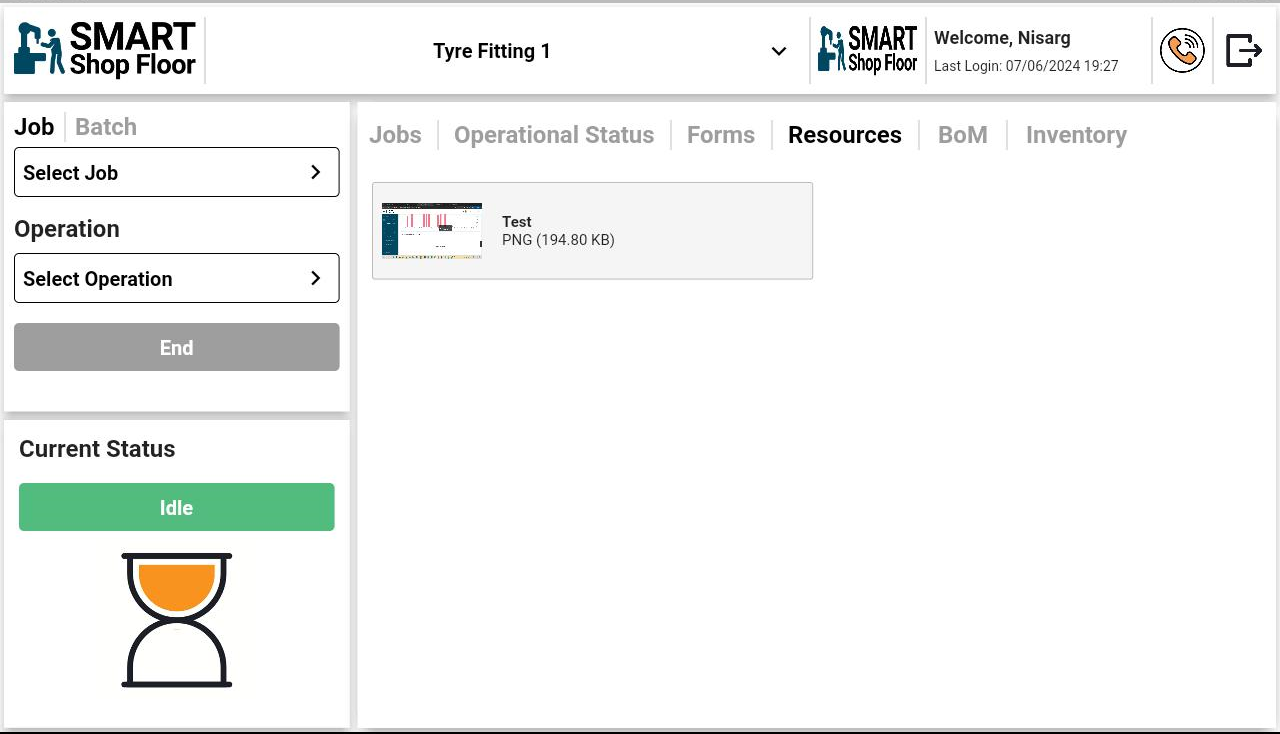
- Clicking on the Resource will open the Document on the app or some files will be download i.e Excel file
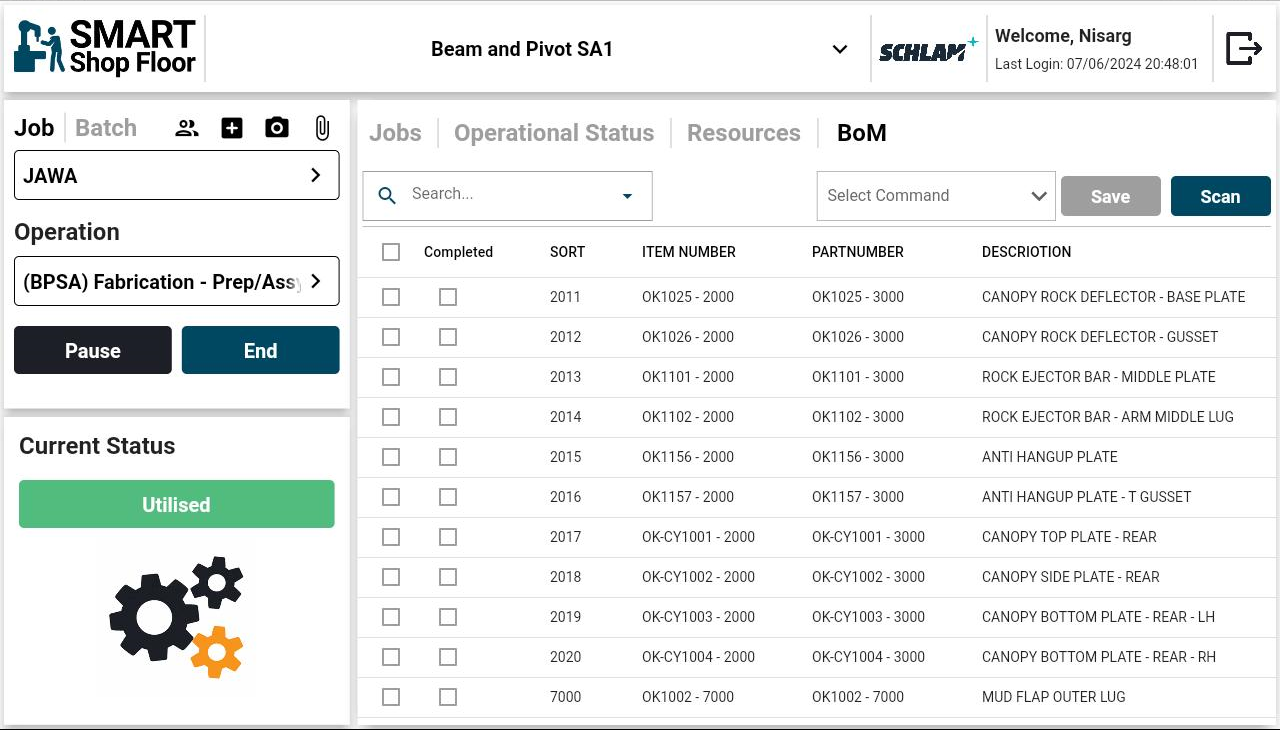
Bill of Materials
- When a job for a component to which BoM is attached is started or resumed, the BoM tab will display a list of Bill of Materials.
- This list is displayed only when the Process Code in the BoM matches with the Operation Code specified for the said operation from the SmartShopFloor portal.
- Also, it should mandatorily have serial number which can be added from the portal as well.
- This feature will only appear in the user interface if it is enabled for the user
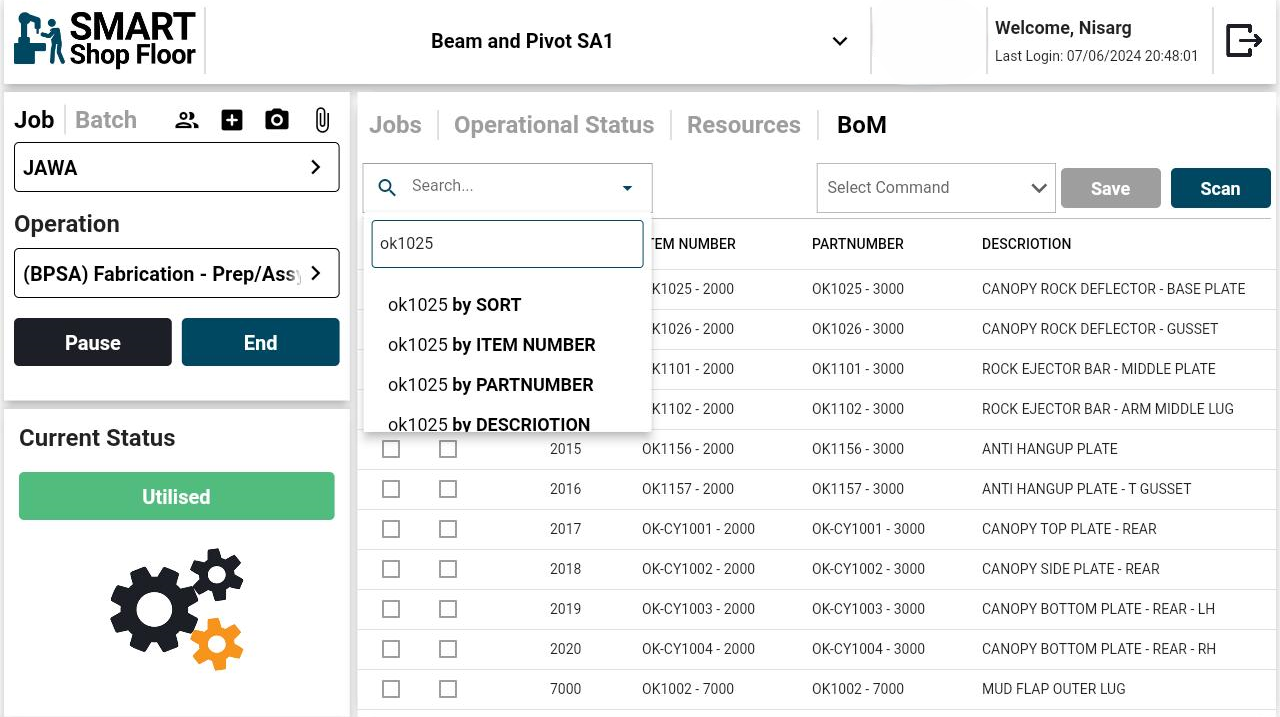
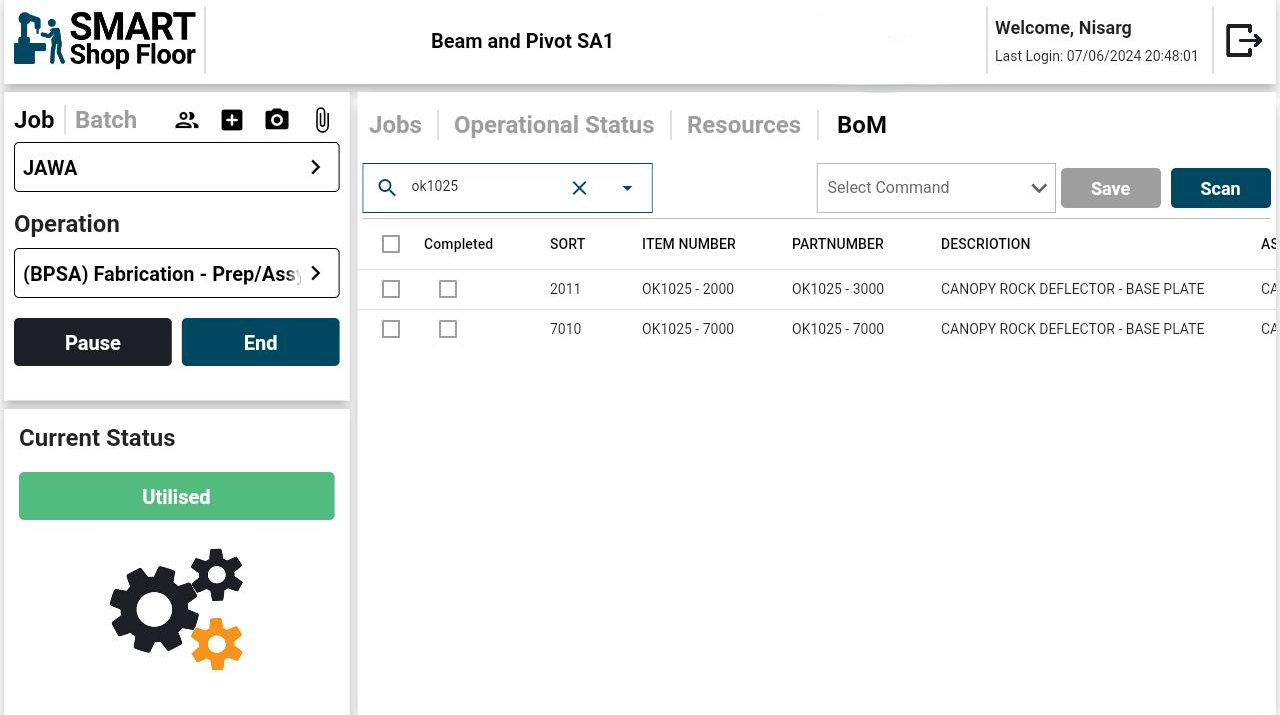
Search box
- Entering value in search box related to any field name in a box and selecting that will show that particular BoM records related to the value or text entered in search box
Select Command
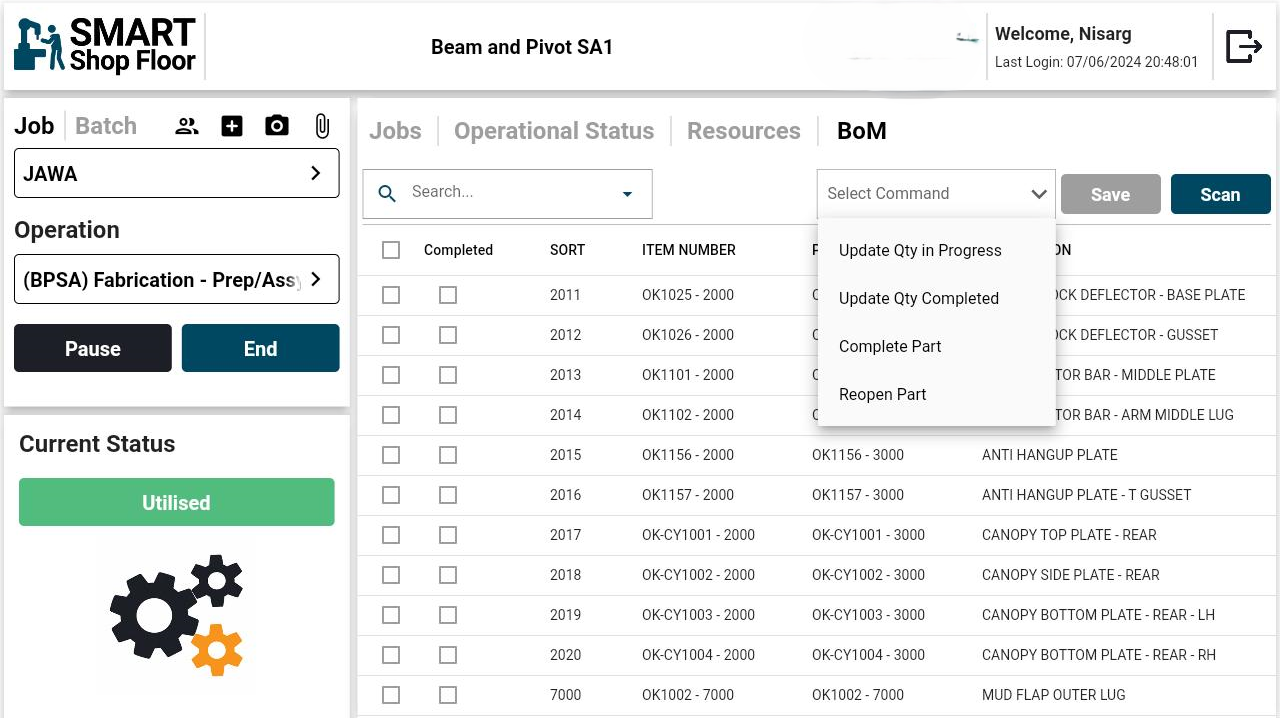
- It will show a list of Commands selecting a command filter as per below
- Update Qty in Progress: Selecting any records from the BoM data and clicking on Update qty in progress will enable that selected Bom record's Qty in progress box with by default the same value as Qty remaining for the same record or user can enter the value in Qty In progress box less than Qty remaining for that record
- Update Qty Completed: By selecting this command and BoM's data will enable the Qty completed value editable in which user can enter the value less than or equals to the value of Qty remaining value for the same record.
- Completed part: By selecting this command and any BoM's data will and saving it will show the same value as Qty value for that record.
- Reopen part: By selecting this command and completed boM's record will reopen it.
This update will get reflected on the job’s View Details screen under the BoM tab on the portal.
Scan QR Code
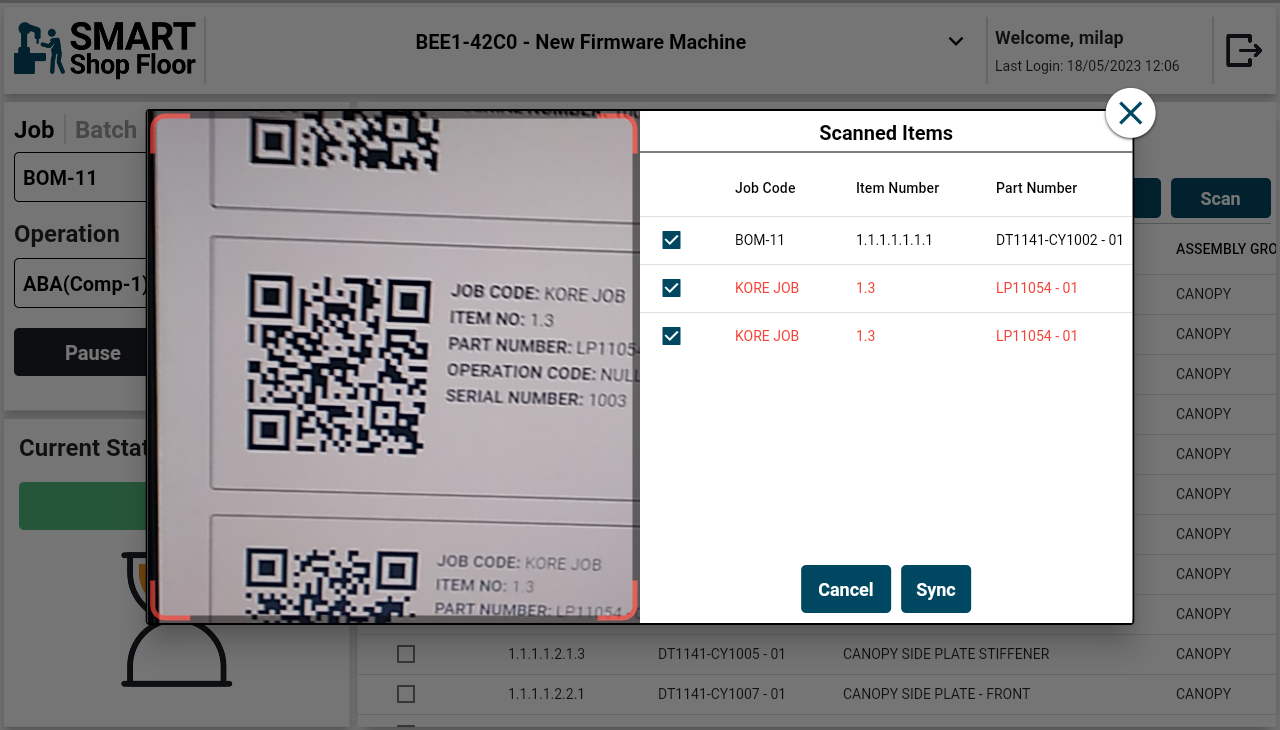
- To scan a BoM QR Code, simply tap the Scan button at the top
- Scan the required QR Codes from the list derived for the job code from the SmartShopFloor portal.
- The scanned items will get listed on the pop-up screen.
- QR Code of same job will be shown in Black and QR Code of different job will be shown in Red.
- By default, all the items are selected. Unselect the once that are not required.
- Tap the Sync button.
- On successful sync, the scanned items will get displayed in the BoM list.
Inventory tab
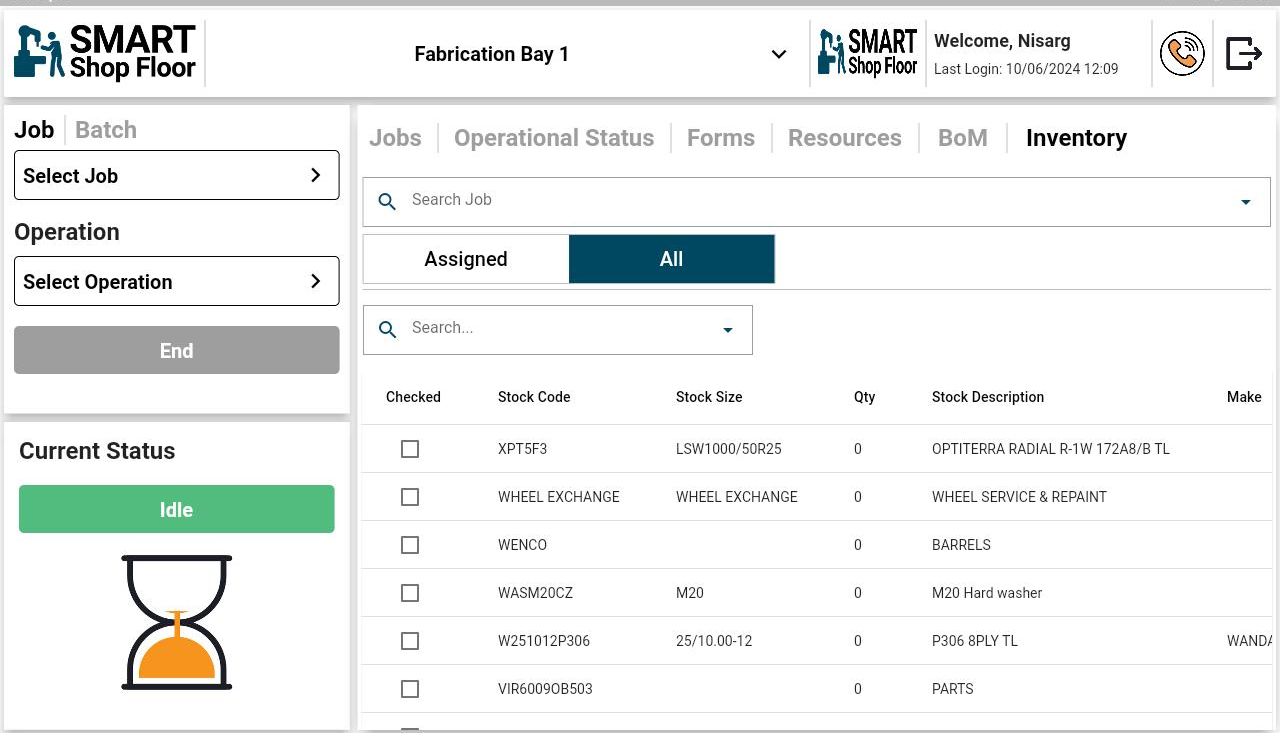
- It will show a list of Inventory added from the portal.(Job configuration -> Inventory)
- This feature will only appear in the user interface if it is enabled for the user.
- Search Job filter: User can search for the job whose Operations are binded to the machine he logged in.
- It will show 2 tabs which are as below:
- All: It will show list of all Inventory added from the Portal
- Assigned: It will show the list of submitted Inventory allocated for a job from "All" tab.
- Search filter under Assigned and all tab will help user to search the Inventory data for any particular record from the list.
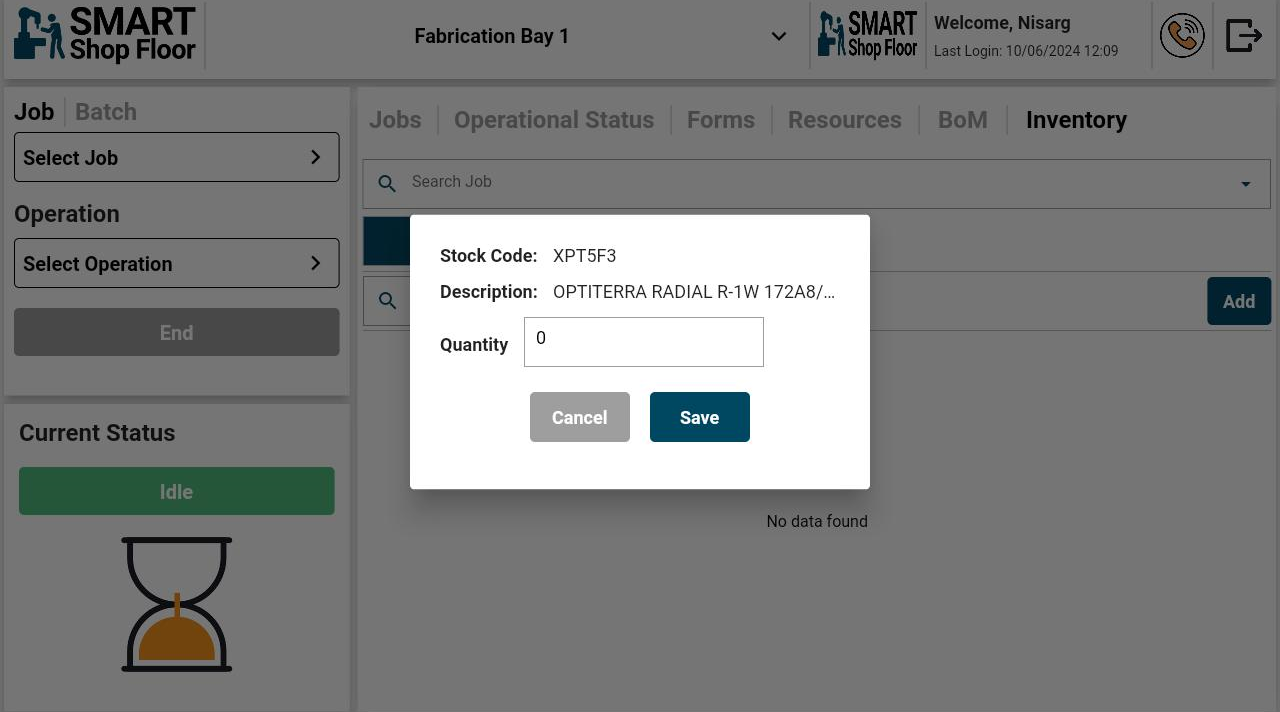
- Selecting any Inventory record from all tab will open the popup to enter quantity
- if you enter quantity greater then current quantity of the record selected then it will show warning message that "Requested qty entered value is greater than available current qty in inventory do you want to proceed?" if you select proceed it will save the record and will show it in assigned tab with allocaed quantity value entered.
- if you enter quantity less than the current quantity it will save the record successfully.
- Add button will be displayed on the top right corner of the assigned tab.
- Clicking on add button will redirect the page to all tab from which user can select the record and enter quantity and saving it will show the submitted record to assigned tab.