Jobs
- In this section the user can add/import, edit and view and reopen the jobs created in the portal.

- In this section you wll see cards on the top of the grid which are as below
- Active jobs : It will show Total number of open jobs in the Smart Shop Floor.
- Eligible for scheduled : It will show total number of jobs whose due dates are within x days configured in scheduling configuration.
- Scheduled : It will show total number of jobs successfully scheduled once scheduler is run.
- Unscheduled : It will show total number of Jobs where one or more Components could not be scheduled due to some reason.
- Running behind : It will show total number of jobs that are behind the schedule.
Filters
- The user can search data by by adding relevant text in the Search text box with all metafields set in custom fields
- The data of any duration can be viewed by selecting the required dates from the date picker.
- The board setup can be accessed from the filter at the right-hand side of the screen.

- By default, Completed and Cancelled items i.e. the jobs with all the completed or cancelled operations will not be displayed in the list. The user can view them by enabling it from the filter.
- The data can be exported in Excel, JSON and CSV formats by clicking the Export button at the right-hand side of the screen.
Job List
- The following information is displayed on the listing grid:
| Column | Description |
|---|---|
| Job Code | Codes of jobs configured/imported on the portal. The default sorting of this column is based on the date the job was created |
| Order # | Order number of the job |
| Customer | The customer's name |
| Branch | The customer's Branch |
| BoM | It will show BoM is attached to the job or not |
| Created Date | Date on which the job was created on the portal |
| Priority | The Job's Priority |
| Due Date | Completion due date for the job. In case the due date of the operations differ, the due date displayed here would be the nearest (smallest) of all. If the deadline is missed, then the date is displayed in Red |
| ETC | This is the estimated time of completion |
| End Job | Provides the option to end the job from the portal |
| Action | Provides the option to view,chat,edit and delete a job |
-
Clicking on the arrow provided for each record will expand the row to display component details,
- The component row can further expanded to view operation details and status

Configuring Jobs
- Jobs can be configured and managed in the following ways:
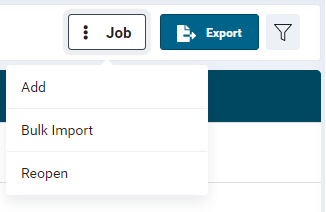
- Add (add single job at a time)
- Bulk Import (add multiple jobs at a time)
- Reopen (reopen completed components)
- The data displayed on the page can be exported to Excel, JSON and .CSV format by clicking the
 button
Add Jobs
- In this option the user can add single job with multiple components at a time.
- A minimum of one component is required to configure a job.
- Click the Add Job button.
- On click, a Job Details screen will open. Provide inputs as specified below.
Job Details
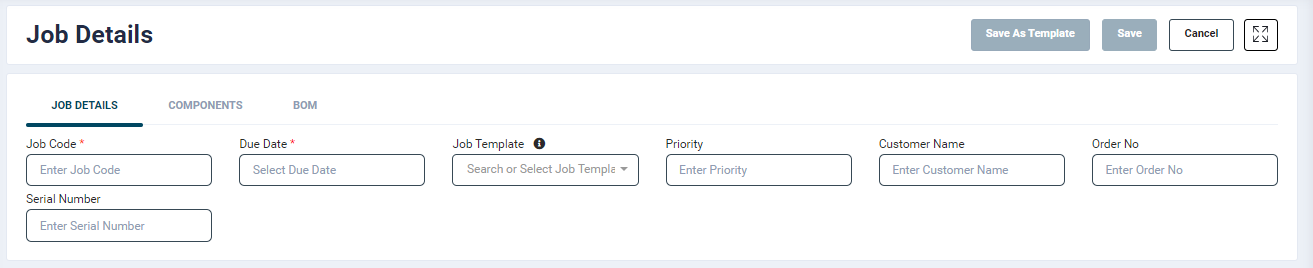
| Field | Description | Mandatory/Optional |
|---|---|---|
| --------------------- | Job Details | ------------------ |
| Job Code | Ensure to enter a unique job code. Valid inputs: alphanumerical and special characters. As soon as you enter the job code, there will be additional blocks for adding multiple components | Mandatory |
| Due Date | Ensure to enter a date that is greater than the current date. The date format should be DD/MM/YYYY. | Mandatory |
| Job type | It will show 2 options in dropdown selection Stock and production. | |
| Job Template | This feature automatically populates component level information configured in the selected template. To know more, please refere the Job Templates section. | Optional |
| Priority | This is a numerical field. If priority is set, the jobs listed in the SFC app will be as per the order. | Optional |
| Customer Name | Specify the customer/company name for whome the job is being created. | Optional |
| Order No. | Specify an order number, if available. | Optional |
| Description | Input any description pertaining to the job | Optional |
| Serial Number | Specify the serial number if available | Optional |
| Customer Branch | Specify the Customer Branch if available | Optiona |
| Customer Note | The Imformation entered here would be shown with the respective job in the customer portal |
NOTE: Additional fields can be added from the Organisation → Custom Job Fields section.
Component Details
- To add component details, click on the Component tab.
!{](ps_component_tab.png)
- On this screen, click on the Add Component button.
- On click, a pop-window will open. Provide inputs as described in the table below.
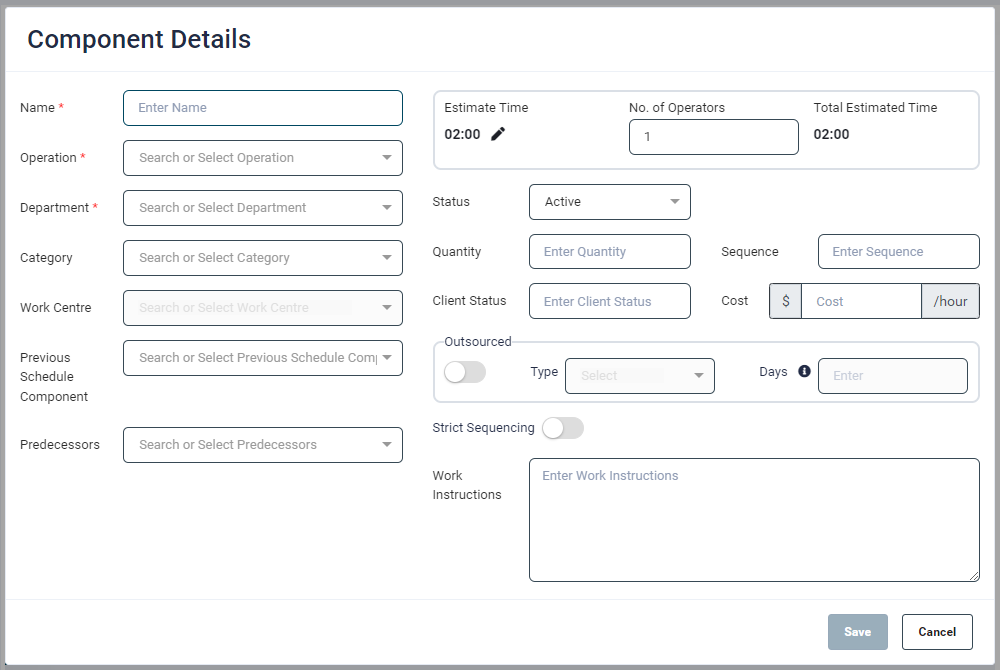
| Field | Description | Mandatory/Optional |
|---|---|---|
| --------------------- | Component Details | ------------------ |
| Name | Specify at least one component for the job | Mandatory |
| Operation}Select from a list of configured operations/tasks that should be performed on the component | Mandatory | |
| Department | The department list will be automatically filered as per the selected operation. Select a required department from the list. | Mandatory |
| Category | When a category is specified, the job code will be displayed as priority on the Tablet apps assigned to Work Centres under the selected Work Centre category and selected department. When unassigned, the job code is listed as other jobs. | Optional |
| Work Centre | This field is enabled only when a Category is selected. It will list Work Centres which belong to the selected category | Optional |
| Previous Schedule Component | As the name suggests this is a previous scheduled component. This field allows you to specify a component that should be scheduled before the current component. E.g. If 'Component A' is added as a previous component for 'Component B', then it will not be scheduled unless its previous component 'Component A' is scheduled first | Optional |
| Predecessors | Predecessors are selected operations which need to be completed before the current(next) operation can be started. If the predecessor work is not completed then there would be a warning message while starting the current component from the SFC App | Optional |
| Estimated Time | By default the estimated time is 02:00 hours. If the selected operation has a set estimated time, then it will display that value. This value can be modified. | |
| No. of Operators | Specify the number of operators required for the task. One is specified by default. | Mandatory |
| Total Estimated Time | This field automatically calculates the total time based on the estimated time and number of operators. | |
| Status | Select a status related to the component (Active, On Hold, Cancelled) | Optional |
| Quantity | This is an optional field. Enter the quantity of the component | Optional |
| Client Status | Add any additional information as required | |
| Sequence | This is an optional field. Enter a numeric value to specify the work sequence of the component. | |
| * Jobs for a component with multiple operations can be numbered in consecutive order i.e. 1, 2, 3 etc. E.g. Job code 260422-2 has Component HSG with two operations, CUMTCACHC & PAINT. Here the sequence should be 1 and 2 respectively. Also, the schedule for orders should be greater than the sequence preceeding it. i.e. schedule for sequence 2 should be greater than that of sequence 1. Though it is not restricted while configuring. | ||
| * Jobs for multiple components with single operations can be numbered as 1. E.g. Job code 260422-2 has component HSG 1 and HSG 1 with single operation PAINT. Here the sequence for both the components should be 1 | Optional | |
| Cost | Specify the per hour cost of performing the required operation on the Work Centre | Optional |
| Outsourced | This field is displayed for backward schedule mode which can be set from Adapive Scheduling &rarr: Configuration section. | Mandatory when enabled. |
| Strict Sequencing | This field is displayed for backward schedule mode which can be set from Adapive Scheduling &rarr: Configuration section. | Optional. |
| Work Instructions | Clicking the Work Instructions textbox, would open a pop-up and show the work instructions in it. | Optional |
- Any number of components and materials can be added as per requirement.
- The Save as Template button allows you to save it as a template for creating future jobs with same component details. The saved template will get listed in the Job Templates section.
- Click Save to add the job on to the portal.
- The operators at the shop floor can now start working on the Work Centre assigned to the jobs.
- Once the job is started, the assigned Work Centre's utilisation and status data will be available on various sections of the portal, such as Production Monitoring, Utilisation Improvement, etc.
- The user can also configure various Reports based on this data.
Adding Bills Of Material
- When a job ID is created using a job template, the Bill of Materials (BoM) associated with the template will be automatically carried forward to the job.
- Any modifications made to either the template or the BoM attached to the template will not be reflected in previously created jobs.
- If changes are made to the BoM of a specific job, those changes will only affect that particular job and will not update the BoM attached to the template from which the job was created.
View Job Details
- To view a job, click the view icon
 of the required record from the Action column in the listing grid.
- On click, a page will open to display the details of the configured job.
- The top right-hand side of the screen has the Reconcile and Export buttons
- The Reconcile button allows the user to modify the job details of a component. It is advisable to reconcile the job once work on all the operations are completed.
- The user can export the job details in Excel format by clicking the Export button.
- The top left-hand side of the screen displays the job code
Job Details tab
-
The table provides the following information:
- Created On - Date and time of job creation
- Created By - Name of user who created the job
- Template code - Name of the template selected while creating Job
- Expected On - Expected job end Date and time
- Actual Completion Date - Actual job end Date and time
- Job Status - Current job status
- Cost - Displays the total Work Centre utilisation cost for the job. This is the total of hours (Utilisation and OT Utilisation) multiplied with their respective hourly cost that is specified when configuring Work Centres.
- Total Duration - It will show Total Duration taken by Job
- Customer Name - it will show the customer name configured while creating Job.
- Order no. - it will show the Order no. entered while creating job.
- Act. Duration: The actual time taken for the job as compared to the estimated time.
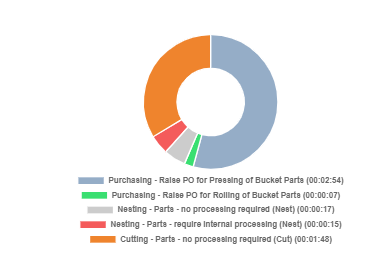
- The right-hand side would display a pie chart or a Department table for time taken on each component's job work.
- Upto 17 operations would be displayed. All other operations would be summed up and displayed under 'Other' without any duration.
-
It will show the Component and Operation Details below the table
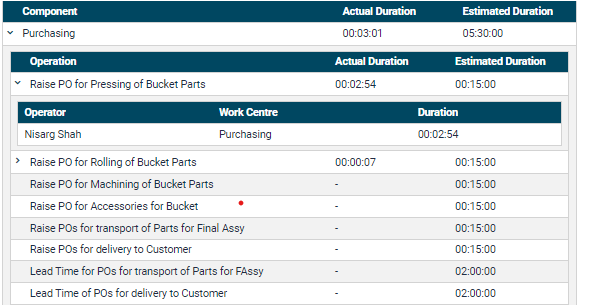
* It will show all component name with Actual time and Operation time columns
* Expanding the Component will show Operation name and Actual duration if worked upon and estimate time
* Total Actual Duration of all Operations will show against that component.
* Expanding the Operation will show which Operator have worked on that Operation with the Duration and workcentre.
Components tab
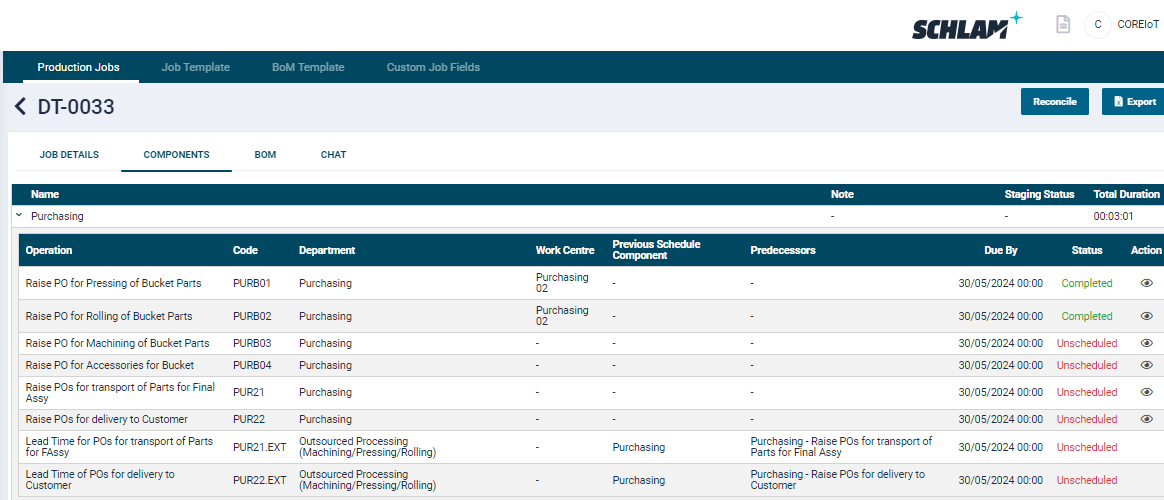
- It will show all the components with its Operations configured details added while configuring Job
- It will show Component Name, Customer note, Staging Status and Total duration
- Name - it will show Component name
- Customer note - it will show the customer note added for the specific component added while editing that component and saved.
- Staging status - It will show the status once all Operation of that component is completed
- Total Duration - It will show the Total Duration of all the Operation's took time to Complete
- When the Expand icon against component is clicked, a detailed table of the Operation containing in that component will be displayed with the following information:
- Operation - It will show the Operation name configured while creating job/component
- Code - It will show the process code configured while creatiung operation
- Department - it will show the Department name on which Operation is configured
- Work centre - It will show Workcentre name configured while creating a Job
- Previous Schedule component - It will show the previous scheduled component configured while creating a job or by selecting a job templated having previous scheduled component configured
- predecessor - It will show the predecessor configured while creating a job.
- Due by - It will show Due by according to that Operation's schedule to Time
- Status - It will show the Operation's status i.e In Progress, Scheduled, Completed etc
Operation view

* When clicking on view icon against the Operations it will open the popup with following details
* It will show the Operation name on the top left corner and its details configured
* Act vs Est Operators - it will show the actual Operators added when running that Operation from app vs the estimate Operators configured while adding the Job
* Act vs Est. Duration - It will show the Actual Duration took while completing that Operation vs Estimate duration configured whie adding the Job
* Completed/ Requested Qty - It will show the Completed qty added while completing that operation from app and will show the requested qty entered whiile configuring Job
* Scrapped qty - It will show the Scrapped qty added from sfc app while completing that Operation
* Cost - It will show the Total cost of the Operation if and if configured the cost value while adding a job
* Created at - It will show the created date and time of the Operations
* it will show the History table of the operation i.e When Operation gets started ,paused or completed with the following details
* Status: Displays statuses such as Created, In Progress, Paused as per the component's workflow through various points in time based on the actions performed by the operator
* Operator: Displays the name of the person who created the job as well as the operators working on the component.
* Scheduled: Displays the original date and time scheduled for the job
* Scheduled Work Centre: Displays the name of the Work Centre which was assigned to the component during job creation
* Actual: Displays the actual date and time when the job was started
* Actual Work Centre: Displays the Work Centre name which the component is being worked on
* Duration: Displays the time taken on each Work Centre
* Cost: Displays the total Work Centre utilisation cost for the work on the component. This is the total of hours (Utilisation and OT Utilisation) multiplied with their respective hourly cost that is specified during Work Centre configuration
BoM tab
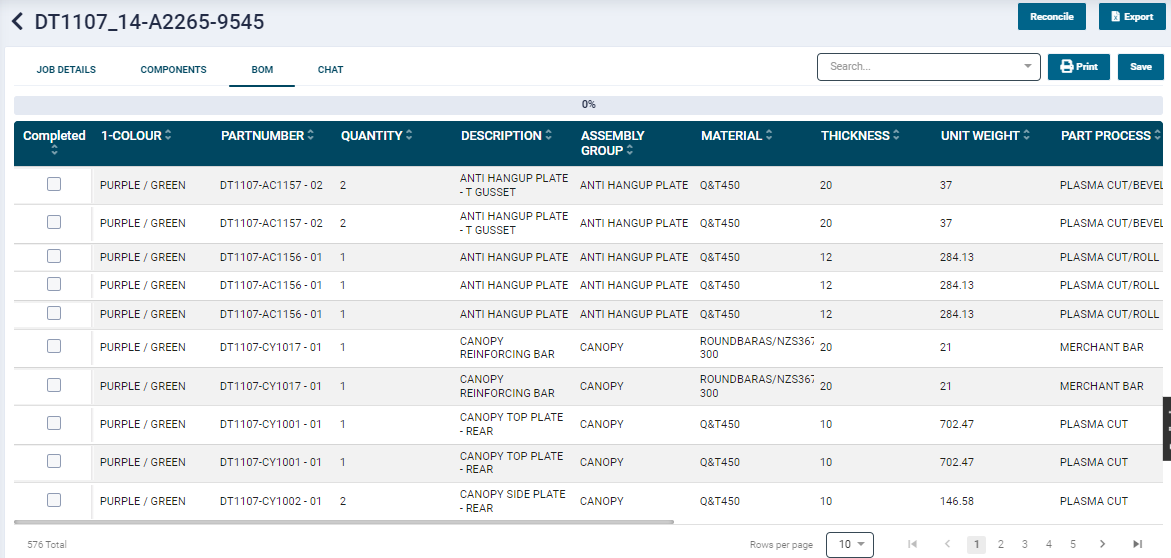
- It will show all the BoM records which we have uploaded the file while configuring job
- Search filter - Entering value and search with any metalfields listed will show that matching individaul record
- Print icon - it will show the qr code with all the information i.e Job code, Item number, Part Number, Operation code and Serail number
Chat tab
- It will show the Component name, Operation name, Operation code, Comments, Attachments, Commented By, Commented on.
- Component name - it will show the component name consist of the Operation on which chat is done
- Operation name - It will show the Operation name on which chat is done
- Operation code - It will show the Operation code i.e process code configured while adding that Operation
- Comments - it will show the Comments done in chat window for the Operation
- Attachments - It will show the Attachments done in a chat window for the Operation
- Commented By - It will show the Commented by name of the Operator/User
- Commented on - it will show the Date and time of the comments done in chat window.
Edit a Job
- To edit a job:
- Click the edit icon
 of the required record.
 - Modify the information as requied and click Save.
- Please note that Job Code and Component fields are non-editable.
- Click the edit icon

End a Job
- After the work on all the components of a job is complete, the user can click the End Job button
 on the listing grid to close it. On click,
- All the completed components will be displayed as Dispatched
- The components on which the work is yet to be started, would get cancelled
- The date on which the job is ended will be displayed in the Completed Date column
- Please note that once a job is ended, its details can be viewed but not edited.
The user can choose to display the jobs on the Utilisation Monitoring App (if purchased) by checking the Show jobs on tablet from the Production Monitoring → Configuration section.
Delete a Job
- To delete a job:
- Click the delete icon
 of the required record.
 - The delete icon is displayed only on jobs that have not yet been started via the SSF Operations Tablet APP.
- Click the delete icon
Reopen a Job
- The user can reopn a job once it has been closed. Also, if a work on any component has ended, it can be reopened as well.
- Click the Reopen Job button
 .
.

- On click a pop-up window will open with the following fields
- Job Code: Select a required job code from the dropdown list
- Component(s): The list of components will as per the selected job code. Select the required components and click the Reopen button.
- comment: Enter a reason for reopening the job.
- On click, a success message will be displayed. The user can restart work on the reopened job/component.
Bulk Import Jobs
In this option the user can add multiple jobs through a CSV file.

Steps
- Click the production jobs -> Add button -> Bulk Import button.
- Click on the Sample CSV File button to download the import template.

- The template has the following fields. Field names are self explanatory.
- Provide inputs in the below listed as specified in the Add Job section.
- Job Code
- This is a mandatory field. Ensure to enter a unique job code.
- Valid inputs: alphanumerical and special characters.
- Component Name
- This is a mandatory field. Specify at least one component for the job.
- If there are more components in a single job, you can specify them in the additional row with same job code
- Operation
- Specified Operation should be available in the specified Department.
- DueDate
- This is a mandatory field. Ensure to enter a date that is greater than the current date.
- The date format should be DD/MM/YYYY
- Department
- This is a mandatory field.
- Current Work Centre Category - If a Work Centre name is provided but the category is left blank, then the system would automatically assign the Work Centre category based on the Work Centre name.
- Current Work Centre
- Quantity
- Operation Sequence
- Status
- Work Instructions - The instructions to be shown on the tablet while selecting the operation to be worked upon.
- Priority
- Duration - Estimated minutes to complete the work on the operation.
- Resources
- Contact name
- CustomerName
- CustID
- Order No - Specify an order number, if available.
- Estimate Hours
- Resource Cost
- Labor Cost
- Material Cost
- Total Cost of Job
- Description - Description associated with job.
- Save the file on your system.
- In the Bulk Import screen, click the Upload CSV File button.
- Select the upload file that was previously saved on your system.
- The jobs with valid inputs will be listed on the screen.
If a specified Work Centre category does not exists in the portal or does not match with the specified Work Centre, then that component would not be taken into consideration.

- All the new jobs will be displayed on the Production Summary listing page.
In the event, any mandatory information is missed out or incorrect input is added to the import file, it will not be uploaded and the system will display a relevant error message.
Bulk upload jobs via template
- In this option the user can add Job by entering Template name already configured in Job template through a CSV file.
- Click the production jobs -> Add button -> Bulk upload jobs via template
- Click on the Sample CSV File button to download the import template.
- The template has the following fields. Field names are self explanatory.
- Provide inputs in the below listed as specified in the Add Job section.
- Job Code
- This is a mandatory field. Ensure to enter a unique job code.
- Valid inputs: alphanumerical and special characters.
- Template Name
- This is a mandatory field. Specify one Template name for the job.
- DueDate
- This is a mandatory field. Ensure to enter a date that is greater than the current date.
- The date format should be DD/MM/YYYY
- Priority
- Quantity
- This is a mandatory field
- Contact name
- CustomerName
- Order No - Specify an order number, if available.
- Estimate Hours
- Resource Cost
- Labor Cost
- Material Cost
- Total Cost of Job * Save the file on your system. * In the Bulk Import screen, click the Upload CSV File button. * Select the upload file that was previously saved on your system. * The jobs with valid inputs will be listed on the screen.  * All the new jobs will be displayed on the Production Summary listing page. ### CSV Import File Mapping * The CSV mapping template allows the user to map their import fields with those in SSF web portal. * Clicking the Set CSV Template button on the top right-hand side of the screen will open the Mapping screen. * Till the time the user sets the CSV template, all the controls would be blank  * The fields marked with an asterix are mandatory. The user is required to add at least one component name. * The user is permitted to input alphanumeric values. * The mapping is a one-time process. Once the template is saved, the Sample CSV will contain only those fields as mapped by the user. --- **Note** * Due date should not be less than Current Date. * If entering past dates ensure that the From date and time are greater than or equal to the current date and time. * While configuring CSV template, the field names at component level should be unique. E.g At Component 1 level if Component Name field is set as “Component1” then at Component 2 level it should be “Component2”. * The rows without mandatory fields will be ignored and valid rows will be inserted. * When editing jobs with csv upload, the component level fields will be updated only if the Component name and Operation name (at component level) are same as that in the existing job. Failing wich a new component will get added since the system allows duplicate component name on same job. Rest of the job level fields will be updated as mentioned on csv file for particular job. * Rows without mandatory fields i.e. Job code, Due Date and at least one component name will be ignored. --- ### Add Jobs * In this option the user can add single job with multiple components at a time. * A minimum of one component is required to configure a job.  * Click the Add Job button. * On the next screen, provide inputs as specified below. | Field | Description |Mandatory/Optional| | ------------------------- |-------------|----------------- | ||Job Details| |Job Code|Ensure to enter a unique job code. Valid inputs: alphanumerical and special characters. As soon as you enter the job code, there will be additional blocks for adding multiple components|Mandatory| |Job Template|This feature automatically populates component level information configured in the selected template. To know more, please refere the [Job Templates](jobtemplates.md) section.|Optional| |Due Date|Ensure to enter a date that is greater than the current date. The date format should be DD/MM/YYYY.|Mandatory| |Priority | This is a numerical field. If priority is set, the jobs listed in the SFC app will be as per the order.|Optional| |Customer Name|Specify the customer/company name for whome the job is being created.|Optional| |CustID|Enter the customer's ID|Optional| |Order No|Specify an order number, if available.|Optional| |Description|Input any description pertaining to the job|Optional| ||Component Details| |Name |Specify at least one component for the job|Mandatory| |Operation|Select from a list of configured operations/tasks that should be performed on the component|Mandatory| |Department|The department list will be automatically filered as per the selected operation. Select a required department from the list.|Mandatory| |Category| When a category is specified, the job code will be displayed as priority on the Tablet apps assigned to Work Centres under the selected Work Centre category and selected department. When unassigned, the job code is listed as other jobs.|Optional| |Work Centre| This field will list Work Centres which belong to the selected Work Centre category|Optional| |Estimated Time|By default it is 02:00 hours. If the selected operation has a set estimated time, then it will display that value. This value can be modified.| |No. of Operators|Specify the number of operators required for the task. One is specified by default.|| |Total Estimated Time|This field automatically calculates the total time based on the estimated time and number of operators|| |Quantity|This is an optional field. Enter the quantity of the component|Optional| |Sequence|This is an optional field. Enter a numeric value to specify the work sequence of the component.
- Jobs for a component with multiple operations can be numbered in consecutive order i.e. 1, 2, 3 etc. E.g. Job code 260422-2 has Component HSG with two operations, CUMTCACHC & PAINT. Here the sequence should be 1 and 2 respectively. Also, the schedule for orders should be greater than the sequence preceeding it. i.e. schedule for sequence 2 should be greater than that of sequence 1. Though it is not restricted while configuring.
- Jobs for multiple components with single operations can be numbered as 1. E.g. Job code 260422-2 has component HSG 1 and HSG 1 with single operation PAINT. Here the sequence for both the components should be 1. |Optional| |Status|Select a status related to the component (Active, On Hold, Cancelled or Removed).|Optional| |Client Status|Add any additional information as required| |Cost|Specify the per hour cost of performing the required operation on the Work Centre|Optional| |Work Instructions|Clicking the Work Instructions textbox, would open a pop-up and show the work instructions in it.|Optional| * Any number of components and materials can be added as per requirement. * The Save as Template button allows you to save it as a template for creating future jobs with same component details. The saved template will get listed in the [Job Templates](jobtemplates.md) section. * Click Create to add the job on to the portal. * The operators at the shop floor can now start working on the Work Centre assigned to the jobs. * Once the job is started, the assigned Work Centre's utilisation and status data will be available on various sections of the portal, such as Production Monitoring, Utilisation Improvement, etc. * The user can also configure various Reports based on this data. > If a job is created with a workcentre but without Work Centre and category, then the system will check if all the Work Centres of that workcentre fall in same category.If yes, then that category will automatically be assigned to the component. ## View Job Details ### Job Details tab * To view a job, click the view icon  of the required record from the Action column in the listing grid. * On click, a page will open to display the details of the configured job. * The top right-hand side of the screen has the Reconcile and Export buttons * The Reconcile button allows the user to modify the job details of a component. It is advisable to reconcile the job once work on all the operations are completed. * The user can export the job details in Excel format by clicking the Export button.  * The top left-hand side of the screen displays the job code * It shows the following information as per the meta set for the Client: * Created On - Date and time of job creation * Created By - Name of user who created the job * Template code - Template name selected while configuring Job * ETC - Last Scheduled Operation's To time * Due Date - It is the due Date showing while configuring job * Job status - Actual status of the job * Actual Completion date - Actual job end Date and time * Job Status - Current job status * Cost - Displays the total Work Centre utilisation cost for the job. This is the total of hours (Utilisation and OT Utilisation) multiplied with their respective hourly cost that is specified when configuring [Work Centres](machine.md). * Act. Duration: The actual time taken for the job as compared to the estimated time. * Customer name - Customer name showing which was added while configuring job * Order no. - Order no. showing which was added while configuring job * Description - Description showing while configuring job showing when viewing Job * Serial number - Serial number showing same as when configuring job * Customer Branch - Branch added while configuring job will be shown when viewing the Job  * The right-hand side would display a pie chart for time taken on each component's job work. * Upto 17 operations would be displayed. All other operations would be summed up and displayed under 'Other' without any duration. * On the left side it shows all the components with Actual duration and Estimate Duration * Expanding the component it will show their respective Operations with the Actual Duration and Estimate Duration * Expanding the Operation will show the Operator name, Work centre name and the Duration ### Component tab  * Component tab will show next to the Job details tab with following information * Name - it will show the component name * Note - it will show the customer note added while configuring job/component * Staging status - it will show the stage pending or Dispatched status once component is Completed * Total Duration - It will show the Total duration i.e summation of all the Operation's actual Duration for that component * Expanding the component will show following information * Operation - It will the Operation name added while configuring Job * Code - It will show the process code added while configuring Operation * Department - It will show the Department configured while adding a job * Work centre - it will show the Work centre name on which the Operation started or scheduled or configured while adding a Job * Previous scheduled Component - it will show the previous schedule component configured while adding a Job * Predecessors - it will show Predecessors configured while adding a Job * Due by - it will show the Operation's due by Date with time (If scheduled it will show "To time", if unscheduled it will show Due date as due by) * Status - It will show Component status i.e In progress, Completed, On-Hold, Stage Pending or Dispatched * Action - View icon * Once all the Operations are completed it will show the Component status as "Stage Pending" under staging status. * Once the component is staged it will show the component status as "Stage completed at dd:mm:yyyy hh:mm:ss" * Once the component id Dispatched it will show the component status as "Dispatched at dd:mm:yyyy hh:mm:ss" ## Operation view * Clicking on the view icon against the Operation will show the table with following information * Act. vs Est. Operators - It will show the Estimate Operators configured while configuring Operations versus number of Actual Operators added for this Operations from the sfc App * Act vs Est. Duration - it will show the Estimate duration configured while configuring Operations versus the Actual duration taken by Operation to complete * Completed/Requested Qty - The quantity configured while adding Operation is considered to be Estimate qty and Quantity added while performing any action against the operation from sfc app and entering value for completed qtyagainst that Operation will be considered as Completed Qty * Scrapped qty - Scrapped qty can be added from the sfc app while the Operation is in progress. * Cost - Value entered while configuring Operation's Cost will be displayed * Created at - It will show the Date and time when the Job is created ### Attachments Button  * If an operator has attached images to the jobs from SmartShopFloor Control app or the user has attached images during staging or dispatching, the attachment button will be appear on the top right corner and clicking on it will appear the attachments.  * Clicking on the attachment button will display the image in a pop-up window. Click the forward or backward arrows to view all the attached images along with a Publish toggle button. * The window will also display the following details: * File Name: Displays the file name and allows the user to download the file by clicking the Download icon next to the name. * Status : Mentions when the image was taken at operation's status. * Added By : Operator's name if from App or User's name if from stage or dispatch. * Time : Timestamp when the image was taken e.g.16/08/2022 12:30:55 * Job Code : Component's job code. * Component(s) : Name of the component on whose operation the image was attached. * Operation: Name of the operation on whose work the image was attached. * Comments : Comments added by the operator/user. * On the top right side there is a switch for **'Publish'**. If it is set ON that particular attachment would be shown to the customer in the Job Tracking else if the switch is set OFF that particular attachment would not be shown to the customer. So its in the user's control which attachments the customer can view. ### Reconcile Button * The Reconcile feature allows users to modify the actual duration, operator, from-to timings and cost of a job. * An admin having rights would be able to make changes to these details. * Click the View details option of a required component operation. * Upon click, a text 'Reconcile Mode On' will be displayed next to the job code. * Click on the Operation view icon and Add button will appear  * Clicking the Add or Edit icon will open a Reconcile Job Detail popup  * The user will be able to select a different Work Centre, operator, alter the From and To date, duration of a particular operation and the cost. * The user will be able to export the modified data. --- **Note** * These changes are limited only to the Production Monitoring → Jobs → View Details. * In this mode the In Progress records cannot be edited, hence the edit icon will be disabled. * It is advisable to Reconcile the job once all its component's operations work have been completed. * When a record is reconciled, a label “Reconciled” will be displayed for that operation details table on the job details screen. --- ## BoM tab * BoM tab will show the BoM record assigned from the SFC app against that Job **Note** BoM data will only be shown against the Operation if and if it matches with the Operation code entered while configuration. ## Inventory tab * Inventory tab will show the Inventory Data which are assigned from the sfc app against the Operation ## Chat tab * Chat tab will show all the chats and attachments done in a chat from the production job's grid, Daily work etc * It will show the details with following information * Component - Component name consisiting of the Operation on which chat is done * Operation - Operation name on which chat is done from Daily work * Operation code - Process code assigned to the Operation * Comments - If comments entered while entering files in the chat * Attachments - Attachment done in a chat * Comments by - Comment done by which user * Commented on - Commented done by user in a chat at which date and time ## Forms table * Digital forms submitted from the Sfc app against any Operation will display in this tab * It will show the details with following information * Name - It will show the Digital form Name * Form type - it will show the form type i.e Quality,Inspection or Dispatch Docket * Submitted date - it will show the submitted date and time when the form is submitted. * Action - Print icon will display against all the submitted form and clicking on it will allow to print and save the form. ## Edit a Job * To edit a job: * Click the edit icon of the required record. * Modify the information as requied and click Save. * Please note that Job Code, Component name and Job type fields are non-editable.  ## End a job * After the work on all the components of a job is complete, the user can click the End Job button  on the listing grid to close it. On click, * All the completed components will be displayed as Dispatched * The components on which the work is yet to be started, would get cancelled. ## Delete a job * To delete a job: * Click the delete icon  of the required record. * The delete icon is displayed only on jobs that have not yet been started via the SSF Operations Tablet APP. ## Reopen a Job * The user can reopn a job once it has been closed. Also, if a work on any component has ended, it can be reopened as well. * Click the Reopen Job button  * On click a pop-up window will open with the following fields 1 * Job Code: Select a required job code from the dropdown list * Component(s): The list of components will as per the selected job code. Select the required components and click the Reopen button. * comment: Enter a reason for reopening the job. * On click, a success message will be displayed. The user can restart work on the reopened job/component. ### Use Cases * From the UI while adding the component fields like component name, operation, department, category and work centre, due date is required. * From the API at the component level only the component name, operation, due date is mandatory so in such case either of the below case would be executed. In the API for department, category and work centre the ids are to be supplied and if any of it is supplied but does not exist in the SSF portal then that component would be ignored. * From the bulk import through the file at the component level only the component name, operation, department, due date is mandatory so in such case either of the below case would be executed. In the bulk import for category and work centre the names are to be supplied and if any of it is supplied but does not exist in the SSF portal then that component would be ignored. (Case in sensitive would be considered as matched). * The component is added with just the operation and the department, no category, no work centre. If the operation (case in sensitive would be considered as matched) is not available in that department, then that operation would be added in that department provided the flag to add is set in the open API else it would be ignored. Since neither category nor work centre is added automatic scheduling won’t be applicable for this component. * The component is added with operation, department, category, and no work centre. There would be category wise automatic scheduling applicable to that component. Component work would be scheduled on any work centre within that category if all the rules for scheduling ar0e satisfied. * The component is added with operation, department, work centre and no category. The category of that work centre would be assigned to that component. Component work would be scheduled on that work centre if all the rules for scheduling are satisfied. * The component is added with operation, department, category, and work centre. There would be work centre-based automatic scheduling. Component work would be scheduled on that work centre if all the rules for scheduling are satisfied.