Operator Roster
The Operator Roster page provides the capability to plan available resources on the shop floor according to their skills and work timings.
- The page displays the projection of resource availability and allows to modify the same across time.
- The page also provides a view of historical data of actual resource availability on a particular date.
- It has the following filter parameters:
- Operator Only: This is checked by default. Unchecking the operator only flag fetches roster data for all the users of SSF.
- Search by User or Operator: Enter the first or last name of the user/operator.
- Date Range (Month, Fortnight & Week ): These tabs on the top-left allows filtering the records by the selected duration.
- The date range in the top centre portion displays the currently selected date range and the arrows around it allows traversing to the next and previous date ranges.
Roster
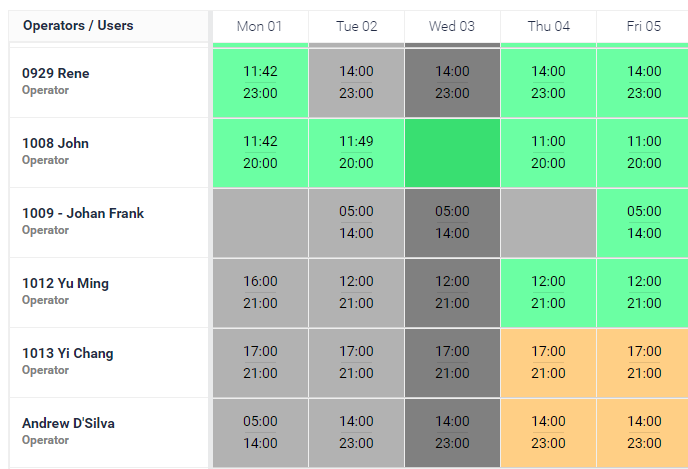
The roster is the main view of the page.
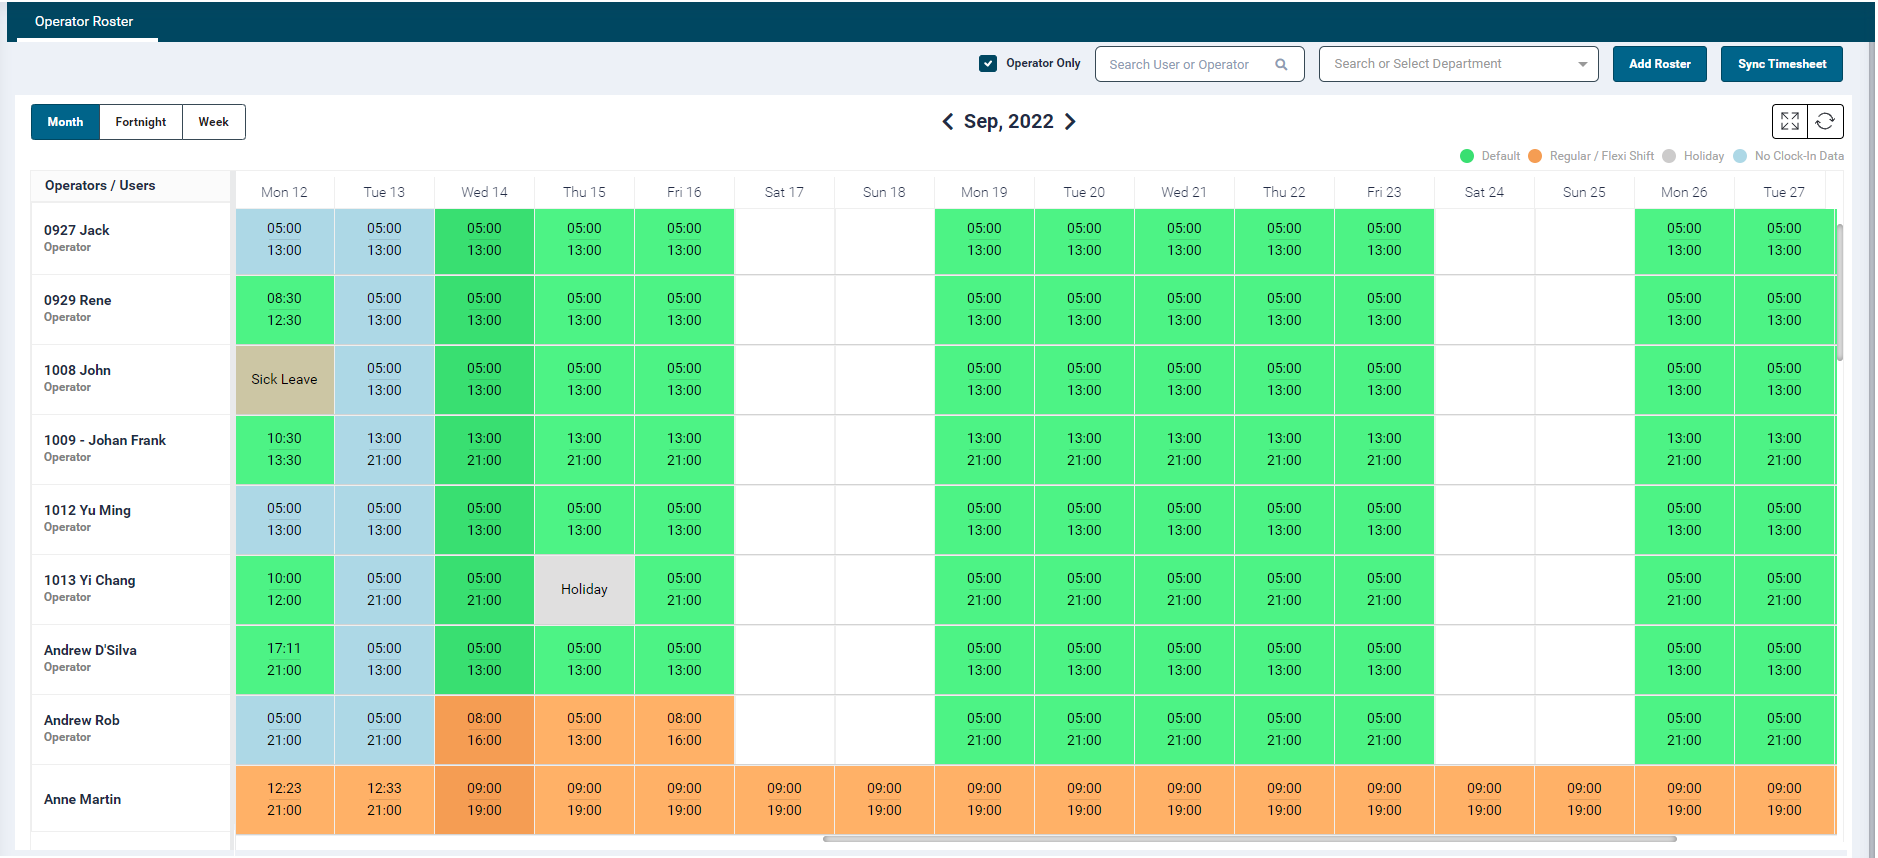
- It shows a tabular layout of the operator/user list in a row and their respective columns consist of dates.
- Each cell of this table displays either a projected shift time of an individual operator for future dates or past clock-in hours.
- The cell background colour represents the following:
- Green: Default shift
- Orange: Regular / Flexi Shift
- Light Grey: Holiday
Light Blue: No Clock-in Data
- The refresh button
 at the right corner allows the user to refresh the data.
 - The expand
 & collapse
 is a toggle button on the top right corner to toggle to full screen and back.
 - Hovering over the roster cells (including past date cells where the clock-in/out data is not available) will display the following details for the Operator/User:
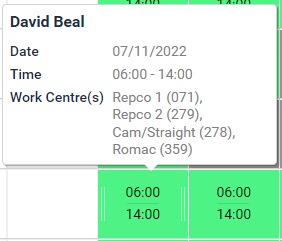
- User Name
- Date: Displays the
- Time: Displays the scheduling hours on a machine on a particular day
- Work Centre(s): Displays the assigned Work Centre names
- Hovering over the roster cells for past days where the clock in and clock out time are available will display the following details for the Operator/User:

- User Name
- Date
- Time
- Job Code(s): Displays the job codes on which the work has been done on a particular day
By default, the Operator Roster is used for operator resource planning on the shop floor only. However, the user can set up a roster for their other employees as well.
Past date records will show the Attendance of the operator. If the attendance is not available, then it will show a roster for the selected operator.
Current Day
- The cell colour of all future Default roster dates and past clock-in hours is Green.
- If a user clocks in and clocks out for the day, then the cell displayed is green with the clock in and clock out time.
- If a user has not clocked in, then the cell is Light Blue with the roster time displayed on it.
- For Regular/ Flexi shift the cell displayed is orange with the shift timings displayed on it.
- The cell colour of users on a Holiday or Sick Leave are Light Grey and Sage respectively.
Past Day
- If a user has not clocked in for the past day, then the cell would be Light Blue with the roster time displayed on it.
- If user has clocked in for the past day, then the clock in and clock out time would be displayed on the cell and the cell colour would be as per the shift configured for that day, i.e. Default or Regular/Flexi Shift.
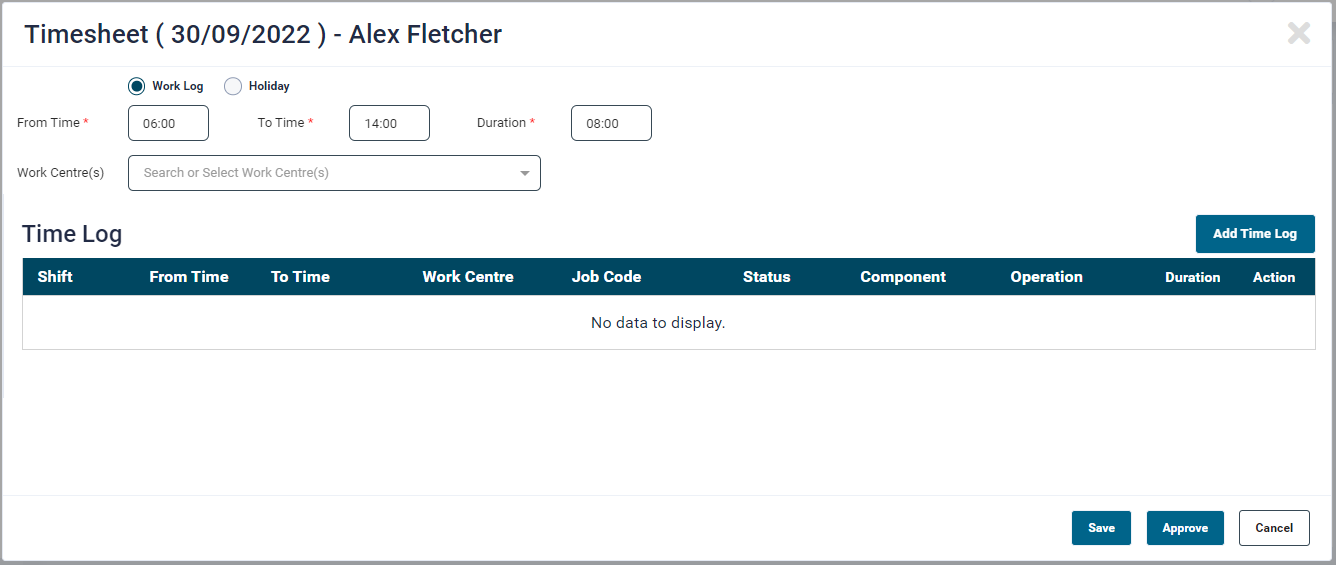
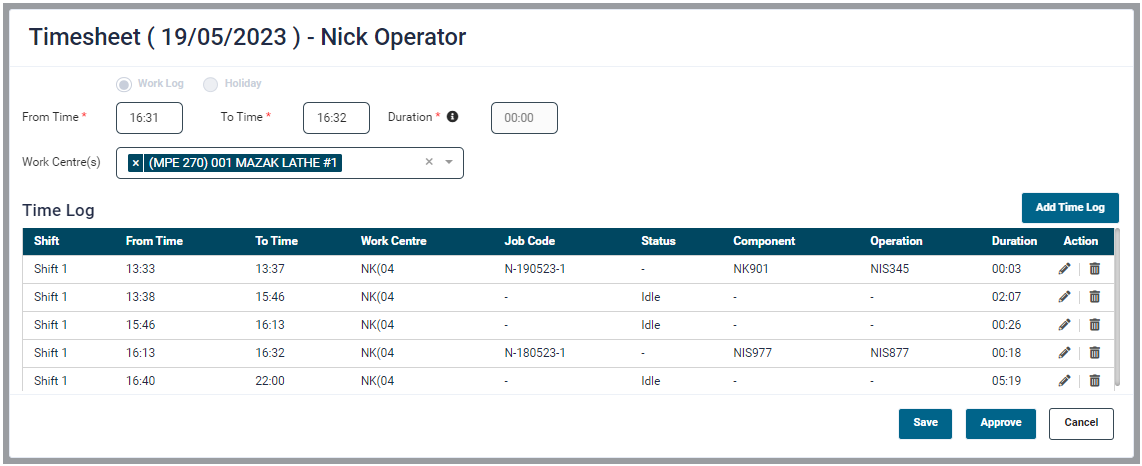
Timesheet
- In the event where the clock-in/out data is not available, the timesheet feature allows you to manually add or edit time log or holiday for past dates.
-
To update such records, click the past date cell of an employee. On click, a timesheet pop-up will open
-
The pop-up provides two attendance options:
- Work Log - This is the default selection
- Holiday - Select this option to apply a holiday
Work Log
Manual time log can be done for status or job.
- By default, the employee's shift From Time, To Time and Duration are displayed.
- This information can be edited as required.
- The user can select multiple work centres from the Work Centre(s) dropdown list.
- To add a job, click the "Add Time Log" button On click a Time Log pop-up will open.
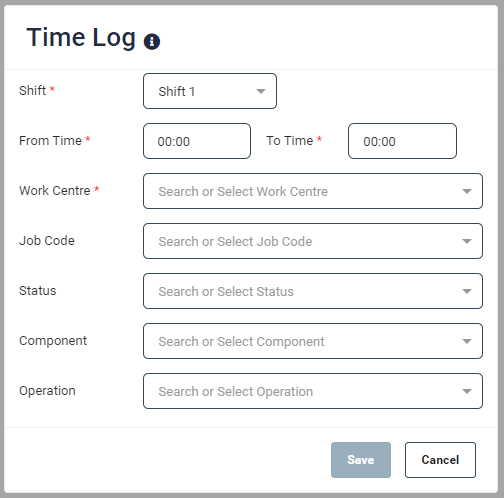
-
Enter values in the following fields displayed on the Time Log pop-up
- Shift
- From Time
- To Time
- Work Centre
- Job Code
- Status
- Component
-
Operation
-
Click Save. The new time log record will get listed on the Timesheet pop-up
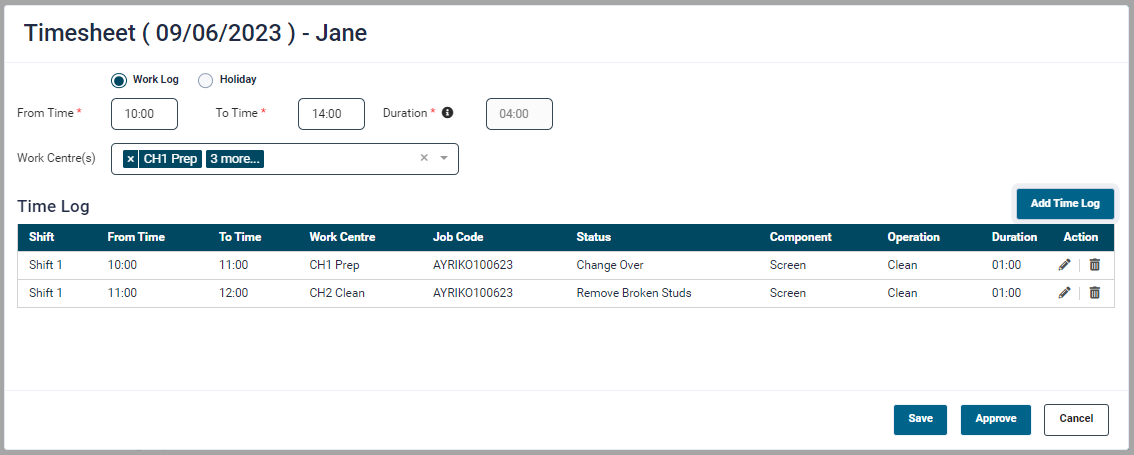
Adding manual time log entry can be for a status or for job. To add a job entry, the work centre, job code, component and operation are compulsory fields and for status entry work centre and status are compulsory.
-
To remove a time log, simply click the Remove button displayed against the required record.
- Once all the input is provided, click Save.
When adding or editing a timesheet, if any work log is already available then the attendance type selection (Work Log / Holiday) will be disabled, i.e. the user will not be able to add a holiday if a work log has been entered.
Holiday

- To add a holiday, select the Holiday button, select the type from Holiday Type dropdown and click Save.
- To go back to the Operator Roster screen, click the Close button at the top right corner of the pop-up screen.
Edit or Delete a Time log
To Edit or Delete a Time Log, simply click the respective Edit or Delete button provided under the Action column.
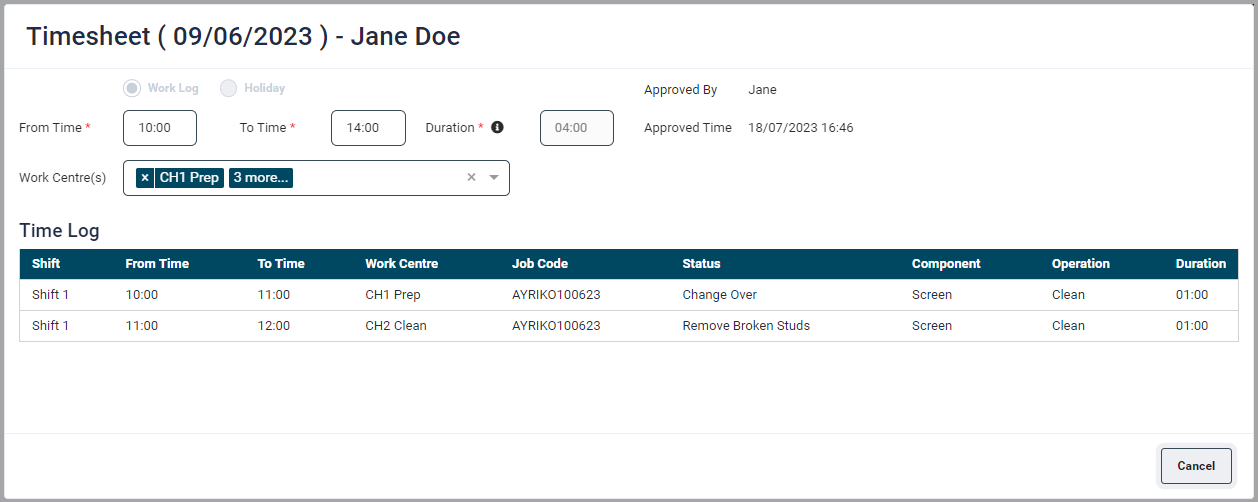
Approve Timesheet
-
After updating the timesheet, the user can approve the records by clicking the Approve button.
-
Once a timesheet is approved, the employee's/operators roster cell will display a tick mark.

-
The timesheet for the operator will display the approver's name and time of approval.
Once a timeshee is approved, the Save and Approve buttons will no longer be available.
Roster Setup
-
Rosters allow the user to set up resource projection across the shop floor.
-
Rosters can only be set up for future dates.
- Rosters can be one of the following: Default shift, Regular Shift, Flexi shift or holidays.
- Default shifts - These are set up from the Users page, these rosters work till the employee is set up as a user of the application.
- Regular Shifts - This is recommended for operators working in multiple shifts, where their roster keeps rotating at a certain time.
- Flexi Shifts - This is recommended for operators working at a different time other than the regular. This shift can be used for half days or fewer working hours as well, especially to handle the exception when someone works on different timings other than the regular ones.
- Holiday - This allows a user to configure full day of unavailability of the resource for a planned holiday or a sick leave.
- Department & Work Centre Selection: The user can select multiple departments and work centre belonging to selected departments.
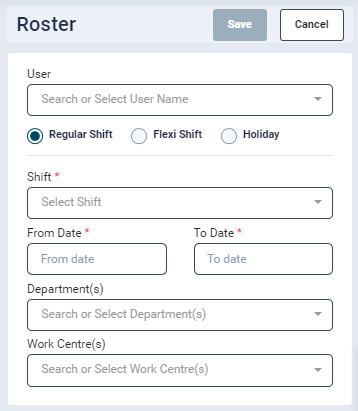
- To add a new rolster, click on the Add Roster button at the top right-hand side of the screen.
- On click, a Roster panel will open up. Set up the roster as explained below.
Regular Shifts
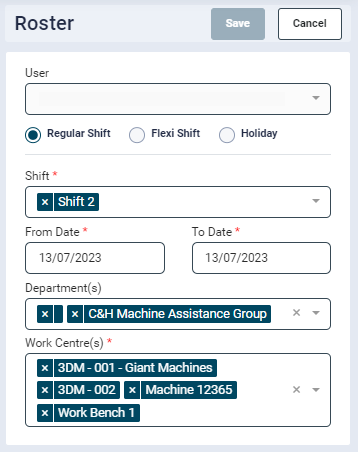
- To set up a Regular shift roster,
- Select the User Name
- Select Regular Shift
- Select the Shift (Shift 1, Shift 2 etc.)
- Select the From and To Date Range for the shift
- Optionally, the user can select the Departments and Work Centres on which the employee will be working. Click Save
-
In an existing Regular Shift roster,
- The remove button is not displayed in the side panel.
- It will show the date range of the single day.
Note : While configuring a Regular shift, if Saturday and Sunday need to be included in the date range, then the user is required to set business hours for the weekends from the Settings rarr; Business Hours section, else the shift for those 2 days will not be displayed.
-
If the cell is white in colour, it would allow user to configure a flexi shift for that day.
- If the cell is orange in color and the earlier roster is set on a date range then it would create a split for the records.
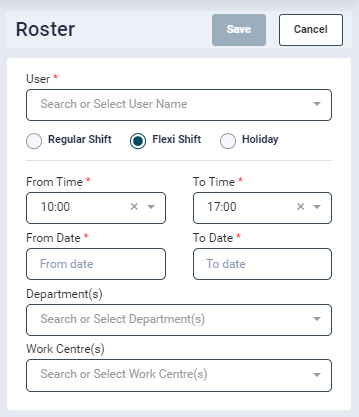
- To set up a flexi shift roster,
- Select the User Name
- Select Flexi Shift
- Select the Shift Time
- Select the Date Range for the shift
- Select the user name, Select Flexi Shift, select the date range and the time range and click the Save button
- Optionally, the user can select the Department and Work Centres on which the employee will be working and click Save.
- In an existing Flexi Shift roster,
- The remove button is displayed in the side panel.
- It will show the date range as selected while configuring the flexi shift record.
Note The default shift times for ‘From Time’ and ‘To Time’ would be displayed if the ‘Shift 1’ configured on the portal. If the shift is not configured for the day, then it will show the default ‘From Time’ and ‘To Time’ as 0600 – 1400.
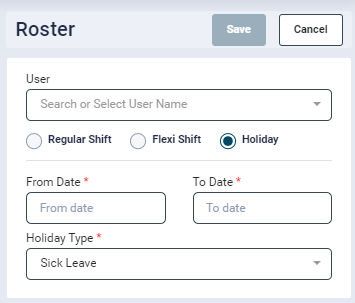
- To set up a holiday/sick leave, select a cell of the future date or click on the Add Roster button.
- Select the User Name
- Select Holiday radio button
- Select the Date Range
- Holiday Type: Select the holiday type (configured in the Configuration → Settings → Holiday Types) and click Save.
- When holiday is selected, the cells in the Operator Roster grid would have a Light Grey/Sage colour with the holiday type displayed on it.
Edit Roster
- To edit a roster, select a future date a cell of a user, modify the roster and click Save.
Attendance
- The attendance information is provided from the past dates.
- The clock-in information is recorded via the Clock-in app.
- For the current day, the roster displays the cells against each user with a darker highlight.
- Each cell will list the operator shifts.
- If an operator's shift time has started and he has not logged in yet, the cell will turn grey until he logs on for that day, else the attendance will log it automatically as a holiday.
- Once the user clocks in, the actual information is displayed on the cell.
- When the user clock's out the clock out information is displayed.
- In case the employee has missed clocking in, then the application will pick the time employee first logged in to the SFC app.
- If an employee has missed clocking out, then at midnight the employee will be automatically clocked out and the shift end time will be logged against the attendance.
Clock-In/Out
- On clicking any past date the actual attendance details are displayed, which include clock-in/out times, the Work Centre an operator logged into and the job codes the operator had worked on.
- The admin can modify the logs when required and approve the record.
Sync Timesheet
- This feature is available for clients having simPRO software.
- System Admin users will have access to the Sync Timesheet button.
- Clicking this button will upload the approved timesheet data to the simPRO software.
Data that was approved after the last sync will be considered for uploading.
Use Cases
- If the business days for the industry is set from Monday-Friday and operator wants to work on Saturday or Sunday i.e., the week days which are holiday for the company.
- For such scenario, the user needs to set it from “Operator Roster” i.e., selecting the date and adding the Roster with timings and work centre(s). As per configuration it will make the slots available for those work centre(s).
- It is advisable to set such roster prior to the offset days if configured or before the configured auto scheduling time, so that the jobs would get schedule in this new slot automatically. The user can always schedule the jobs on those slots manually after setting the roster.
Operator willing to work for extra hours
- If an operator is willing to work for extra hours other than what has been set in the user configuration.
- This can be done from “Operator Roster” by selecting the day and editing the roster with flexi shift and desired timings and work centre(s).
- Rest scheduling part would work as explained in first point.
Operator willing to work for different timing for someday(s) other than preconfigured shift hours
- This can also be done from the “Operator Roster” as defined in above points.
- Rest scheduling part would work as explained in first point.
Operator taking an emergency leave
- If there are already scheduled jobs for an operator and he takes the leave.
- The user will need to apply holiday from the “Operator Roster” by selecting that day and editing the roster.
- In case the jobs are already scheduled to that operator and since he is unavailable, they would mitigate with miss schedule jobs. So, to avoid this the user might need to manually re schedule (update as per availability or remove) them or assign it to another operator.
- In case the jobs are not scheduled, i.e., operator is willing to take leave on some future dates the job won’t get schedule on those date(s) and the Gantt chart would be greyed out so that manual schedule shouldn’t work. But if any other operator’s roster is available for the same date and time on the same work centre then both automatic and manual schedule would work.
Shift rotation in the industry
- If the industry is meant for shift rotation suppose for every 15 days i.e., an operator is supposed to work in shift 1 for 15 days and for next 15 days in shift 2 and so on.
- In such scenarios as well, it is advisable to set it from Operator Roster à Regular Shift section and not from the default shift hour from user configuration. Such edit should be done prior as explained in the first point.
- Rest scheduling part would work as explained in first point.
It is advisable to configure any change in the operator roster from the “Operator Roster” rather that the default shift hours in the operator configuration. The current system is not designed for calculating overtime or to run the payroll, hence any extra hours or working on the holidays will be considered as normal working.