Master Schedule
Master Schedule
- This section provides an overview of all scheduled & unscheduled components within various jobs across all Departments, as well as indicate the job's current status.
- The user can filter this data by selecting a required Department from the dropdown option on the right. Multiple Department names can be selected.
- User can type a required job code in the Search Job Code option. It will search job code on Gantt chart as well as unscheduled component list (Left panel).
- The left side panel display the list of all unscheduled components sorted by priority and due date. The main panel displays the Scheduled components on a timeline accross all Work Centres of the Department.
- The Zoom in
 , Zoom out
  and Fit To Screen
  icons allows the user to increase or decrease the granular details accross the timeline within the chart.
 - The Expand icon
 will minimise the menu panel and display the data in full screen.
 - The Collapse icon
 will reset the screen to normal view.
 - The Refresh icon
 will refresh the page and display the recent updated data.
 - The Auto Schedule icon
allows automatic scheduling of jobs.
To know how to Add Job & Bulk Import, please visit the Jobs section.
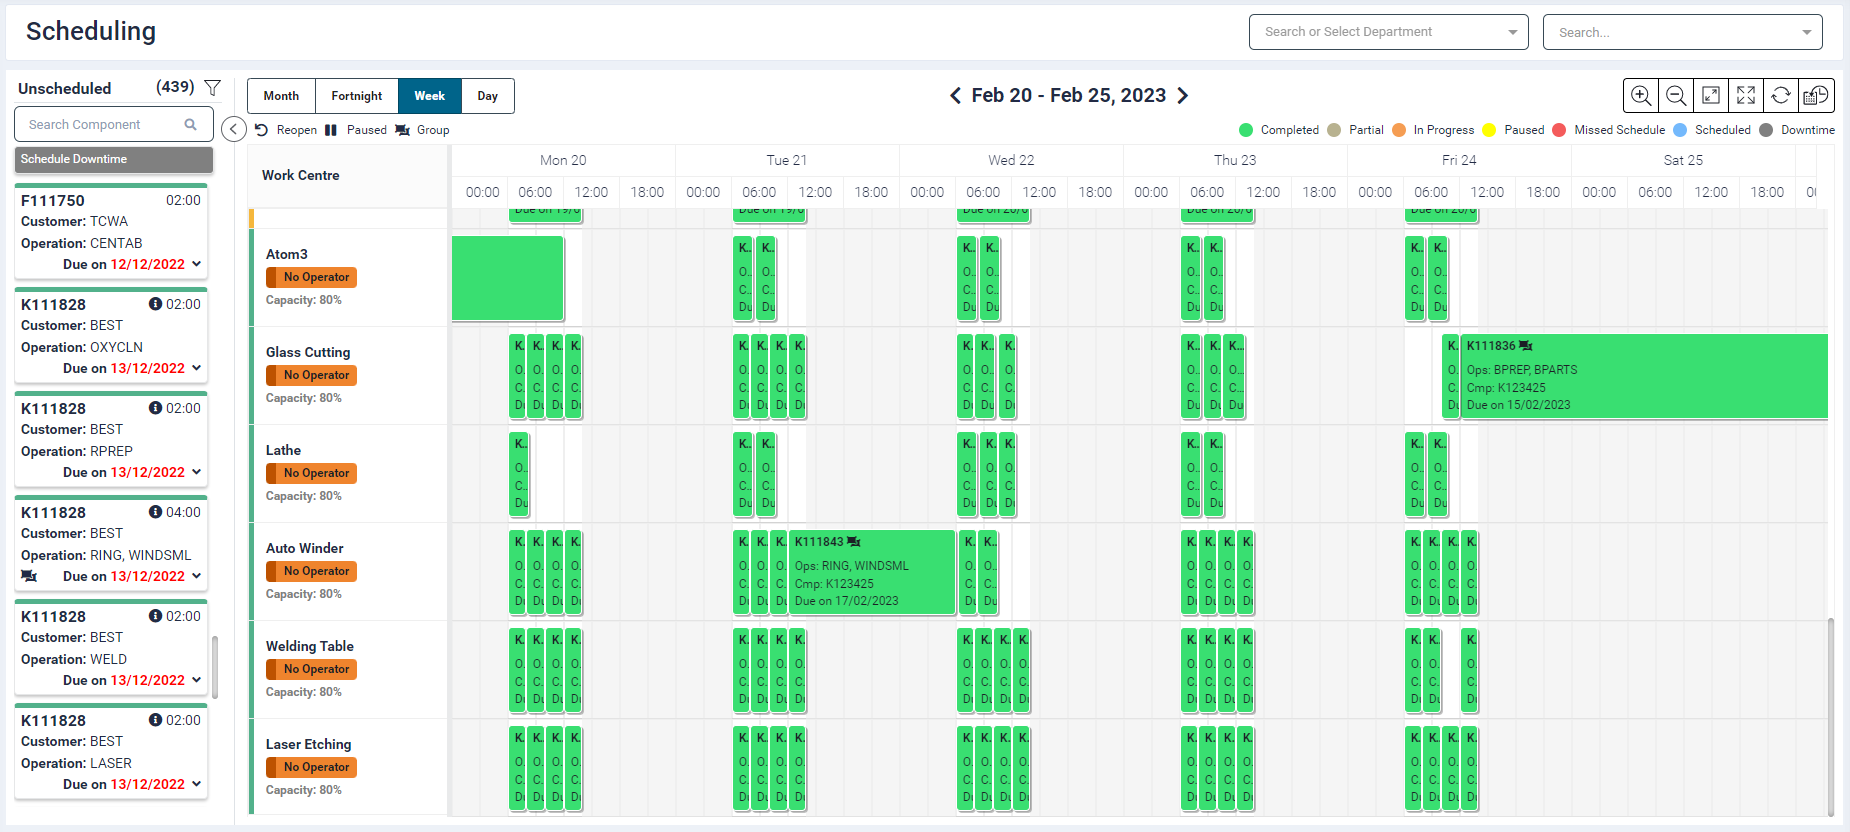
Schedule Chart
- On the Gantt chart, a list of Departments and Work Centres with work centre status and capacity is displayed on the left.
- The chart displays all the scheduled jobs.
- The white portion is the schedulable area. The greyed out areas depict out of office hours.
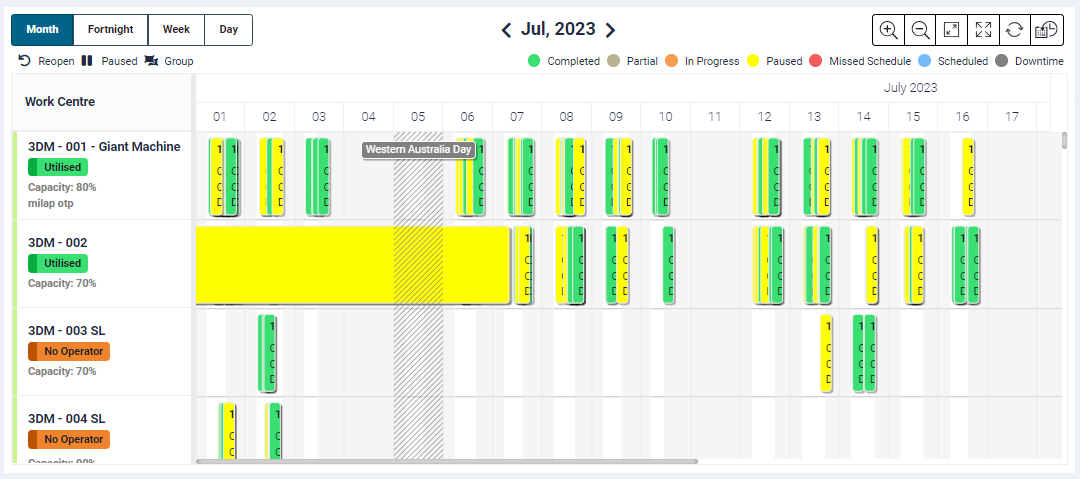
- Four views are available; Month, Fortnight, Week and Day. By default, the week-wise schedule is displayed.
- The Previous and Next arrow provided on either side of the dates navigate the user to other months/weeks/days.
- In the month-wise and week-wise view, the current date is highlighted.
- The Active jobs displayed on the chart are colour coded as per the job status (Completed, In Progress, Pause, Missed Schedule, Schedule, Downtime), the legends for which are displayed above the chart.
- If any downtime is scheduled, then the time slot will be greyed out and no job scheduling will be permitted for that duration.
Scheduling Jobs
-
The left panel on the screen displays a list of unscheduled job components, with a colour coded line on top to depict the Department.
-
Each box displays the following information:
| Field | Description |
|---|---|
| Job Code | Codes of jobs configured in the portal |
| Duration | Displays the estimated time specified for the job |
| Customer | Displays the client's name |
| Operation | Any task related information for the job |
| Component | Name of the component |
| Work Centre | Displays the assigned work centre's name |
| Status | Specifies the current status of the job |
| Due on | Expected completion date of the job. |
 |
This symbol is displayed if the components in a job are reopened |
| This symbol is displayed if the components in a job is paused | |
| This symbol is displayed if the components in a job are grouped |
- This list is displayed in ascending ordered of job Due Date.
- Component jobs can be scheduled in the following ways:
- Drag and Drop: Click on the required component block from the left panel, drag it towards the gantt chart area and drop (release click) it at the required date and time slot.
- Set a schedule: Single click on the required component. A Component Schedule panel will open. The Schedule From and To would display the current time.

- Click on a required component, a panel would open.
-
It will display the basic non-editable information such as:
- Component
- Job Code
- Due Date
- Estimated Time
- Customer
- Operation
- Scheduled By
- Job Status
- No. of Operators
- Requested Quantity
- Work Instructions
-
The user needs to provide the following mandatory inputs:
- Schedule From and To date : The Schedule From and To times will be rounded off to the nearest 5-minute interval.
- Department
- Sequence:Enter a number to set the sequence for the component schedule
- Work Centre
-
Other fields are non-mandatory
- Operator: Assign the component schedule to an operator by selecting an operator name from the dropdown list. In the operator dropdown, even if the operator has access to multiple work centres, it would show the work centre short name for the selected component operation only.
- Previous Schedule Component: This field is non-editable and displays the name of a previous scheduled component
-
Click Save.
- When the schedule is saved, it will be removed from the left panel and be displayed on the chart at the From date block.
Jobs cannot be scheduled out of business hours.
Jobs which are On hold cannot be automatically scheduled.
For the unscheduled component cards, if Work Centre name and/or status names are available, they will be displayed on the card, else they will be hidden.
If an operation from a group component is started on another Work Centre via the category tab, the entire group will be shifted to that Work Centre.
When an operation is scheduled on category and no Work Centre is selected for it, then the scheduling will be done based on the priority assigned to the Work Centres. Default value for priority will be 1 for a Work Centre.
Split Group in a Schedule
If a group is partially completed on one Work Centre and later on started on another Work Centre, the group will be split, and the group name for the completed component operation will be displayed with text “(Split)” and a split number appended to it.
**Partial Group Status
- When there is no operation from a group, i.e. it is in progress or paused and atleast one operation is completed and atleast one operation is active, then the status for the group on the Gantt chart will be displayed as Partial.
- The group component will have a separate colour.
Schedule on Same Category Work Centre
During auto scheduling if the assigned Work Centre has no more slots available, then it would schedule the component on another Work Centre from same category and Department Work Centre.
Schedule Downtime
-
Before scheduling a downtime, ensure to configure scheduled downtime status and categorise them into global and individual downtime from the Settings → Preferences → Production section.
-
To schedule a downtime, click on the Schedule Downtime button. A pop-up window will display the following fields.

- Downtime Status: Select from a list of configured statuses
- Schedule From & To: Select date and time. (Value in To field should be greater than that in From field)
- If the downtime is global then it will block the scheduling for the selected date range and time for all the Work Centres.
- If the downtime is individual then it will block the scheduling for selected date range and time for particular selected Work Centre.
- Individual scheduled downtime will put grey colour markup on the chart.
- Department: Select from a list of configured Departments
- Work Centre: Select from a list of available Work Centres in the Department selected previously
- Reason: Specify a reason for downtime if required.
- Provide the required inputs and Save.
A downtime schedule cannot overlap another scheduled downtime or a scheduled job.
For more information, please refer our Configuration training guide.
Scheduled Jobs
- The job are spread across the month, fortnight, week or day as per their schedules and are colour coded as per their status.
- The user can extend or reduce the duration of a job by horizontally dragging the job block to the desired dates.
- Paused jobs (yellow) which are displayed on the gantt chart are also listed in this panel so that they can be restarted/rescheduled later as required.
- If a paused job is started without any scheduling (e.g. by the operator), then its status will be set to In Progress i.e. orange and will be shown on the timeline at that point in time when it was restarted.
- If an unscheduled job is started by an operator via the tablet app, it will be shown on the timeline at that point in time when it was started and its status will be set to In Progress.
- Jobs can be put on hold from Production Monitoring -> Summary section or via a utility. Jobs with On hold status get automatically removed from the schedule.
- Hovering over the scheduled job in the chart will display its brief infomation such as:
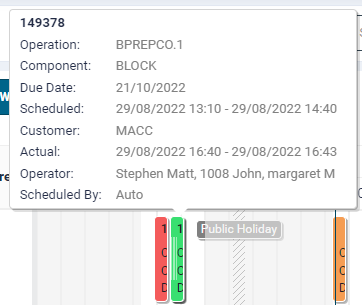
- Job code
- Operation
- Component name
- Due date
- Scheduled (configured schedule)
- Customer
- Actual (actual schedule)
- Operator
- In an event where the To date time i.e. the job end time is set to 0:00 hours, e.g. 10/07-2021 00:00 hours, then in the Month view, this schedule end will be displayed on 10/07/2021 as well. However, in week-wise and day-wise view the it will be displayed on 09/07/2021 full day slot.
- Any component having job status as Missed Schedule and Scheduled, will be displayed on the chart on the configured scheduled date and time.
- Any component having job status as Completed, In Progress, Pause, will be displayed on the chart on the actual scheduled date and time.
Moving Scheduled Jobs
- The user can move scheduled jobs by simply clicking and dragging the job block to the required date and time slot.
-
If the components/operations are grouped, then if any one of the operations is moved to another time slot on the gantt chart, then the other operations within it's group will also move along with it.
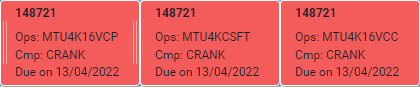
- For example, three operations of a component are grouped as shown in the image below.
- If the time slot where the operation is being move to has an existing schedule, then the details of jobs getting affected will be displayed in Scheduled - Affected Jobs screen.

-
The user can do the following:
- Cancel: This will terminate the action of moving the schedule.
- Reschedule the affected jobs by clicking the
 icon provided under the Reschedule column. On click a Component Schedule panel will open.

-
The user can do one of the following:
- Modify: Change the Schedule From & To fields and click Save. The modified record will be removed from the Scheduled - Affected Jobs screen. The Save button will get enabled. Click it to confirm the modification.
- Remove: On clicking the Remove button, the component will be removed from the gantt chart and be displayed in the unscheduled jobs panel list on the Scheduling screen.
- Cancel: This will cancel any modification done on the component schedule and close the panel.
Paused jobs cannot be moved to another schedule on the Gantt Chart.
A job cannot be moved to a slot alloted for a scheduled downtime.
Please note
- The User will not be allowed to:
- Schedule a component which overlaps an already scheduled downtime
- Schedule more than one component at the same time on the same Work Centre
- Scheduling of a component depends on three categories of machine hours ( Default Machine Hours, Specific Machine Hours and No Slots available.)
- First priority is given to No Slots Available.
- Second priority is given to Specific Machine Hours
- Third priority for scheduling given to Default Machine Hours where jobs/component will be scheduled between default time range set for each day.
- If Machine hours are not specified then it will schedule jobs/component between shift hours added for the day.
- It is mandatory to have shift added for the day to schedule a job machine hours wise or shift wise.
- If a component work is completed earlier that the scheduled time, then this component block will move ahead for that much time on the chart.
- If a component work extends more than schedule time, then the extended time will be highlighted with a green bar
- When component work is Paused through app, it will be highlighted in yellow colour on Gantt chart, and this component will list again on unscheduled component list (left panel) with pause icon on it.
- When a component job is reopened: When a component is reopened it will list again on unscheduled component list (left panel) with reopen icon on it.
- In certain scenarios the operations may overlap. E.g. if a job #158696 was to be started on 19/04/2022 at 10:30, but the operator started another job #147585 instead. In this case, job #158696 will be overlapped by #147585 and its status will be shown as Missed Schedule.
Automatic Scheduler
- When the Auto Scheduler button is clicked, the application will try to auto schedule jobs available in the left panel (list of unscheduled jobs).
- It will pick up priority 1 jobs followed by priority 2, 3 etc.
- Arranges all the Priority 1 jobs based on their most recent due date.
- Schedule the Priority 1 job component who's sequence number is the lowest (sequence no 1, sequence no 2 etc.)
- The automatic scheduler will schedule jobs as per the below logic on Machine Hours settings.
- First it will check for No Slots Available. For example, if jobs are being scheduled for 20/04/2020, is there any no slot set for the machine?
- If not, is there any Machine Hours set for the machine?
- If not, job on the machine will run as per the Default Machine Hours.